Selzy introduces omnichannel automation, allowing you to create scenarios that may include both email campaigns and communication through Telegram bots. Beyond delivering marketing communications across multiple channels, these scenarios also collect subscriber data for later use in segmentation.
In this article, we cover only basic functionality of omnichannel automation.
Please note that the feature is in active development, so you can expect us to expand its capabilities in the coming months. If you encounter any unexpected behavior or would like to share your feedback, please reach out to our Support Team.
This functionality won’t affect your existing chatbots or automated email sequences — they will keep working as independent systems.
Basic capabilities
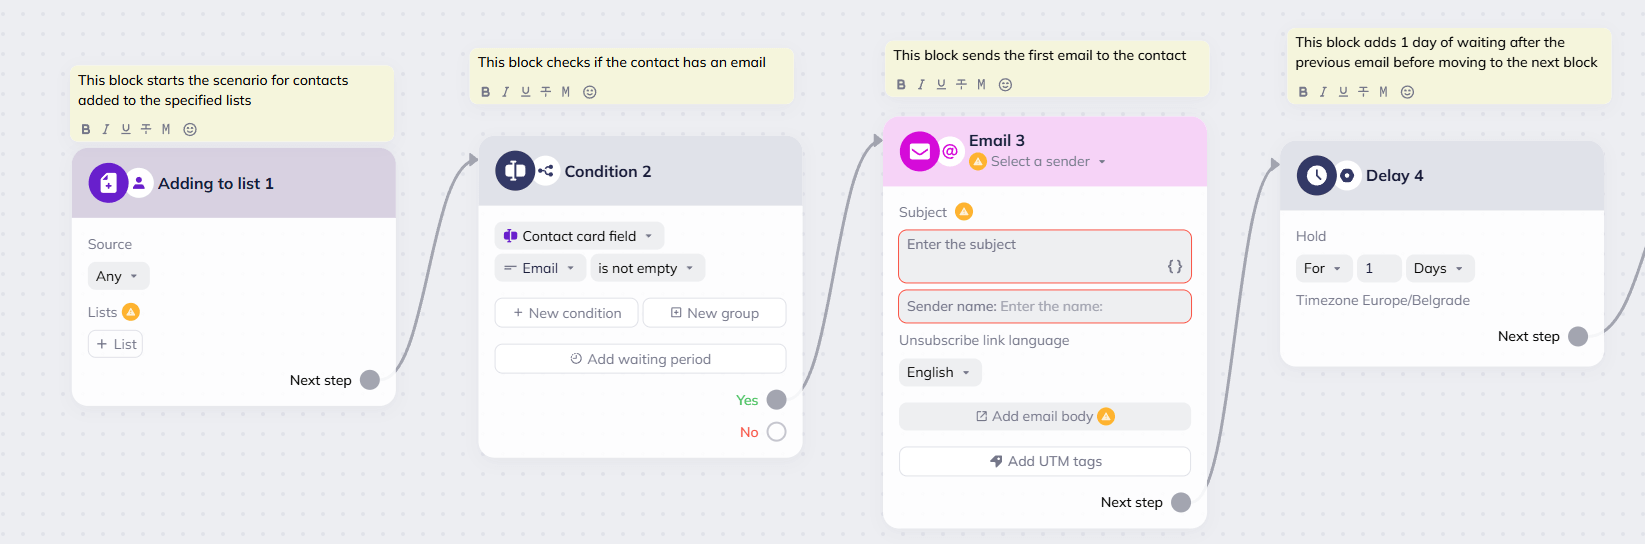
Any omnichannel automation scenario must start with a trigger event, such as adding a new contact to the specified list. It is possible for one scenario to include multiple triggers, covering different potential trigger events.
When the scenario is triggered, the subscriber is added to it and begins progressing through its steps. At set points in the scenario, the system executes predefined actions based on the subscriber's behavior. These actions may include collecting subscriber data (such as name, email address, or phone number), segmenting contacts, and assigning tags.
You can monitor subscriber progress in real time by reviewing detailed scenario statistics.
The collected subscriber data is stored in Selzy contact cards, where you can manage custom fields, assigned tags, and associated scenarios.
The collected data can be used to create more personalized scenarios, such as targeting new subscribers or offering discounts on birthdays.
Bulk vs Triggered scenarios
In Selzy’s omnichannel automation, you can create two types of scenarios:
- Bulk — designed for time-bound campaigns and bulk actions on contacts. For example, you can use a bulk scenario for a once-a-year sale, where all subscribers enter the flow at the same time. You can also use it when you need to change many contact tags at once.
- Triggered — designed for transactional, retention, and other automated communications. In this case, each subscriber enters the scenario whenever the trigger event happens. For instance, a Triggered scenario can start after a first purchase — every new client receives a receipt and a series of onboarding messages.
Both bulk and Triggered scenarios can be created in an intuitive scenario editor and operate in a similar fashion: based on the parameters you set, the system will guide subscribers through the scenario automatically. The difference lies in the functions of the blocks.
You can learn more about each scenario block in dedicated articles.
Create omnichannel scenario
To access omnichannel automation, go to Scenarios — Triggered or Bulk, and choose one of the following options:
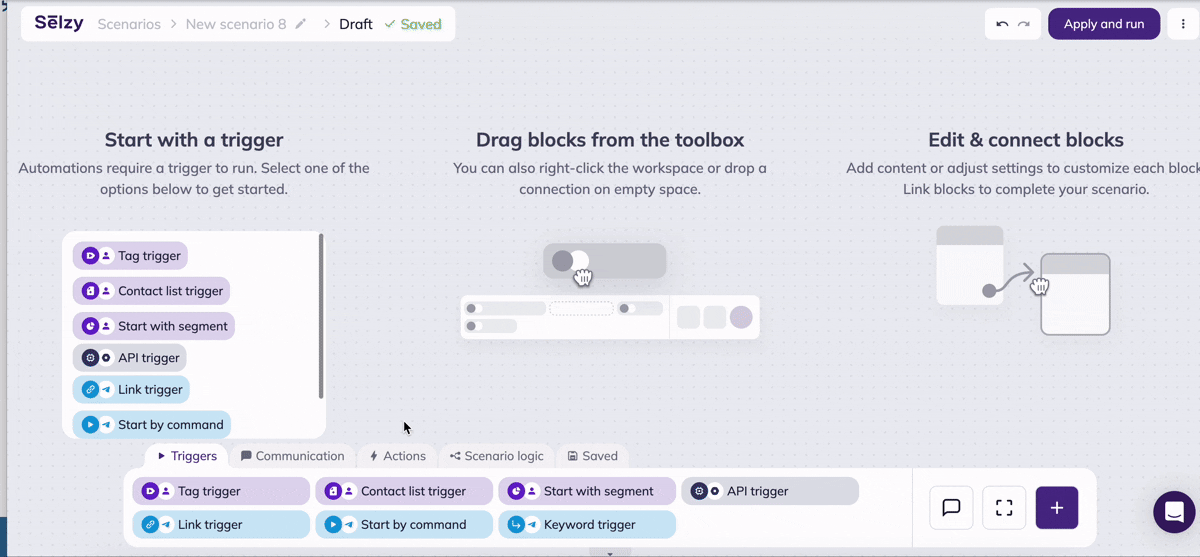
Whether you are designing a new scenario from scratch or customizing a template, you’ll work in a visual scenario editor. Simply drag and drop blocks and edit their content as needed. All changes are saved automatically as you work. For scenarios that do not involve transferring data directly from an external system, for example, from your website, no coding experience is needed.
We recommend starting with templates, even if you plan to create a completely new scenario. Templates not only provide pre-made scenarios but also include onboarding notes. Using templates is a great way to familiarize yourself with the omnichannel automation blocks and their features.
To implement the same scenario in multiple languages, you’ll need to create a separate scenario for each language.
Create a new scenario from scratch
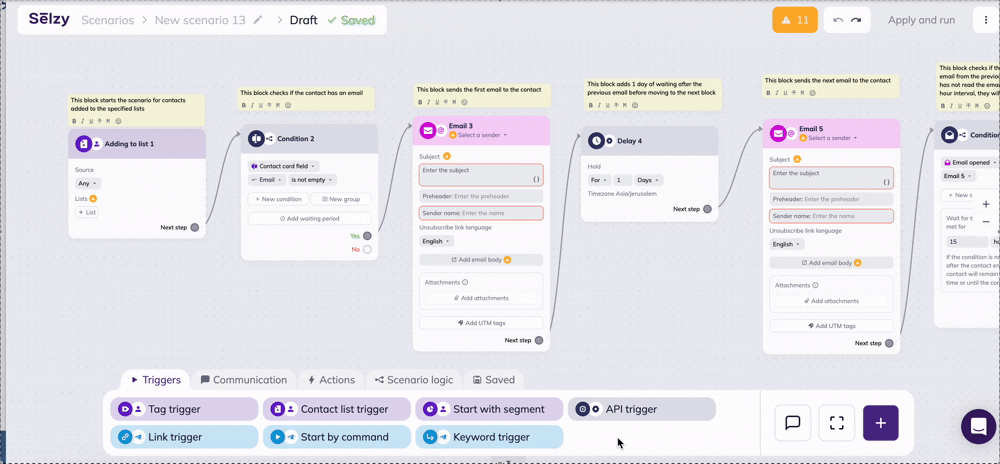
Add blocks to the workspace and connect them. Populate the blocks with content, such as text for Telegram messages, interactive elements for the Telegram bot, email designs, and more. Check for errors and test run the scenario.
We cover creating scenarios from scratch in greater detail in the article ‘How to create an omnichannel automation scenario.’
Use one of the available templates
Templates come with the pre-set blocks tailored to a specific purpose, for example, launching drip campaigns or collecting additional contact information. All you need to do is to adjust block settings and contents and run the scenario.
Every element of the template is fully customizable, including notes, block names, and even Telegram bot commands.
We cover creating scenarios from templates in greater detail in the article ‘How to create an omnichannel automation scenario.’
Test scenario
Before you launch the scenario for your subscribers, double-check that everything's working right:
- The trigger starts the scenario as expected.
- Messages are sent in the right order with the correct content.
- Subscriber can progress through the scenario without encountering any issues.
To test the scenario, act as a real subscriber. For example, subscribe to your newsletter or campaign with the test email address or add it to your contact list manually, depending on the trigger you chose.
Check for errors that could stop subscribers from moving through the scenario properly or cause the wrong emails or messages to be sent.
If the scenario is designed to collect data or assign tags to contacts, confirm that the data is being added correctly to the Selzy contact card.
Run / stop scenario
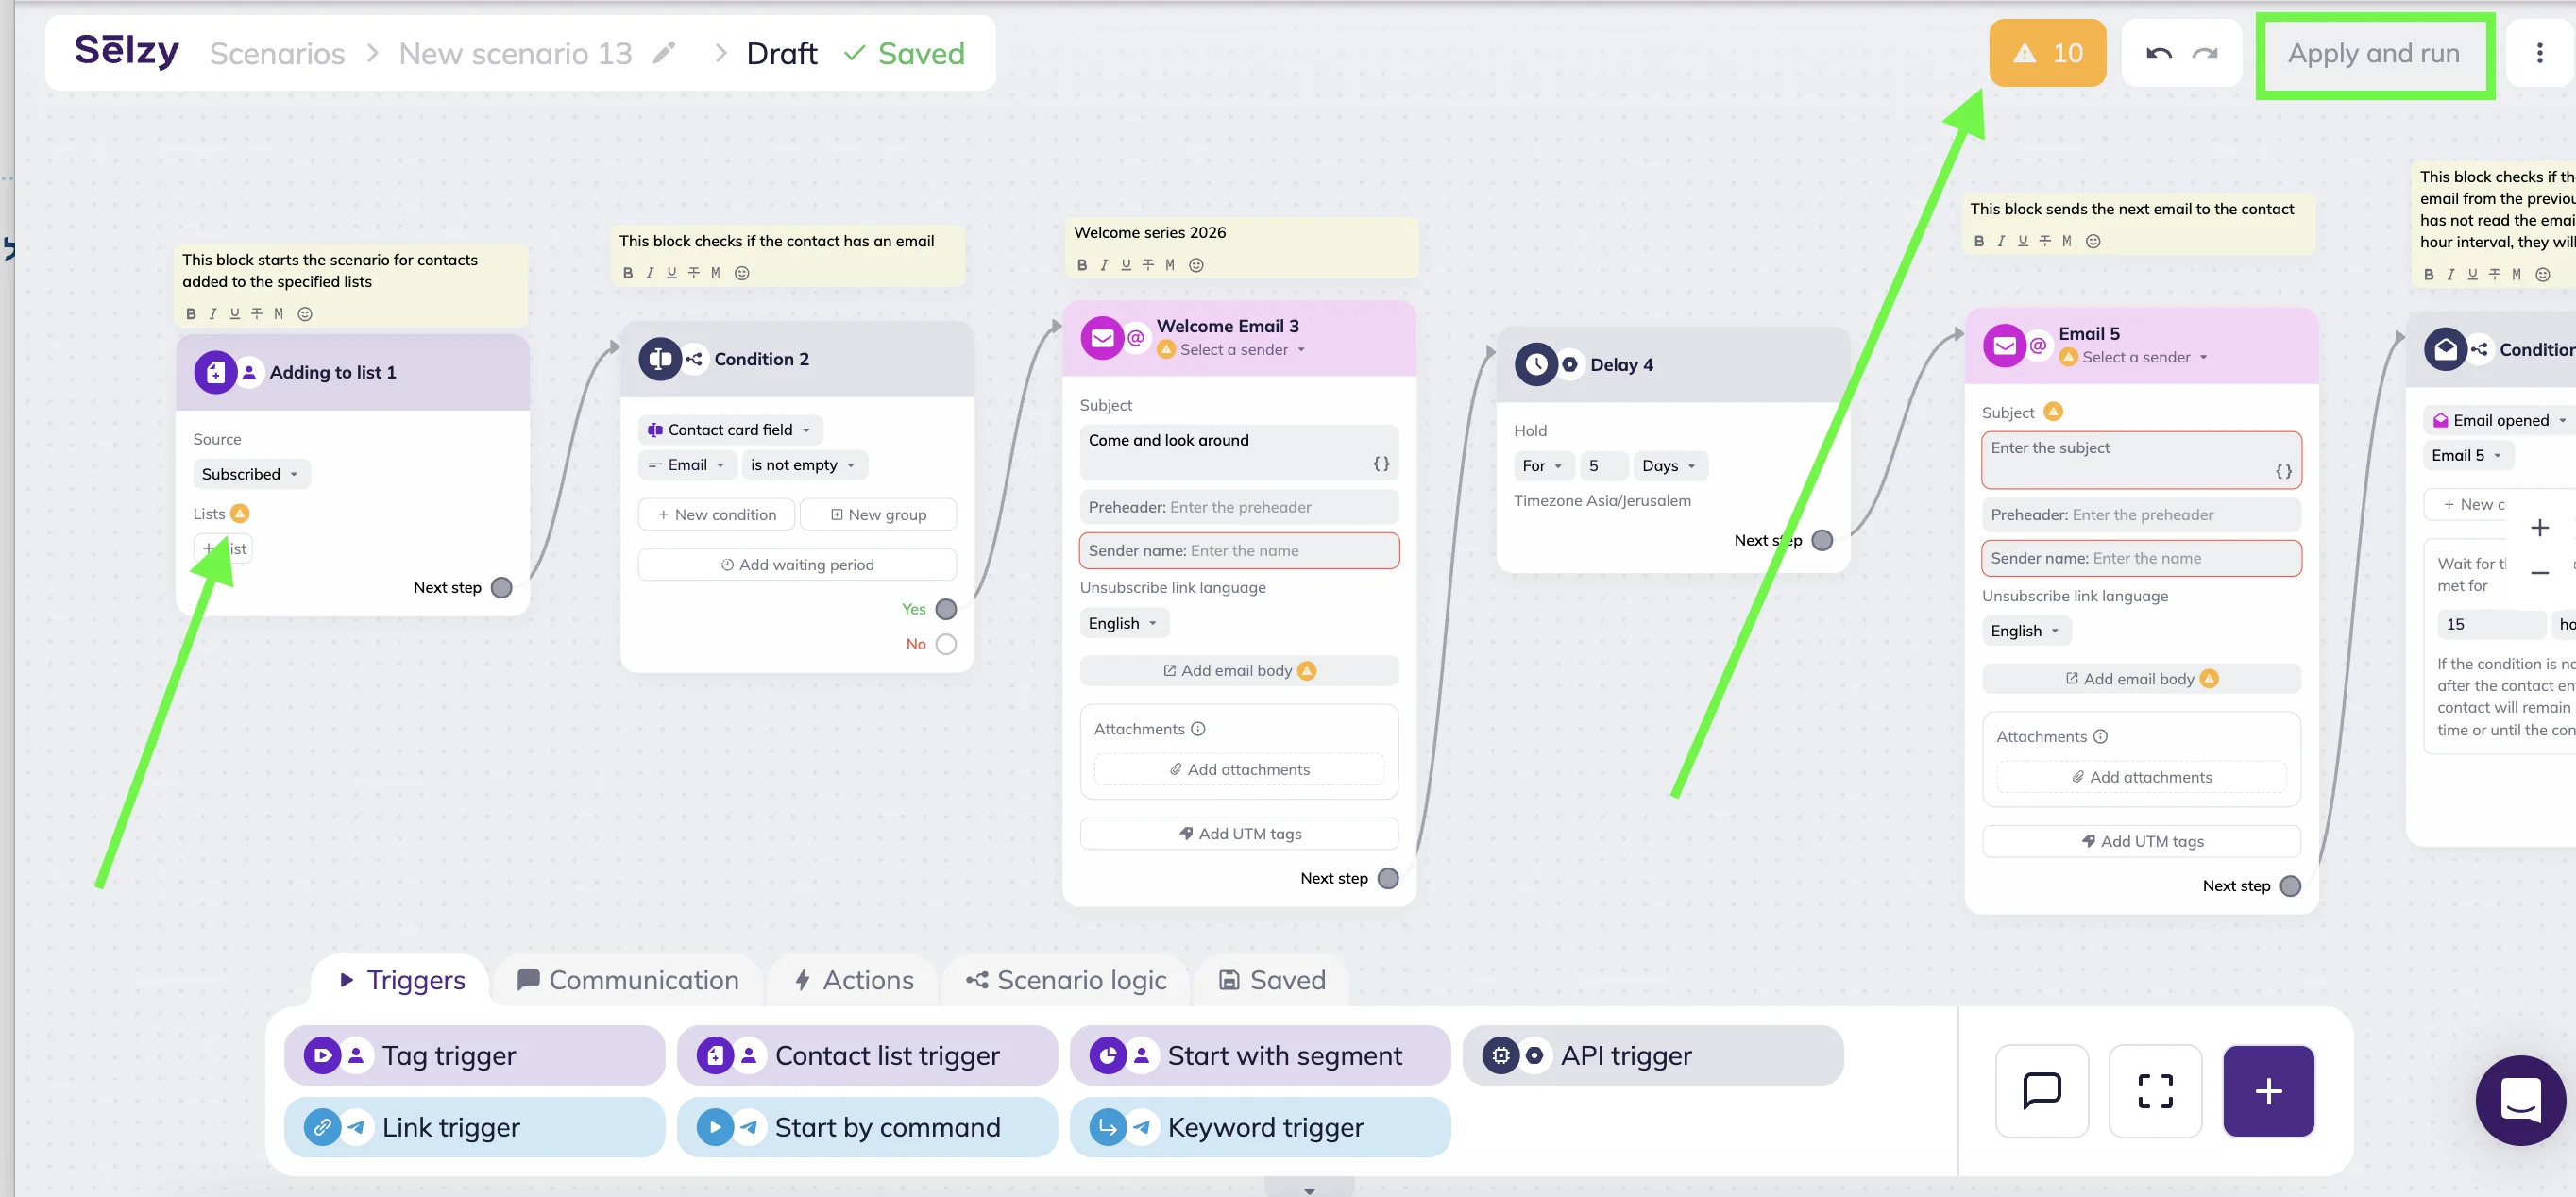
When the scenario is ready, click Apply and run at the top of the screen. Once activated, the scenario becomes available for your subscribers, and they will begin receiving the designed communications.
You can only run scenarios that are error-free. If the ‘Apply and run’ button is greyed out, address the issues and the button will become active.
Common errors include:
- Mandatory fields were not completed.
- A Telegram bot was not connected to start sending messages.
- The sender email address was not selected.
- Scenario blocks were not connected.
- The Telegram bot token is invalid or has expired.
If you need to stop the workflow go to scenario go to Scenarios — Triggered or Bulk. Find the scenario you want to pause in the list, go to the Status column, and toggle off the switch.
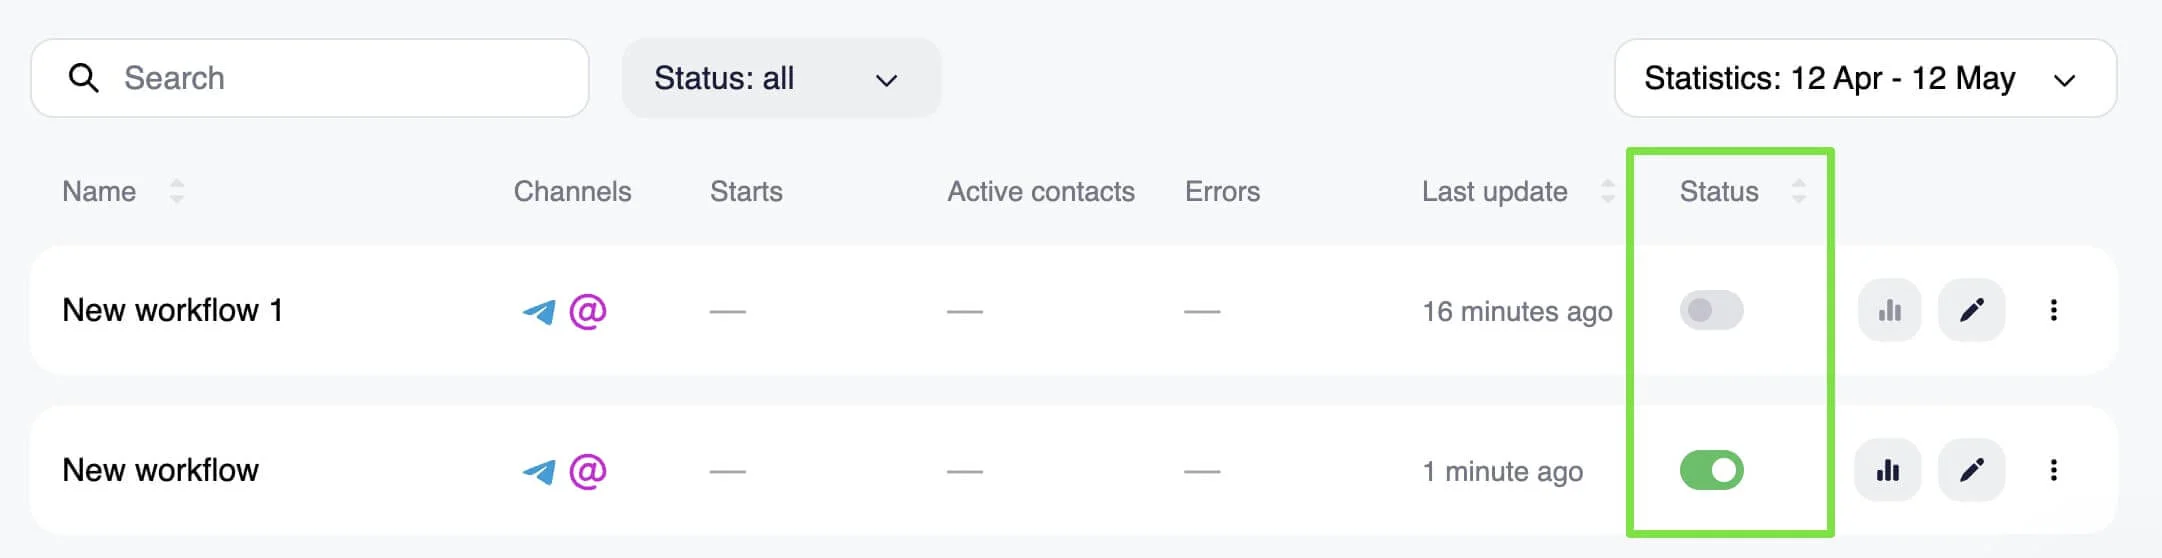
When you stop the scenario, new subscribers will no longer be added. Active subscribers will remain in the block where their progression ended at the time the scenario was stopped.
When you restart the scenario, these subscribers will resume progressing from where they left off.
Edit scenario
You can edit the scenario at any time — add new blocks, change the content, or update block settings.
Even active scenarios can be edited without stopping them. Any changes you make won’t affect subscribers who are already progressing through the scenario.
To edit a scenario, click the pen icon next to the one you want to update.

The scenario will open as a draft in the scenario editor, allowing you to make the necessary changes. Once your edits are complete, click Apply changes to publish the draft.
The updates will be applied to the active scenario. Subscribers added to the scenario after the updated version is published will interact with the new content.
View statistics
To view basic statistics for each scenario, go to Scenarios — Triggered or Bulk and review the following columns:

- Starts: The number of contacts who triggered the scenario at least once. For example, by sending the command /start in your Telegram bot. While subscribers can trigger the same workflow multiple times, only their first interaction counts towards ‘Starts’ in the statistics.
- Active contacts: The number of subscribers who, within a specified period, interacted with any scenario blocks — for example, by reading messages, clicking buttons, or submitting their data.
- Errors: Any issues encountered during the scenario operation. These may include exceeding sending limits, using an expired token, or attempting to send messages to inactive contacts.
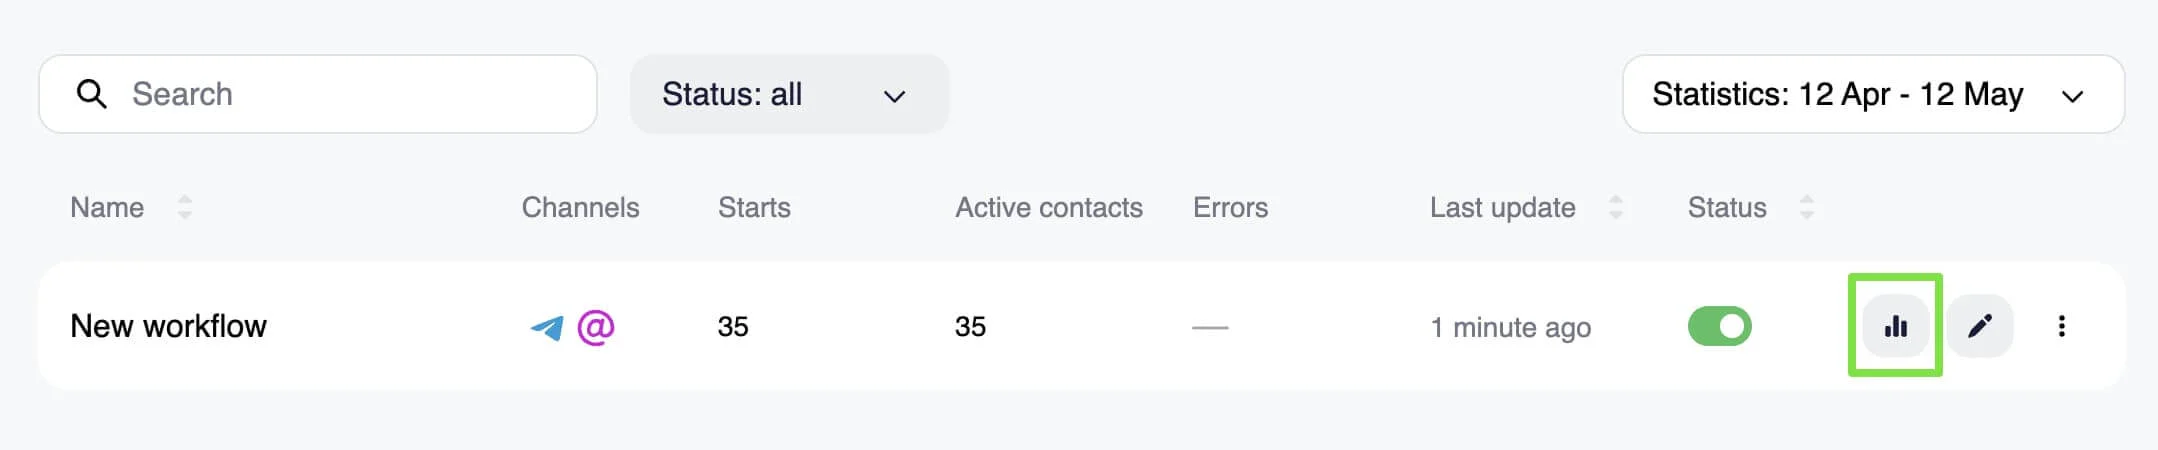
You can also view the detailed statistics for each block and track the subscriber progression, such as number of contacts who reached each block, the number of messages delivered, and the number of clicks. Simply click on the diagram icon next to the scenario in the list.
By default, both basic and detailed statistics show data from the past 30 days. You can adjust the period or filter to view data for the past 7 days, 30 days, 3 months, 6 months, or 1 year. You can also set a custom period ranging from as short as 1 day to up to 1 year using the date picker.