The Condition block belongs to Scenario logic blocks and controls how subscribers move through a scenario. The block’s functionality is the same for Triggered and Bulk scenarios.
The Condition block checks whether a subscriber meets specific criteria (e.g., location, device, or action taken) and determines which scenario’s branch the subscriber will follow next. Two rules apply:
- Yes — if the condition is met.
- No — if the condition is not met.
Use this block to:
- Segment subscribers by lifestyle or demographics (e.g., age, location, interests)
- Target subscribers based on their actions (e.g., email opens, link clicks)
- Separate engaged and inactive subscribers
- Create different paths for loyalty programs
- Build complex personalized scenarios with multiple conditions
Condition block settings

To add the Condition block to the scenario, choose the “Scenario logic” tab in the scenario builder’s toolbar and drag the “Condition” block to the workspace. Alternatively, you can right-click the workspace and choose the block from the pop-up menu.
Click the “New condition” button to create a simple or compound condition.
Simple condition — a single parameter check. For example: City equals “Miami”.
Compound condition — includes several checks. Those checks are combined with operators:
- AND — the condition is met only if all checks are passed. Example: City equals “Miami” AND the subscriber opened the email
- OR — the condition is met if at least one check is passed. Example: City equals “Miami” OR City equals “Orlando”
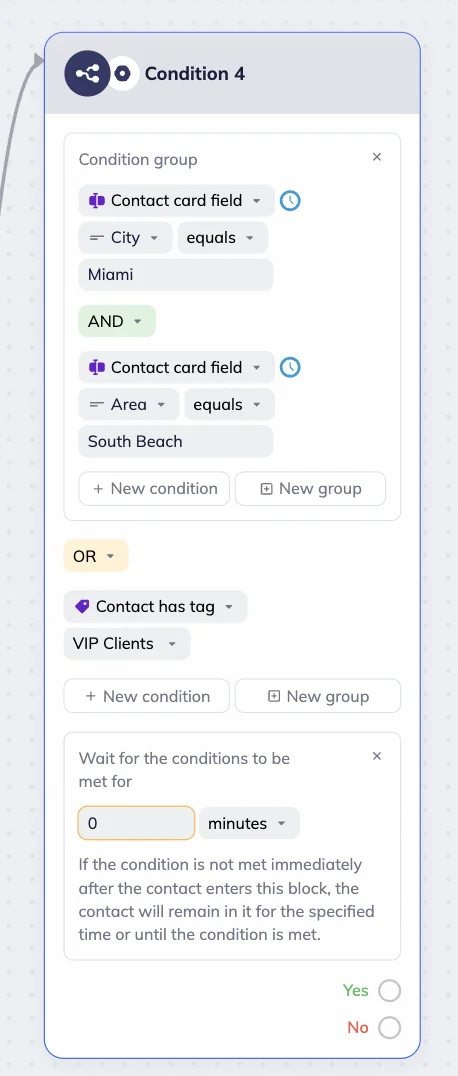
Click the “New group” button to create a condition group. Condition group is a combination of multiple simple or compound conditions for advanced checks. Inside a group, you can use AND or OR operators.
Example: (City equals Miami AND Area equals South Beach) OR (Subscriber has tag “VIP client”).
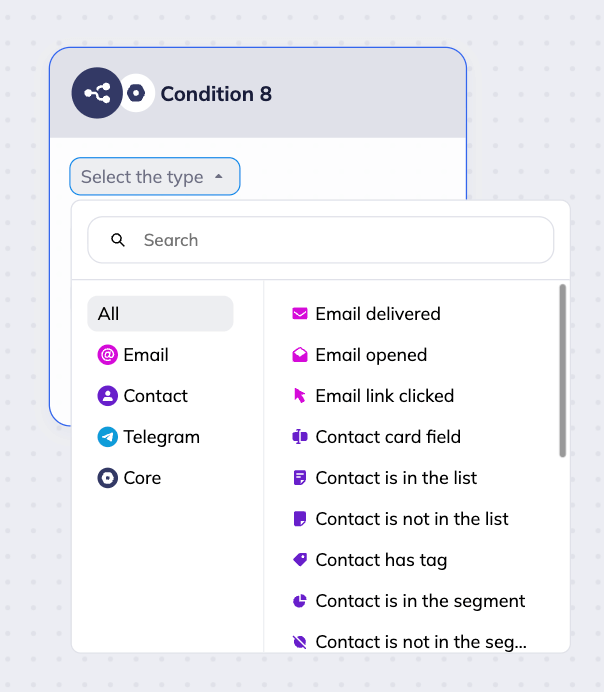
Conditions in the block include:
- Value of a custom field (e.g., city or birthday)
- Subscriber actions with an email (opened or clicked a link)
- Presence in or absence from a specific contact list
- Contact tag value
- Telegram group or channel subscription
- Telegram bot activity (whether the bot was started or not)
- Time, day of the week, or date
Waiting period
Waiting period — the time during which the system will check if the conditions are met. Useful when data isn’t provided immediately (e.g., the subscriber opens an email a few days later). If the data is provided within the waiting period, the subscriber will go down the Yes branch; otherwise, the No branch.
To set up a waiting period, click on the “Add waiting period” button in the block.
With the waiting period set, the conditions are checked when contacts enter the block, right before the end of the waiting period, and once every 24 hours if the waiting period exceeds 1 day.
If there is a waiting period, contact progress through the scenario will depend on the condition type:
Reactive conditions
Reactive conditions include: Email delivered, Email opened, Email link clicked, Contact is in the list, Contact is not in the list, Contact has a tag.
For these conditions, the contacts move through a scenario immediately after they perform a certain action or are added to the list. For example, you have a Contact list condition check with a 1-day waiting period. As soon as a contact gets to this step of the scenario and is added to the list, they move to the next step.
Note that for some condition checks, the waiting period is required. Those conditions include Email delivered, Email opened, and Email link clicked.
Non-reactive conditions
Non-reactive conditions include: Contact card field, Channel joined, Group joined, Channel not joined, Group not joined, Bot started, Bot not started.
For non-reactive conditions, the subscriber might not move on to the next step of the scenario immediately after the condition is met, if there is a waiting period set.
If the waiting period is less than 24 hours: Contacts will move to the next step only after the full waiting period ends — even if the condition is met earlier.
If the waiting period is more than 24 hours: The system automatically checks the condition once every 24 hours. When the condition is met, contacts will proceed at the time of the next system check.
For example, you set up a 3-day waiting period for a custom field check. If a contact meets the condition within the first day, they will move to the next step after the first ‘once every 24 h’ check. However, if you set up a 12-hour waiting period, the contacts will move to the next step only at the end of this waiting period, even if the condition is met earlier.
Condition checks
The Condition block allows you to perform different checks. It can check custom fields, lists, tags, segments, email or Telegram activity, and time.
Custom field check
Custom fields store subscriber data in the contact card — for example, city, phone, interests, birthday, or last order date. In the Condition block, you can check one or multiple custom fields.
Add the Condition block from the toolbar or from the pop-up menu that appears if you right-click the workspace. Select and click either “New condition” or “New group”, depending on your goal.
Choose the type “Contact card field” from the dropdown menu. Next, select the field (e.g., phone, email, name). You can choose from default options or create a new field.
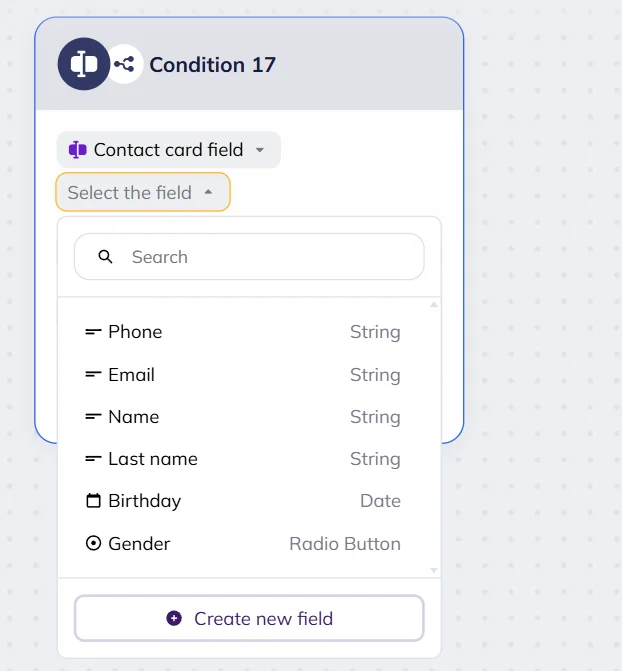
💡 To create a new contact card field directly from the block’s settings, click the “New condition” button in the Condition block → select “Contact card field” → click the “Select the field” in the dropdown menu → click the “Create new field” button at the bottom of the list. Fill out:
- Field name — appears in menus when selecting a custom field, and in the contact card.
- Variable — is used in emails, subscription forms, and Telegram messages as a merge tag. Use Latin letters, numbers, and underscores without spaces to create a variable. Note that the first character must be a letter.
- Field type — defines the format of data this field will store. You can choose a string (single-line text up to 255 characters), a number, a text, a Yes/No checkbox, a radio button, or a date.
Click the “Create” button. A new field will be automatically added to the field list in the block’s dropdown menu. It will also be added to the contact cards.
Depending on the custom field type, you can apply the following conditions:
| Condition parameter | Description | Custom field types |
| Is empty / Is not empty | The condition is met if the field is filled out / empty.
Example: If “Email” is empty, you can set up to send a reminder to subscribers via Telegram. If “Email” contains an address, you can immediately send an email. |
String, text, number, date, yes/no, radio button |
| Equals / Does not equal | The condition is met if the field value matches or does not match the given one.
Example: City = Miami; City ≠ Miami. |
String, text, number, date, radio button |
| Contains / Does not contain | The condition is met if the field contains/does not contain the given word/phrase.
Example: Position contains “manager.” |
String, text |
| Starts with / Does not start with | The condition is met if the value starts/does not start with the given text.
Example: Company starts with “LLC.” |
String, text |
| Ends with / Does not end with | The condition is met if the value ends/does not end with the given text.
Example: Email ends with “@gmail.com” |
String, text |
| Greater / Less | The condition is met if the value is greater/less than the given number or date.
Example: Birthday > 30 Oct. 2007. |
Number, date |
| Greater or equal / Less or equal | The condition is met if the value is greater/less or equal to the given number or date.
Example: Orders ≥ 5. |
Number, date |
| Yes/No | Checks whether the field is set to Yes or No.
Example: if “Subscribed to newsletter” = Yes. |
Yes/No |
💡You can add multiple conditions and combine them with AND or OR:
- With AND, all conditions must be met. Example: The “City” field value equals “Miami” AND the Area field value does not equal “South Beach.”
- With OR, at least one of the conditions must be met. Example: City field value equals “Miami” OR Area field value equals “South Beach.”
You can also add a waiting period — if the condition is not met immediately, the contact will remain on the specific step for the set period of time or until the condition is met.
Contact card field check is a non-reactive condition. This means that contacts might not move on to the next step of the scenario immediately after the condition is met, and instead wait for the waiting period to end or for the next system check to happen.
Custom field check example
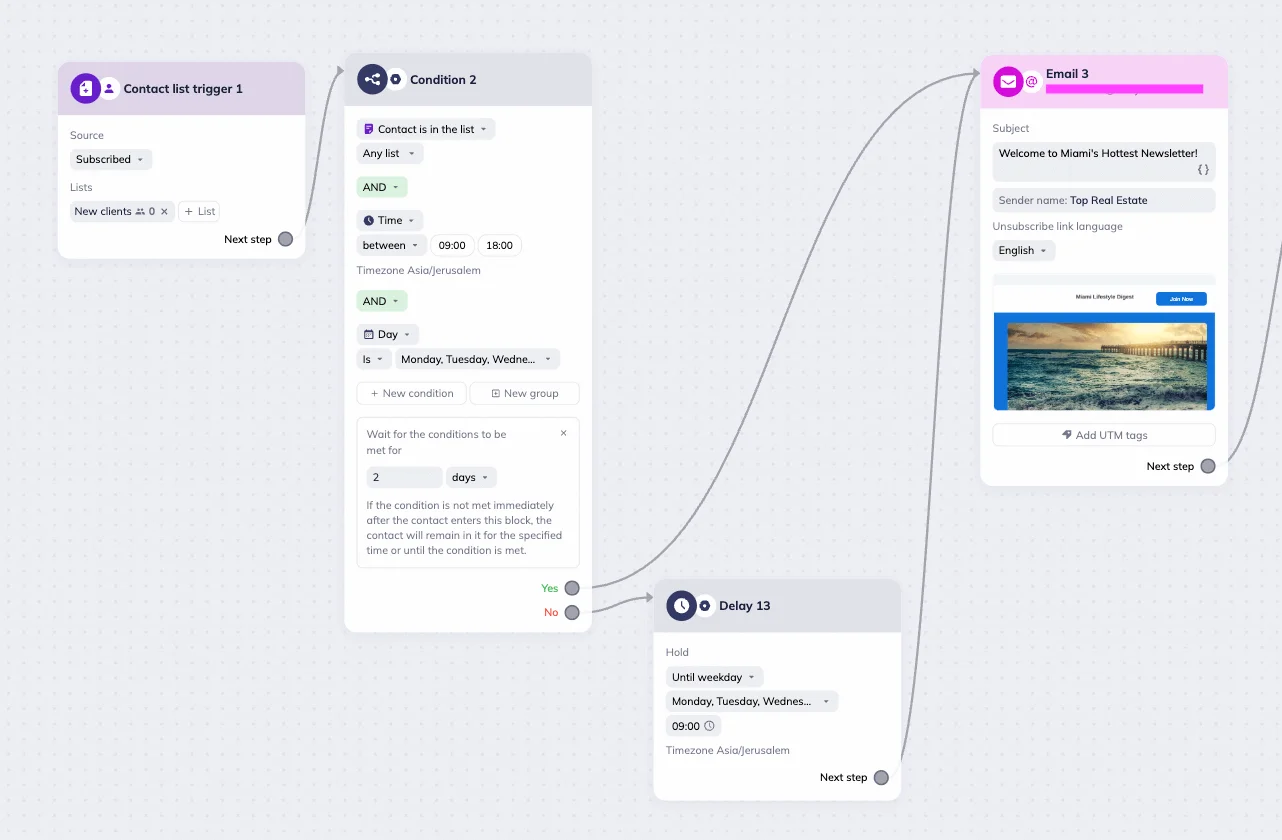
For a simple scenario, we chose the Contact list trigger — when a user subscribes to the newsletter and puts their city as Miami, they will receive a location-specific newsletter. To set up the scenario, we added a “Contact card field” in the Condition block settings. Next, we created a text custom field “City”, added the “equals” condition, and put “Miami” in the value field. Then we connected an email block to the “Yes” branch.
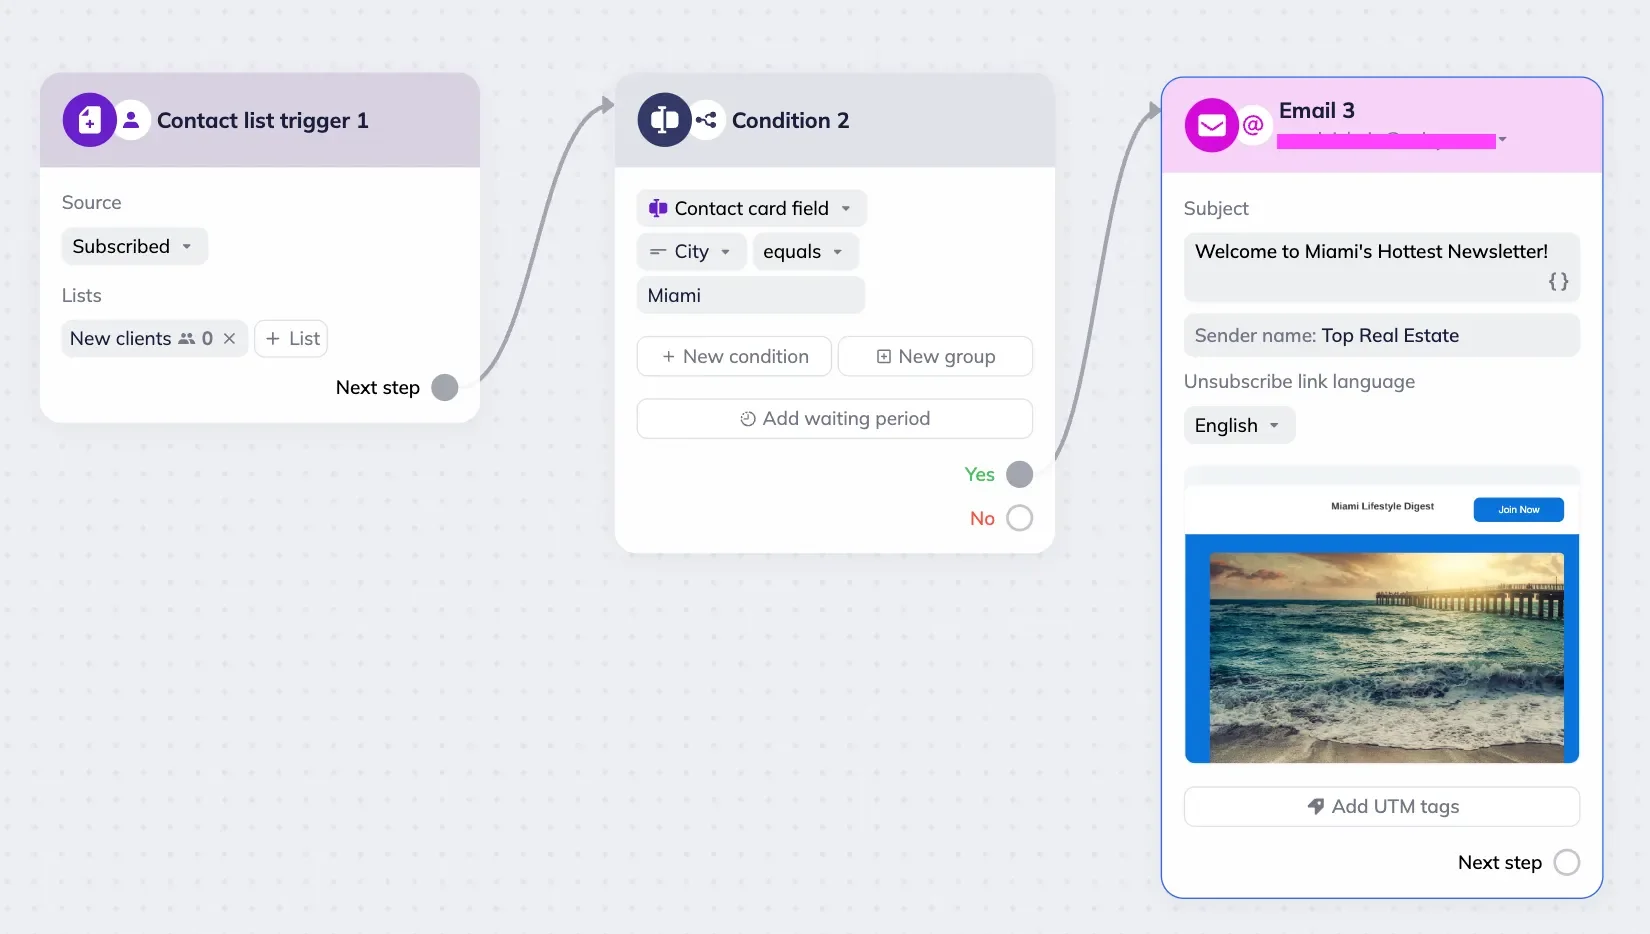
Suppose this condition is met, and the subscriber puts “Miami” as their location in the subscription form. In that case, they will automatically reach the next step in the scenario and receive the “Welcome to Miami’s Hottest Newsletter” email.
Contact list check
The Condition block allows you to check whether a subscriber belongs to a specific contact list. For example, if they are in the “Regular clients” list, they receive a personalized offer; otherwise, a standard one.
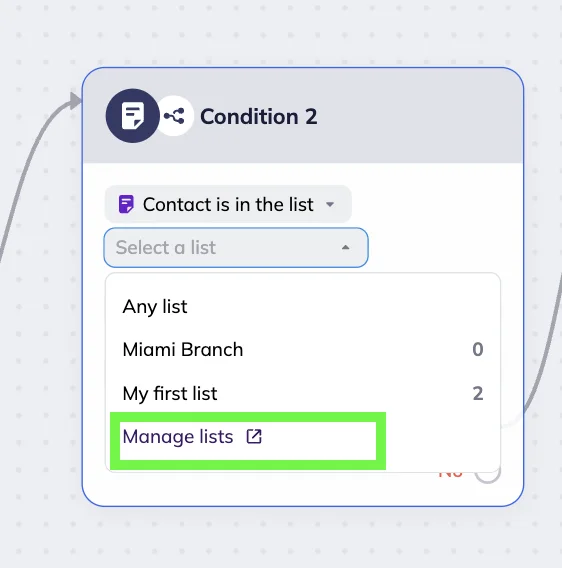
To set the Contact list check, select “Contact is in the list” or “Contact is not in the list” in the Condition block settings. Next, choose a specific list from the dropdown menu. Start typing its name for a quick search. The default option is “Any list” — all your subscribers will meet this condition.
If you want to create a new list, click Manage lists in the list selection dropdown menu. You will be redirected to the Lists page in a new browser tab. After you create a new list, it will automatically appear in the list selection dropdown menu.
💡You can add multiple conditions and combine them with AND or OR:
- With AND, all conditions must be met. Example: a contact is in “Regular clients” AND not in “Promo participants.”
- With OR, at least one of the conditions is met. Example: a contact is in “Regular clients” OR “Promo participants.”
You can also add a waiting period — if the condition is not met immediately, the contact will remain on the specific step for the set period of time or until the condition is met.
Contact list checks are reactive conditions. This means that if contacts meet the condition within the set waiting period, the system allows them to immediately move on to the next step.
Contact list check example
A client subscribes to the real estate agency’s newsletter. If they share their location in the subscription form and get added to the “Miami Branch” list, they will automatically receive the location-specific email. If the clients don’t specify their location, they will automatically receive the “Welcome to the Agency’s Newsletter” general email.
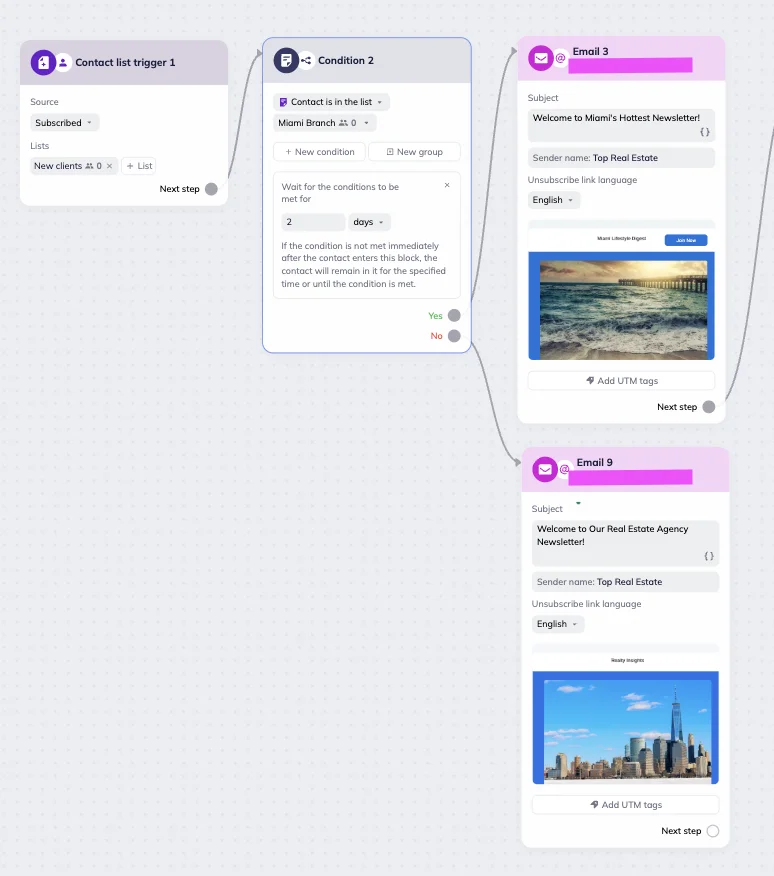
To set up this scenario, we selected “Contact is in the list” in the Condition block settings, then chose “Miami Branch” from the dropdown and set up a 2-day waiting period. For the YES branch, we added the Email block and set it up for the “Welcome to Miami” email. For the NO branch, we added another Email block and set it up for the “Welcome to the Agency’s Newsletter” email.
Contact tag check
The Condition block allows you to segment your audience by tags assigned to subscribers.
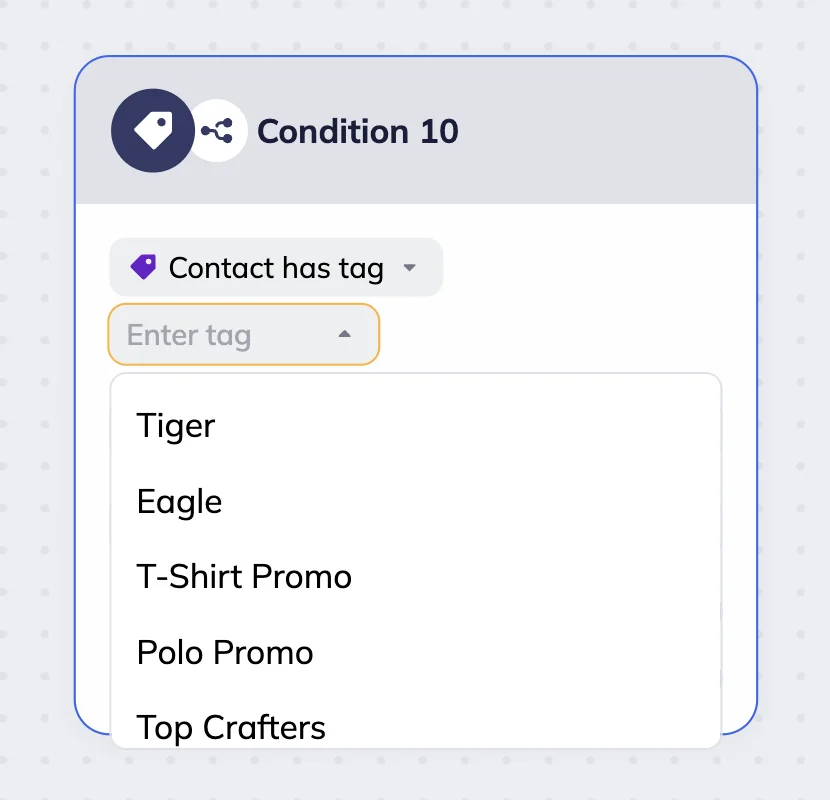
To set this up, select “Contact has tag” in the Condition block settings. Then, choose the tag from the list.
After checking, the scenario continues only for subscribers with that tag.
To add a new tag, type its name in the “Enter tag” field and click on the “Create a new tag” command that will appear immediately.
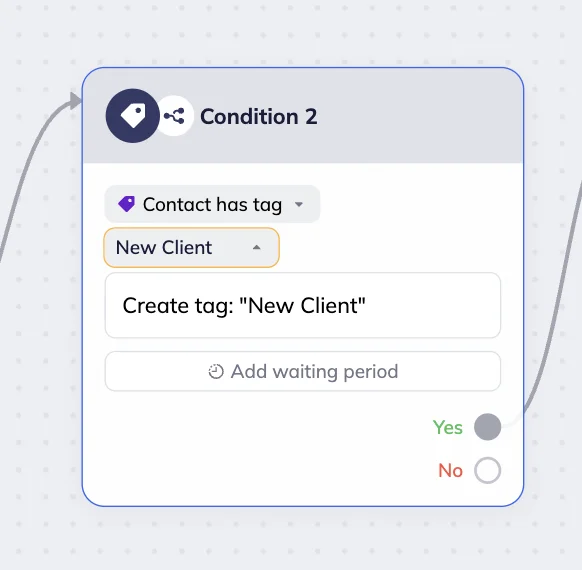
Example: if you select “New client,” the scenario will run for them only.
💡You can add multiple conditions and combine them with AND or OR:
- With AND, all conditions must be met. Example: You want to award bonus points to VIPs who are fans of the specific football team. Only those contacts with tags “Tiger” AND “Super Fan” will receive an email with bonus points.
- With OR, at least one of the conditions must be met. Example: You are promoting products for the specific match between the “Tiger” and “Eagle” teams. Only if the contact has either the “Tiger” OR the “Eagle” tag, they will receive your email.
You can also add a waiting period — if the condition is not met immediately, the contact will remain on the specific step for a set period of time or until the condition is met.
Contact has tag is a reactive condition. This means that if contacts meet the condition within the set waiting period, the system allows them to immediately move on to the next step.
Segment check
The Condition block can check whether the contact is in the specified segment.
To set the check up, select “Contact is in the segment” or “Contact is not in the segment” parameters in the Condition block settings.
Then, select a segment from the dropdown menu in the “Segment” field.
You can also select additional conditions in the block. If conditions are not met by the time you’ve set up, the system will perform the “No” scenario.
💡You can add multiple conditions and combine them with AND or OR:
- With AND, all conditions must be met. Example: Contact is in the “Novice” segment AND Contact is in the “Top” segment, when you need to target users who are both highly engaged and new to a specific product category.
- With OR, at least one condition must be met. Example: Contact is in the “Novice” segment OR Contact is in the “Top” segment, when you want to announce a new product to both new customers and your most loyal clients.
You can also add a waiting period — With the waiting period set, the conditions are checked when contacts enter the block, right before the end of the waiting period, and once every 24 hours if the waiting period exceeds 1 day.
Segment check is a non-reactive condition. This means that contacts might not move on to the next step of the scenario immediately after the condition is met, and instead wait for the waiting period to end or for the next system check to happen.
Example: Extra discount for subscribers with birthdays
Let’s say we are sending a promotional mass email to the whole list, but we want to give subscribers whose birthday falls this month an extra discount.
To do that, we create a Bulk scenario with the Start with the list trigger. We add a Condition block with “Contact is in the segment” and select the segment “December birthdays.”
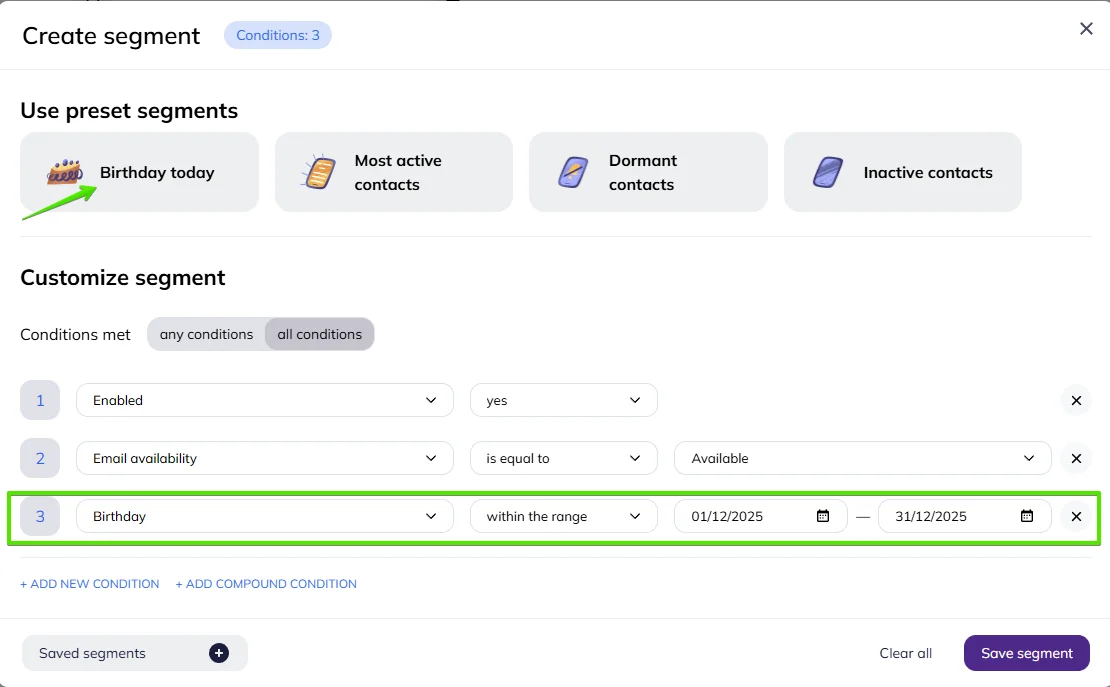
Birthday month segment can be created by editing a segment preset ‘Birthday today’:
For the YES branch, we send an email with an upgraded offer — for example, a 25% birthday-month discount.
For the NO branch, we send the standard promotional message.
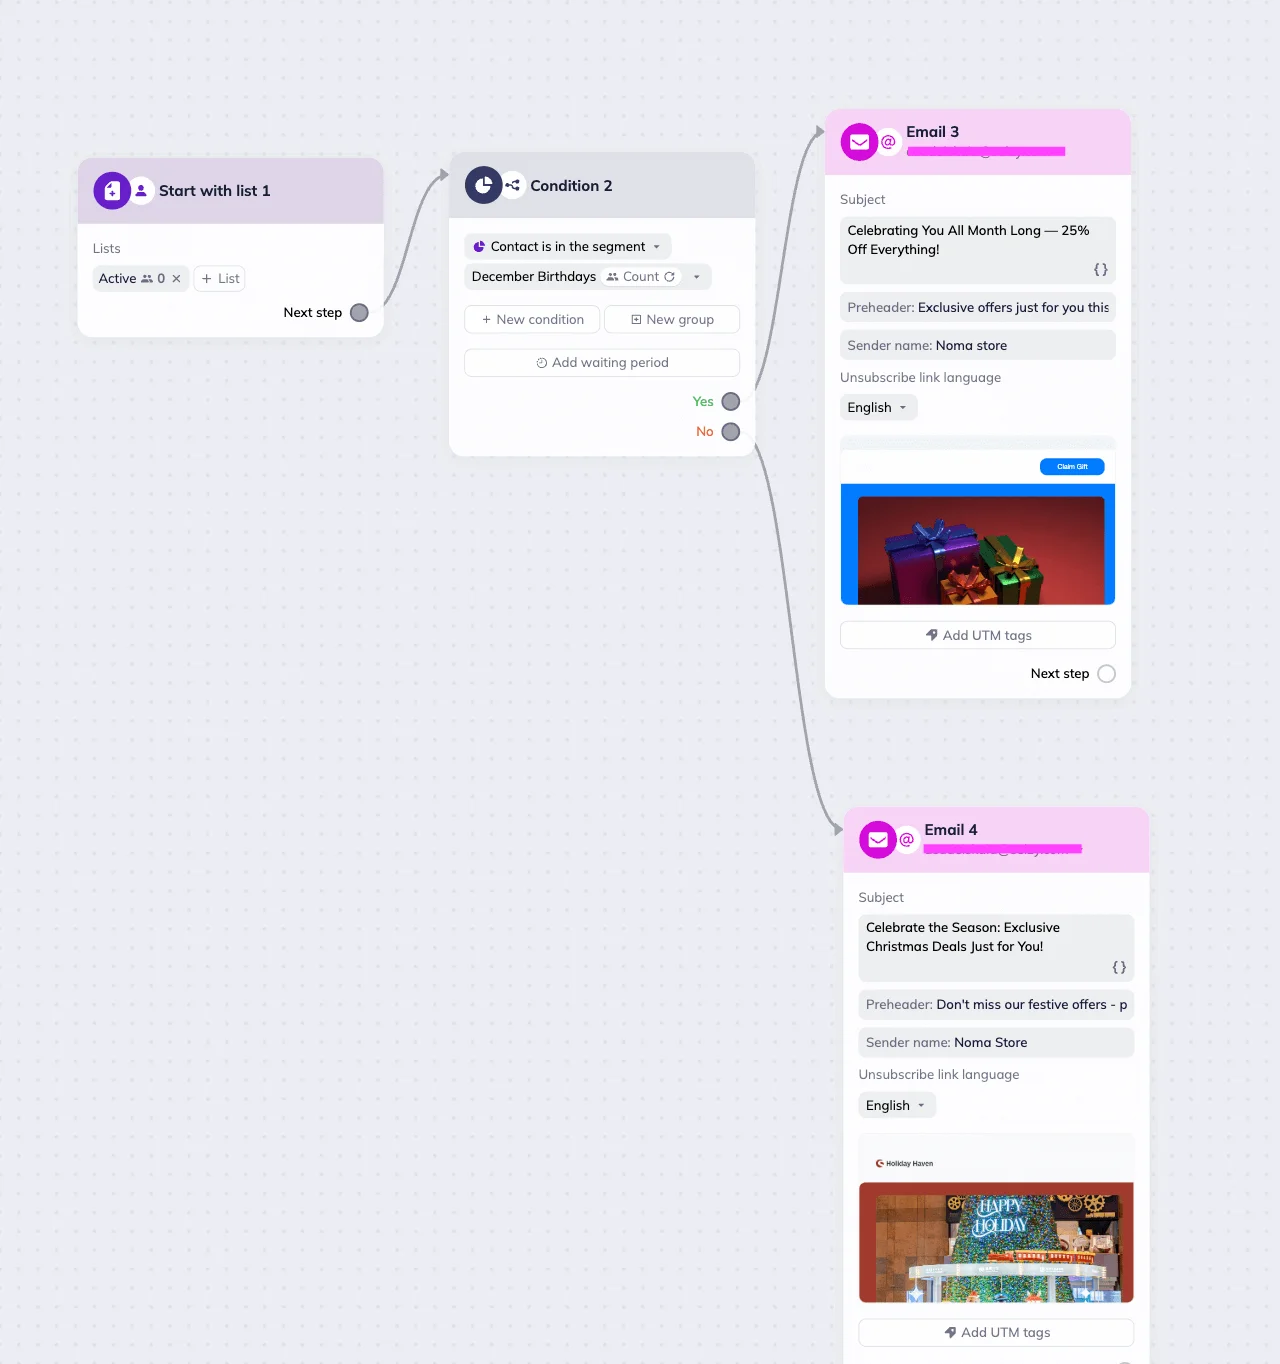
This way, all subscribers receive the campaign, but those celebrating a birthday this month feel valued with a personalized reward.
Email activity check
The Condition block can check how a subscriber interacts with an email sent within the scenario.
Available conditions:
- Email delivered — the email from the Email block was delivered.
- Email opened — the subscriber opened the email.
- Email link clicked — the subscriber clicked a link. You can track any link or specify one (e.g., by URL or UTM tag).
For these reactive conditions, a waiting period is required. By default, the system sets it for 15 minutes. You can adjust the waiting period in days, hours, minutes, or seconds. You can’t put the field value as 0 — the system will mark this as an error and won’t allow you to run the scenario. Once the subscriber meets the condition, the system allows them to move on to the next step.
Email delivered and Email opened
To set the Email delivered or Email opened conditions, select “Email delivered” or “Email opened” in the Condition block settings.
Next, select the email from the dropdown menu. Note that you can only choose emails from the same scenario.
For these two conditions, setting up a waiting period is required. By default, the system sets it for 15 minutes.
You can adjust the waiting period in days, hours, minutes, or seconds.
You can’t put the field value as 0 — the system will mark this as an error and won’t allow you to run the scenario.
Email delivered and Email opened are reactive conditions. This means that if contacts meet the condition within the set waiting period, the system allows them to immediately move on to the next step.
Email link clicked
To set the Email link clicked condition, select the “Email link clicked” in the Condition block settings.
Next, select an email from the dropdown menu. Note that you can only choose emails from the same scenario.
Select the email link condition parameter. By default, it is set to “Any” — if a subscriber clicks any link in your email, they will proceed to the next step in the scenario. Other conditions require inputting a specific link.
Condition parameters include: Equals, Does not equal, Contains, Does not contain, Starts with, Does not start with, Ends with, Does not end with.
For this condition, setting up a waiting period is required. By default, the system sets it for 15 minutes.
You can adjust the waiting period in days, hours, minutes, or seconds.
You can’t put the field value as 0 — the system will mark this as an error and won’t allow you to run the scenario.
Email link check is a reactive condition. This means that if contacts meet the condition within the set waiting period, the system allows them to immediately move on to the next step.
Email activity check example
If the subscriber opens the welcome email and clicks any link, they will be put in the “Active” contact list. To set up the scenario, we selected “Email opened” AND “Email link clicked” in the Condition block settings and added a two-day waiting period.

If the subscriber opens the email and clicks any link in it within 2 days after the email was sent, they will be added to the “Active” list. If they open the email but won’t click any of the links — or they do it after two days — the system will place them in the “Cold” list.
Telegram activity check
The Condition block can check how a subscriber interacts with a Telegram bot, channels, and groups.
Your bot needs different rights to check subscriber membership, depending on whether you add it to a group or a channel. In a Group, the bot can check membership as a regular participant. In a Channel, the bot must be an admin to see member status.
Available conditions:
- Channel joined
- Group joined
- Channel not joined
- Group not joined
- Bot started
- Bot not started
For the Bot started / Bot not started conditions, the system checks all contacts in your Selzy account, even when they aren’t part of a specific list.
If a contact started the bot but was later removed from your account, the system won’t count them.
However, if a contact has stopped the bot but remains in your Selzy account, they will go down the “Yes” branch of the scenario after the check.
To set up a Telegram activity check, select a condition in the Condition block settings, for example, “Channel joined” or “Bot started”.
Next, select a Telegram bot. You can create or connect the Telegram bot on the Chatbots page.
Alternatively, you can connect a new Telegram bot directly from the Condition block. For that, click the “Connect the new bot” button in the bot selection dropdown menu → In the pop-up menu, add the new bot’s name and follow the instructions to connect the bot. → Click the “Save and close” button.
Choose a channel or group. Note that the Telegram bot must be present in the group or have admin rights in the channel to check subscriber membership status. To give the rights to the Telegram bot in a new channel, click on “Channel or Group” → “Add bot to a new channel”. You’ll be redirected to the Telegram app → Choose the group → Click “Ok”.
💡You can add multiple conditions and combine them with AND or OR:
- With AND, all conditions must be met. Example: Bot started AND Channel not joined to send an invitation to your new subscriber to join the channel.
- With OR, at least one condition must be met. Example: Channel not joined OR bot not started to send a reminder to your new subscriber.
You can also add a waiting period — if the condition is not met immediately, the contact will remain on the specific step for a set period of time or until the condition is met.
Telegram activity checks are non-reactive conditions. This means that contacts might not move on to the next step of the scenario immediately after the condition is met, and instead wait for the waiting period to end or for the next system check to happen.
Time check
The Condition block can check when a subscriber interacts with the scenario. Use it to control scenario behavior based on time, day of the week, or a specific date — for example, sending emails only during business hours or activating a campaign on holidays or sale days.
Available conditions:
- Time — checks whether the contact reached this block at the specified time. You can choose an exact time (e.g., 09:00) or a time period (e.g., from 09:00 to 18:00). The time zone is applied automatically based on your account settings.
- Day — checks the day of the week on which the contact reached the block. You can select one or multiple days (e.g., Saturday and Sunday).
- Date — checks exact dates or ranges (e.g., “November 14” or “November 14–20”).
💡You can add multiple conditions and combine them with AND or OR:
- With AND, all conditions must be met. Example: Time AND Date to send a communication.
- With OR, at least one condition must be met. Example: Tuesday OR Wednesday to send a communication.
If you want to prevent the scenario from running outside specific hours, place a Delay block on the No branch.
For example, if subscribers should receive onboarding emails only between 09:00 and 18:00 on weekdays, add a Delay block → Choose the Until weekday setting → Set the time at 09:00 and select weekdays → Connect the Delay block to the same Email block used in the Yes branch.
To set up a Time check, click Core in the Condition block settings and select a condition, for example, “Date” or “Time”.
Date
To set the Date condition, click Core in the Condition block settings and select “Date”.
Next, select a condition parameter from the dropdown menu:
- Equals (e.g. “Equals 14 Feb 2026” → Send a Valentine’s Day promo only on February 14th)
- Before (e.g. “Before 1 Dec 2025” → Remind users about a subscription renewal)
- On or after (e.g. “On or after 10 Apr 2026” → Announce the launch of free shipping for orders over $30)
- Between (e.g. “Between 24 Dec 2025 and 1 Jan 2026” → Holiday autoresponder active during winter break)
- Outside (e.g. “Outside 24-26 Dec 2026” → Pause communications during holiday period)
Select a date from the date picker and click “Done.”
Example: seasonal sale for online store
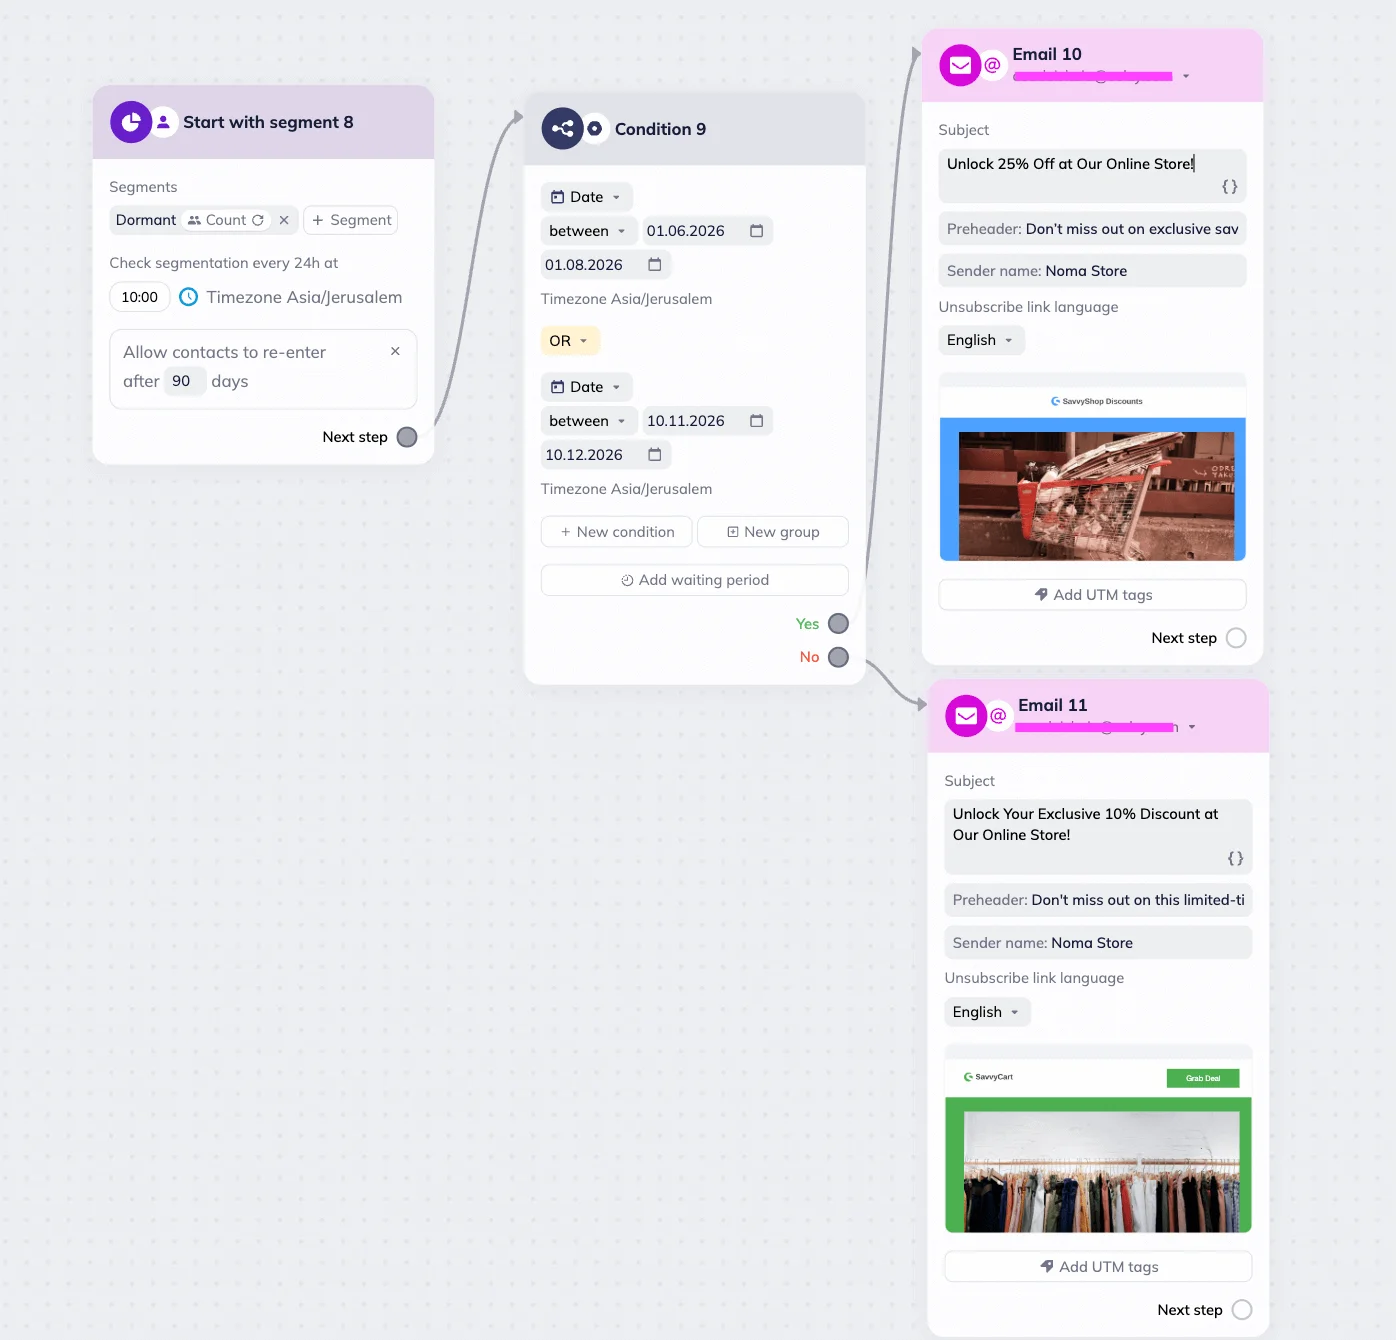
Let’s say an e-commerce store targets subscribers who were active in the last three months but not in the last month. These subscribers receive a re-engagement email with a 10% discount on their next purchase.
If they enter the scenario during a high-promotion period — for example, in November–December or during the summer sale — they receive an upgraded offer with a 25% discount instead.
To create this scenario, the store uses the Segment trigger block and the Dormant preset segment. Next, they set up the Condition block with the high-promotion date range. For the YES branch, they add the Email block with the 25% discount. For the NO branch, they use the same block but with the 10% discount.
Time
To set the Time condition, click Core in the Condition block settings and select “Time”.
Next, select a condition parameter from the dropdown menu:
- Equals (e.g. “Equals 12:00” → Send a daily “Price Drop of the Day” email exactly at noon)
- Does not equal (e.g. “Does not equal 18:00” → Avoid sending messages at 18:00)
- Before (e.g. “Before 11:00” → Show a morning promo)
- Before or on (e.g. “Before or on 16:00” → Send “Order now for same-day shipping” before 4 PM)
- After (e.g. “After 17:00” → Trigger an evening promo)
- On or after (e.g. “On or after 20:00” → Offer a “Night Owl 10% Off” discount)
- Between (e.g. “Between 16:00 and 19:00” → Offer a Happy Hour promo)
- Outside (e.g. “Outside 09:00–17:00” → Send an after-hours support autoresponder)
Enter the specific time or time range.
Example: tech support working hours
Let’s say we want our customer support team to reply during business hours, and outside of those hours send an automated “Support is offline” message and a promise to reply tomorrow.
To do that, we set up a Condition block with two checks: hours between 9:00 and 18:00 and Monday-Friday date range. For the YES branch, we set up the Email block with the “We will be with you shortly” email and the Notification block. For the NO branch , we set up an automated “Support is offline” response.
Day
To set the Day condition, click Core in the Condition block settings and select the “Day” .
Next, select a condition parameter from the dropdown menu:
- Is (e.g. “Is Saturday, Sunday” → Send a weekend-only discount)
- Is not (e.g. “Is not Monday” → Avoid sending emails on low-engagement days)
Then, select any day or days of the week from the “Day” dropdown menu by clicking checkboxes next to it.
Example: Onboarding during business hours only
Let’s say we want to send onboarding messages during business hours only.
To do that, we set up a Condition block with two checks: hours between 9:00 and 18:00 and Monday-Friday date range.
For the YES branch, we set up the Email block with the “Welcome! Enjoy your experience” email — the first in the onboarding sequence.
For the NO branch, we set up the Delay block, choose the Until weekday setting, select the weekdays and set the time at 9:00. We then connect the Delay block to the same Email block used in the YES branch.
If the subscriber enters the scenario between 9:00 and 18:00 on weekdays, they receive the first onboarding email immediately. If they enter outside of this time period, they receive the same email on the next weekday at 9:00.