The Email block belongs to Communication blocks. The block’s functionality is the same for Triggered and Bulk scenarios.
The Email block allows you to add an email to your scenario that is automatically sent to a subscriber when they reach this step.
Email block set up
To add the Email block, go to the Omnichannel automation scenarios page → Based on your goal, choose the Triggered or Bulk scenario tab → Click the “New campaign” button → The scenario builder will open.
Add the Email block to the workspace from the toolbar menu below or by right-clicking the workspace.
Email block settings
In the block settings, you need to specify sender address, subject, sender name, unsubscribe link language, and add an email body. You can also set up a preheader and UTM tags if needed.
Sender address
This field is mandatory — you won’t be able to launch the scenario without it. Note that automated emails can only be sent from a corporate email address on your own domain.
How to set up your email in Selzy
The list of available options includes only addresses added to your account settings under Confirmed emails.
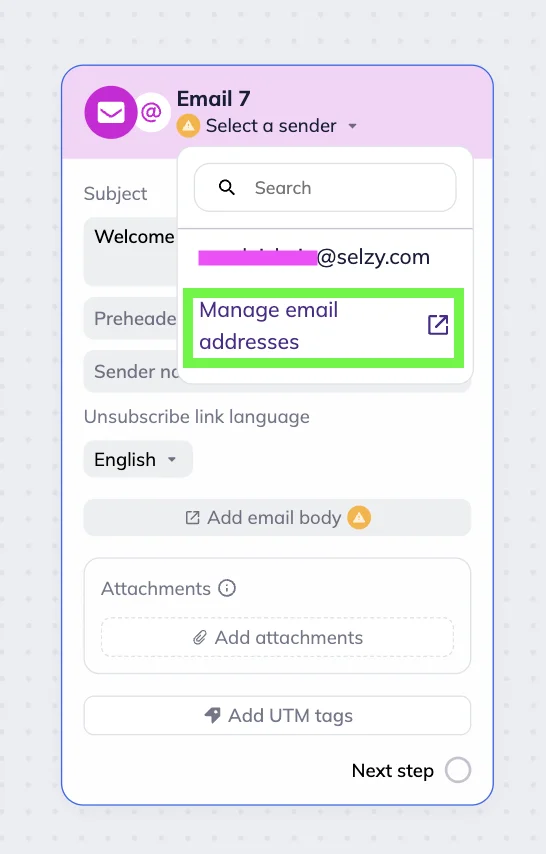
If the address you need isn’t there, click the “Manage email addresses” link in the “Select a sender” dropdown menu. You’ll be redirected to the “Confirmed emails” page in Account Setup. Add the address, verify it, and then return to finish setting up your scenario.
Subject
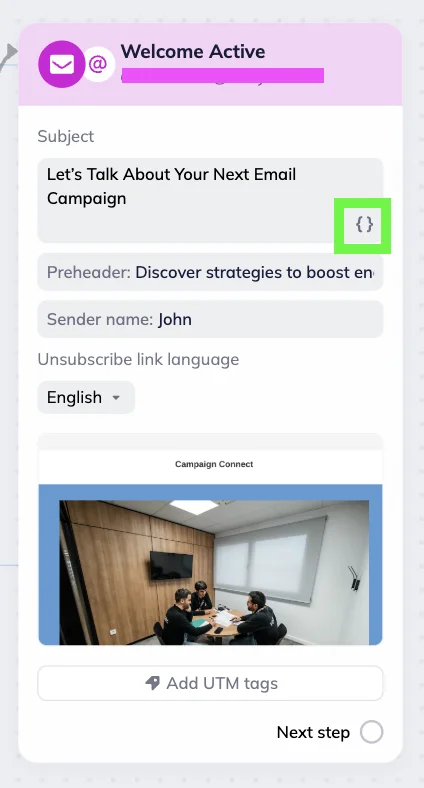
The subject line field is also required. To personalize your subject line, click the “Merge tags” icon — { } (braces).
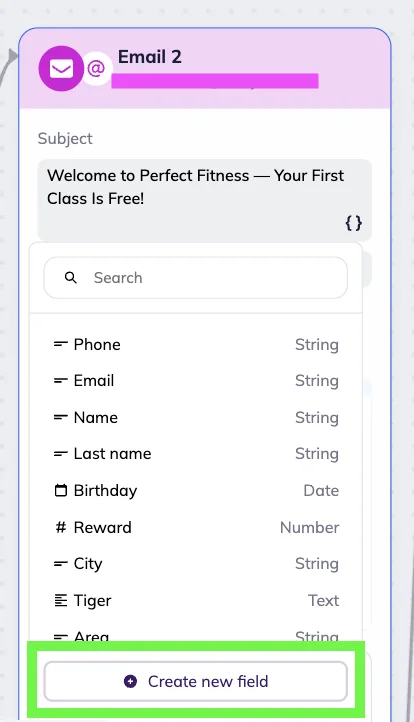
In the dropdown menu, select any custom field or create a new one using the “Create new field” button.
If you add an email with a prewritten subject line — it will appear in the subject field automatically. The block will also be automatically renamed — it will include the subject line, date and time of the email’s creation. If you want to change the name of the block, click on the pen icon next to it. If you want to change the subject line itself, you can change it in the subject field directly.
Preheader
The preheader is an optional field. It is pulled from the email template used in the Email block, and you can edit it directly in the block.
Note that if you change the preheader in the block:
- For templates from Selzy’s library, the preheader is updated automatically. The changes will be visible the next time you open the email in the email builder.
- For custom templates (created by you or other users), changes made in the Email block are not synced back to the email builder. To update the preheader in a custom template, you need to edit it directly in the email builder.
Sender name
By default, the sender name is automatically pulled from the First name field in Confirmed emails (if it’s filled in).
You can replace it with any name directly in the block.
Unsubscribe link language
Selzy automatically adds an unsubscribe link to the end of every email. In this section, you can change the language of the unsubscribe block to match the language of your message.
Email body
Add the email body by clicking the ”Add email body” button. You can create a new email, choose a template, select a draft (a created but not yet sent campaign), or reuse a sent campaign.
💡Omnichannel automation doesn’t support Selzy’s main email builder. While all your templates and campaigns will be visible, they will be automatically opened in the AI email builder.
For a better experience, we recommend creating templates for omnichannel scenarios in the AI email builder. If you don't have access to the AI builder in your account, please contact our Support team.
Regardless of your choice, you’ll be automatically redirected to the AI email builder. There, you can also import or export your email templates. Import options include HTML, EML, and ZIP formats. Export options include ZIP, code, Clipboard, Text, Outlook, PDF, and PNG formats.

After making your edits, save them and click ”Continue” — you’ll then be redirected back to the scenario builder.
⚠️ Important: Emails created in the Email block aren’t saved anywhere else in your account.
If you create an email directly in the block and then remove it from the block — or delete the block itself — the email will be deleted permanently.
To make sure you’ve got the right email message, you can scroll through it in the preview.
To edit the message, hover over the preview and click the pencil icon.
To remove the message from the block, hover over the preview and click the trash icon.
Attachments
You can attach a file to the Email block — for example, price lists, guides, e-books, lead magnets, presentations, tutorials, or printable materials.
💡 You can attach up to 10 files to a single campaign, with a total size of no more than 3 MB.
To add an attachment, click the “Add attachment” button in the block.
Then, select the file you want to upload. The following file types are supported:
- Images — JPG, JPEG, PNG
- Files — PDF, DOC, DOCX, XLSX, XLS
To remove an attachment from the scenario, hover over it and click the trash icon.
💡If you duplicate an Email block with an attachment, the attachment will be duplicated as well.
💡If you share the scenario as a template, the attachment will be visible in preview and included in the shared template. If you don’t want to share your files — make sure you delete them beforehand.
UTM tags
In the block settings, you can automatically add UTM tags to all links in the email so you can track the scenario’s performance in Google Analytics.
UTM tags are special parameters added to a link:
- utm_source — the source of the campaign. Usually indicates the channel where the subscriber came from, for example, email or Instagram.
- utm_medium — the type of source. Helps identify the specific communication type that led to the click, for example, referral or api-trigger.
- utm_campaign — the name of the campaign. Typically, it includes the scenario name, promotion, or communication goal, for example, onboarding, autumn_sale, or webinar_reminder.
- utm_content — the element or the section of the email where the offer was placed. Helps identify which part of the message drove the click, for example, button or footer.
- utm_term — a keyword or additional parameter. It can be used to specify the message subject, audience segment, or offer type, for example, welcome_offer, new_clients or 30%.
Add UTM tags to all links in an email
In the Email block, you can automatically add the same UTM tags to all links in an email. Use it if you want to track the performance of the entire email. Note that if you configure UTM tags in the block settings, the system will ignore any custom UTM tags you've manually added to specific links.
To add UTM tags, find the Email block in your scenario and click the “Add UTM tag” button to reveal the UTM settings section.
💡If you have the UTM tagging feature enabled in your account settings (under Integrations and API ⟶ Google Analytics ⟶ Collect statistics) and choose to add different UTM tags in the Email block, the system will prioritize the UTM tags from the Email block when sending the email. The UTM tags from the account settings will be ignored in this case.
In the expanded UTM settings section, enter the necessary parameters manually or by clicking the Merge tags icon and selecting a field from the list.
UTM parameter requirements:
- Each parameter must not exceed 100 characters.
- Spaces and special characters are not allowed in parameters, except for “+”, “-”, and “_”.
- Do not insert URLs directly into the email body — such links will not be processed by the system, and UTM tags won’t be added to them.
Add a UTM tag to a specific link
You can manually add unique UTM tags to specific links only.
💡If you configure UTM tags in the block settings, the system will ignore any custom UTM tags you've manually added to specific links. Use the UTM settings section in the Email block to add the same UTM tags to all links in the email.
In this case, first create a link with the necessary parameters using a UTM tag generator. Enter the destination URL, fill in the parameters, and copy the generated result.
Then find the Email block in your scenario and open the email where you want to insert this link by hovering over the email preview and clicking the “Edit” button. You will be automatically redirected to the AI email builder.
Embed the link into the email text or a button. Click the desired element and enter the full address with UTM tags in its settings. When your email is ready, save the changes and click the “Continue” button to return to the scenario.
💡 To get correct data in Google Analytics, it is important not to use link-shortening services and websites with redirects. For example, do not use bitly.com, ow.ly, and other similar services. If you use them, the UTM tags will not work, as they will be attached to the redirector’s website link and not your website link.
UTM links example
Let’s say a fitness studio wants to welcome every new client who signs up for their newsletter. For this purpose, they create a Triggered scenario with the Contact list trigger set to “Subscribed” and the “New Clients” list.
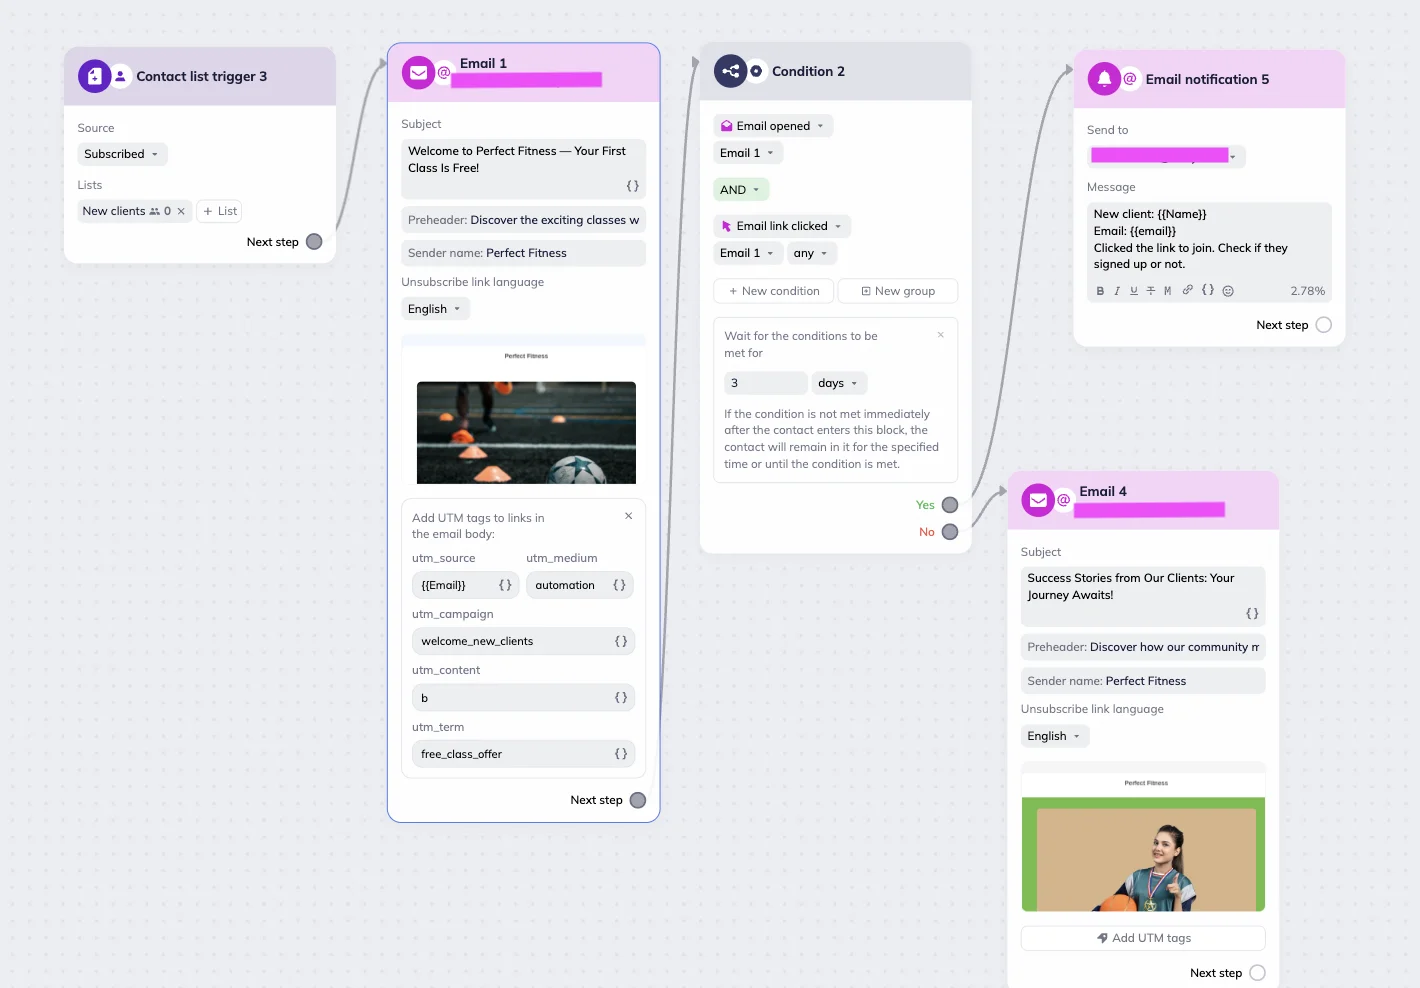
Next, they add an Email block with the welcome email offering a free trial class and enable automatic UTM tagging to track overall campaign performance in Google Analytics:
- utm_source: email
- utm_medium: automation
- utm_campaign: welcome_new_clients
- utm_content: button
- utm_term: free_class_offer
Next, they add the Condition block. If a subscriber opens the email and clicks the link to the class, the system automatically sends a notification to the studio’s sales representative. This allows the team to check whether the new lead signed up and follow up with a tailored offer.
If the subscriber ignores the first email, they receive a follow-up message featuring client success stories. To track which story gets the most clicks, the team creates manual links with unique UTM tags for each success story in the email.
Here is the first link as an example: https://www.perfectfitness.com/success-stories/anna?utm_source=email&utm_medium=automation&utm_campaign=client_success_stories&utm_content=anna_story&utm_term=testimonial
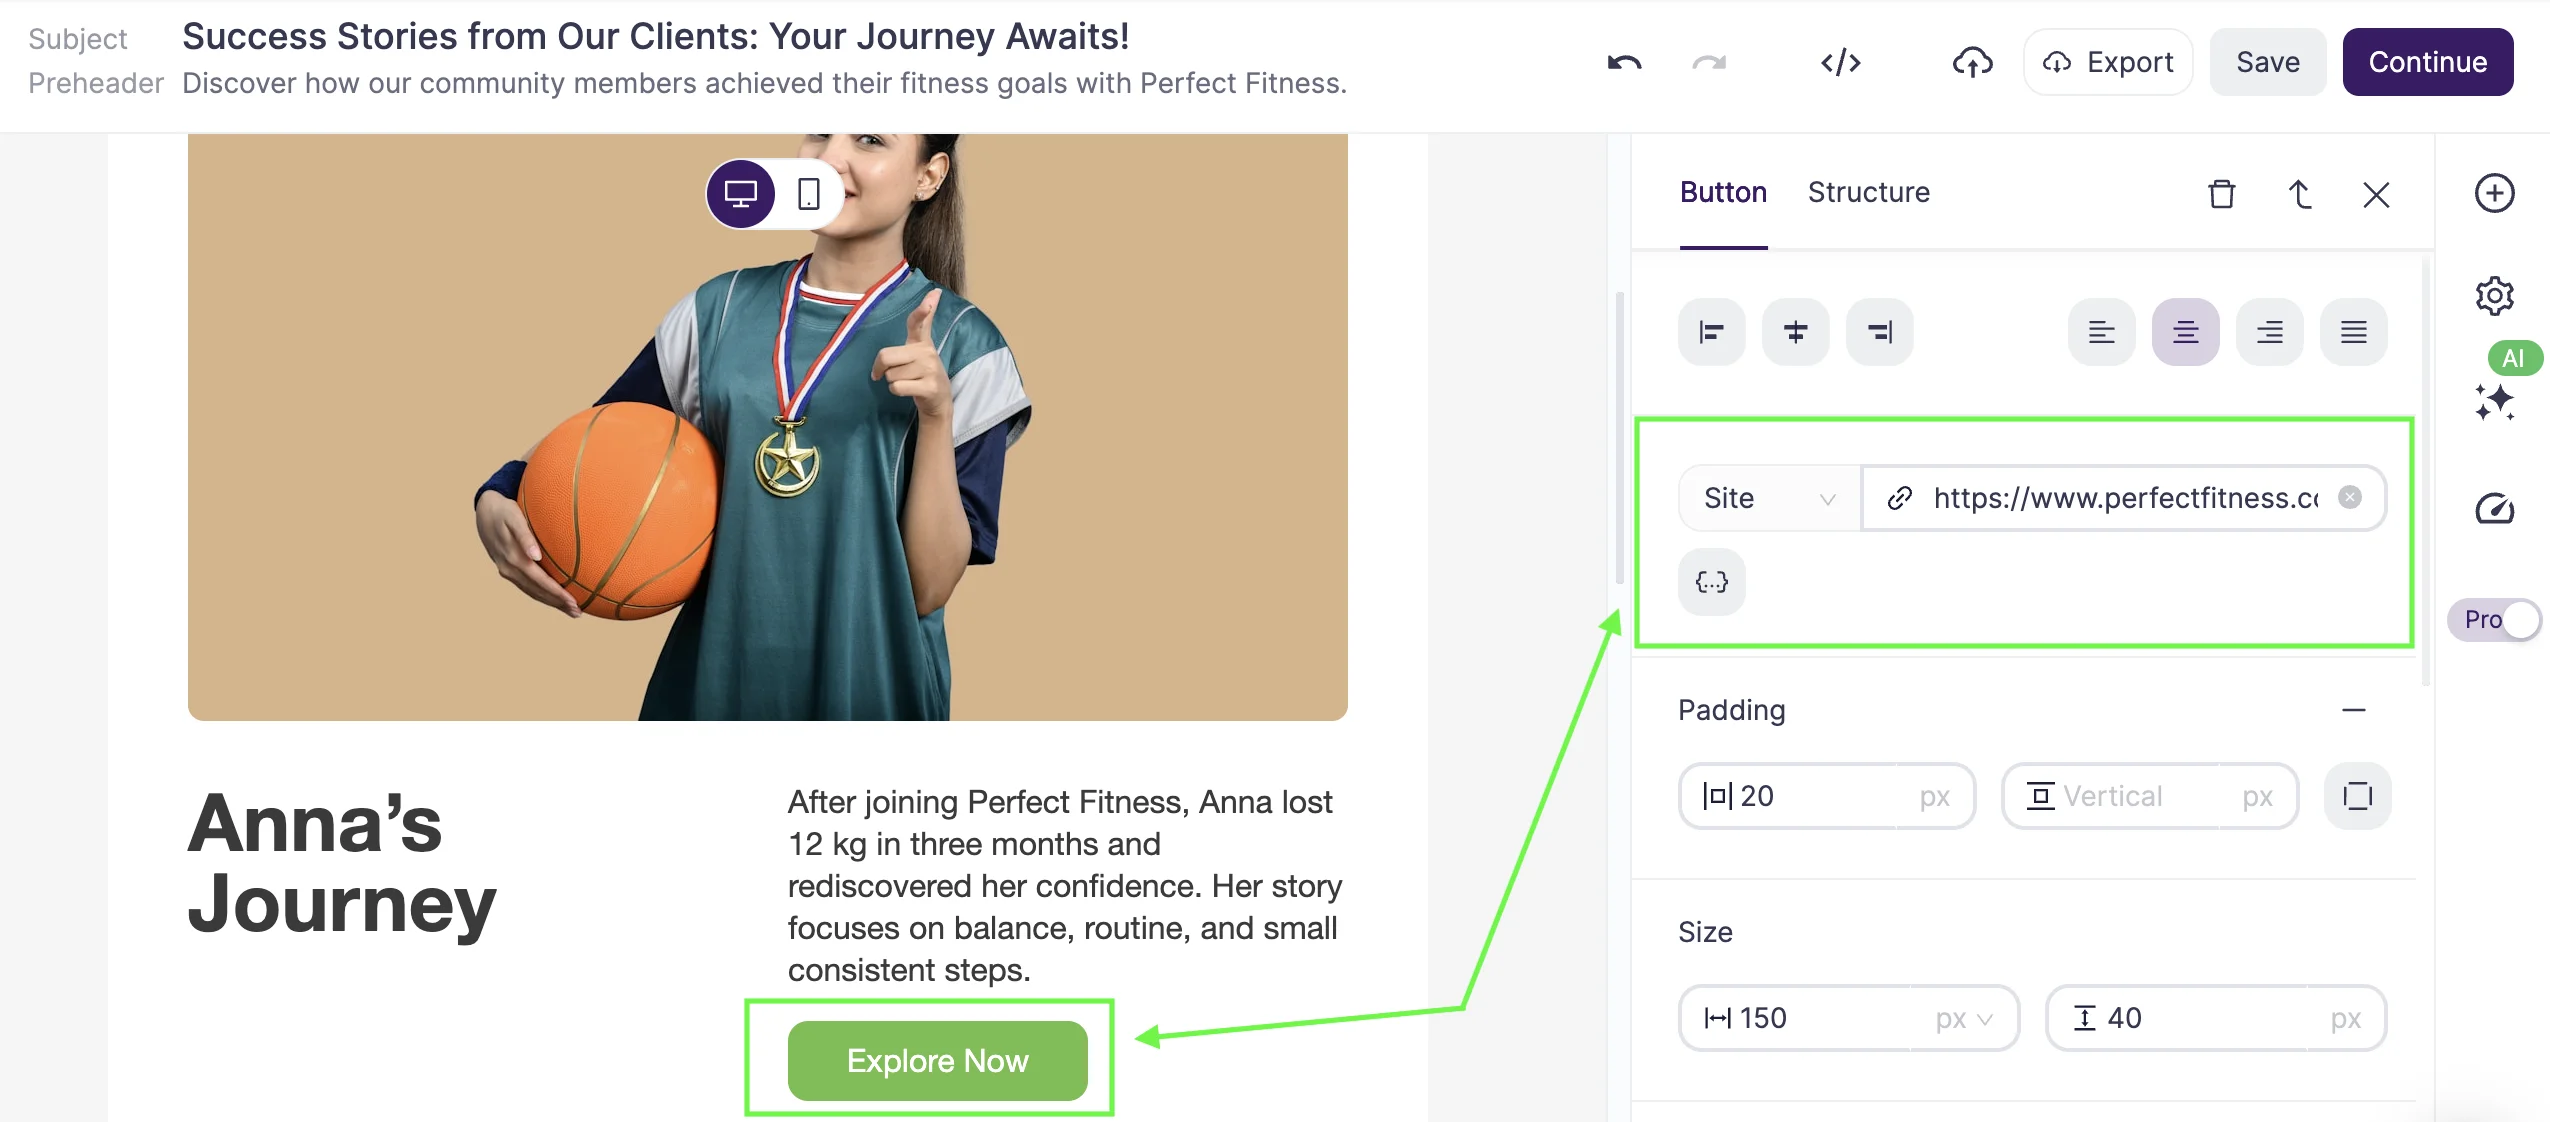
These tagged links are added directly to the buttons in the email. When subscribers click them, the fitness studio can track which story or call-to-action generates the most engagement — helping them understand what content resonates best with new clients.