Contact field editor belongs to Action blocks. The block’s functionality is the same for Triggered and Bulk scenarios.
Contact field editor block allows you to change the value of a contact’s custom field. Contact fields store subscriber details and data you would need for personalized communications — for example, a name, birthday, company name, interests, customer status, or bonus balance.
Use the Contact field editor block to:
- Update subscriber information stored in the contact card,
- Record the date when the contact passes this block,
- Calculate points for a quiz or loyalty program.
Contact field editor block set up
Add the Contact field block to the workspace from the toolbar menu below or by right-clicking the workspace.
Next, select the field you want to edit. You can select an existing custom field or create a new one.
You can add up to 200 custom fields.
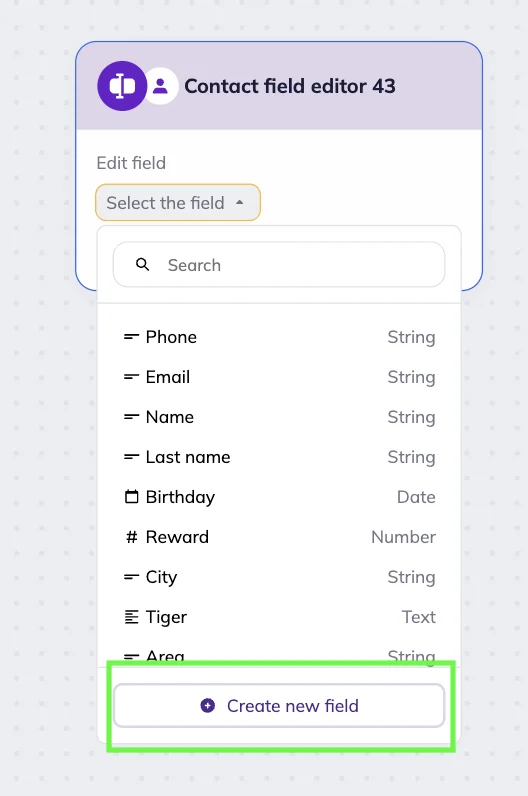
To create a custom field, click the Contacts in the main menu → Tools → Custom fields → Click the “Create new field” button.
To create a new custom field directly from the Contact field editor block, click the “Edit field” dropdown menu in the block settings → Click the “Create new field” link at the bottom of the list.
Then, in the pop-up window, fill out:
- Field name. Shown in your contact lists and contact card.
- Variable. Used in your emails as a merge tag. You can use Latin letters, numbers, and underscores, without spaces. The first character must be a letter. Variables are case-sensitive, so “Code” and “code” will be two different variables.
- Field type. Defines the format of data this field will store.
Click the “Create” button. A new field will be automatically added to the field list in the block’s dropdown menu. It will also be added to contact cards.
You can create custom fields of the following types:
- Text — a long text of up to 5,000 characters. Suitable for storing survey responses or customer preferences.
- String — a short text of up to 255 characters. Useful for short inputs like city names or promo codes.
- Number — an integer or a number with a decimal point, with or without a sign. Use it to store figures like order totals, discount percentages, or the number of purchases a customer made.
- Date — a field with a date picker. Ideal for tracking birthdays, subscription start dates or deadlines.
- Yes/No — a checkbox field. It can be used to specify subscription consent or promo participation.
- Radio button — selecting a single value from a set of options. Suitable for structured data like industry, preferred mailing lists,or gender.
Then, select the corresponding action in the Contact field editor block. Depending on the type of the field, you can set up different actions:
| Field type | Available actions |
| Text / String / Yes-No / Radio button |
|
| Number |
|
| Date |
|
Contact field actions
Depending on your goals and custom field types, you can choose different actions to change a field’s value.
Change to a new value
This action is available for the Text, String, Number, Yes/No, and Radio Button field types.
Use the Change to a new value action to record important customer data (e.g. if they clicked a button with a specific answer, agreed to receive emails, or provided information like their hobby or city).
In the Contact field editor block, select the field you want to update → Choose “Change to a new value” from the “Select action” dropdown menu → Enter the new value.
With Text and String field types, you can click the “Merge tags” icon — { } (curly braces) and insert an existing field value (for example, if you have it from a different scenario). You can mix regular text with other field values at the same time. For example: “Favorite place in the city — {city} {street}.”
Character limits:
- Text fields — up to 5000 characters
- String fields — up to 255 characters
When a contact reaches the Contact field editor block, the system automatically updates the value in the custom field.
Example: Tracking client preferences (Bulk scenario)
Let’s say a real estate agency launches a new email campaign to promote a Miami listing — a condo building with an ocean view. To track client interest, the agency creates a custom field called “Last offer viewed.”
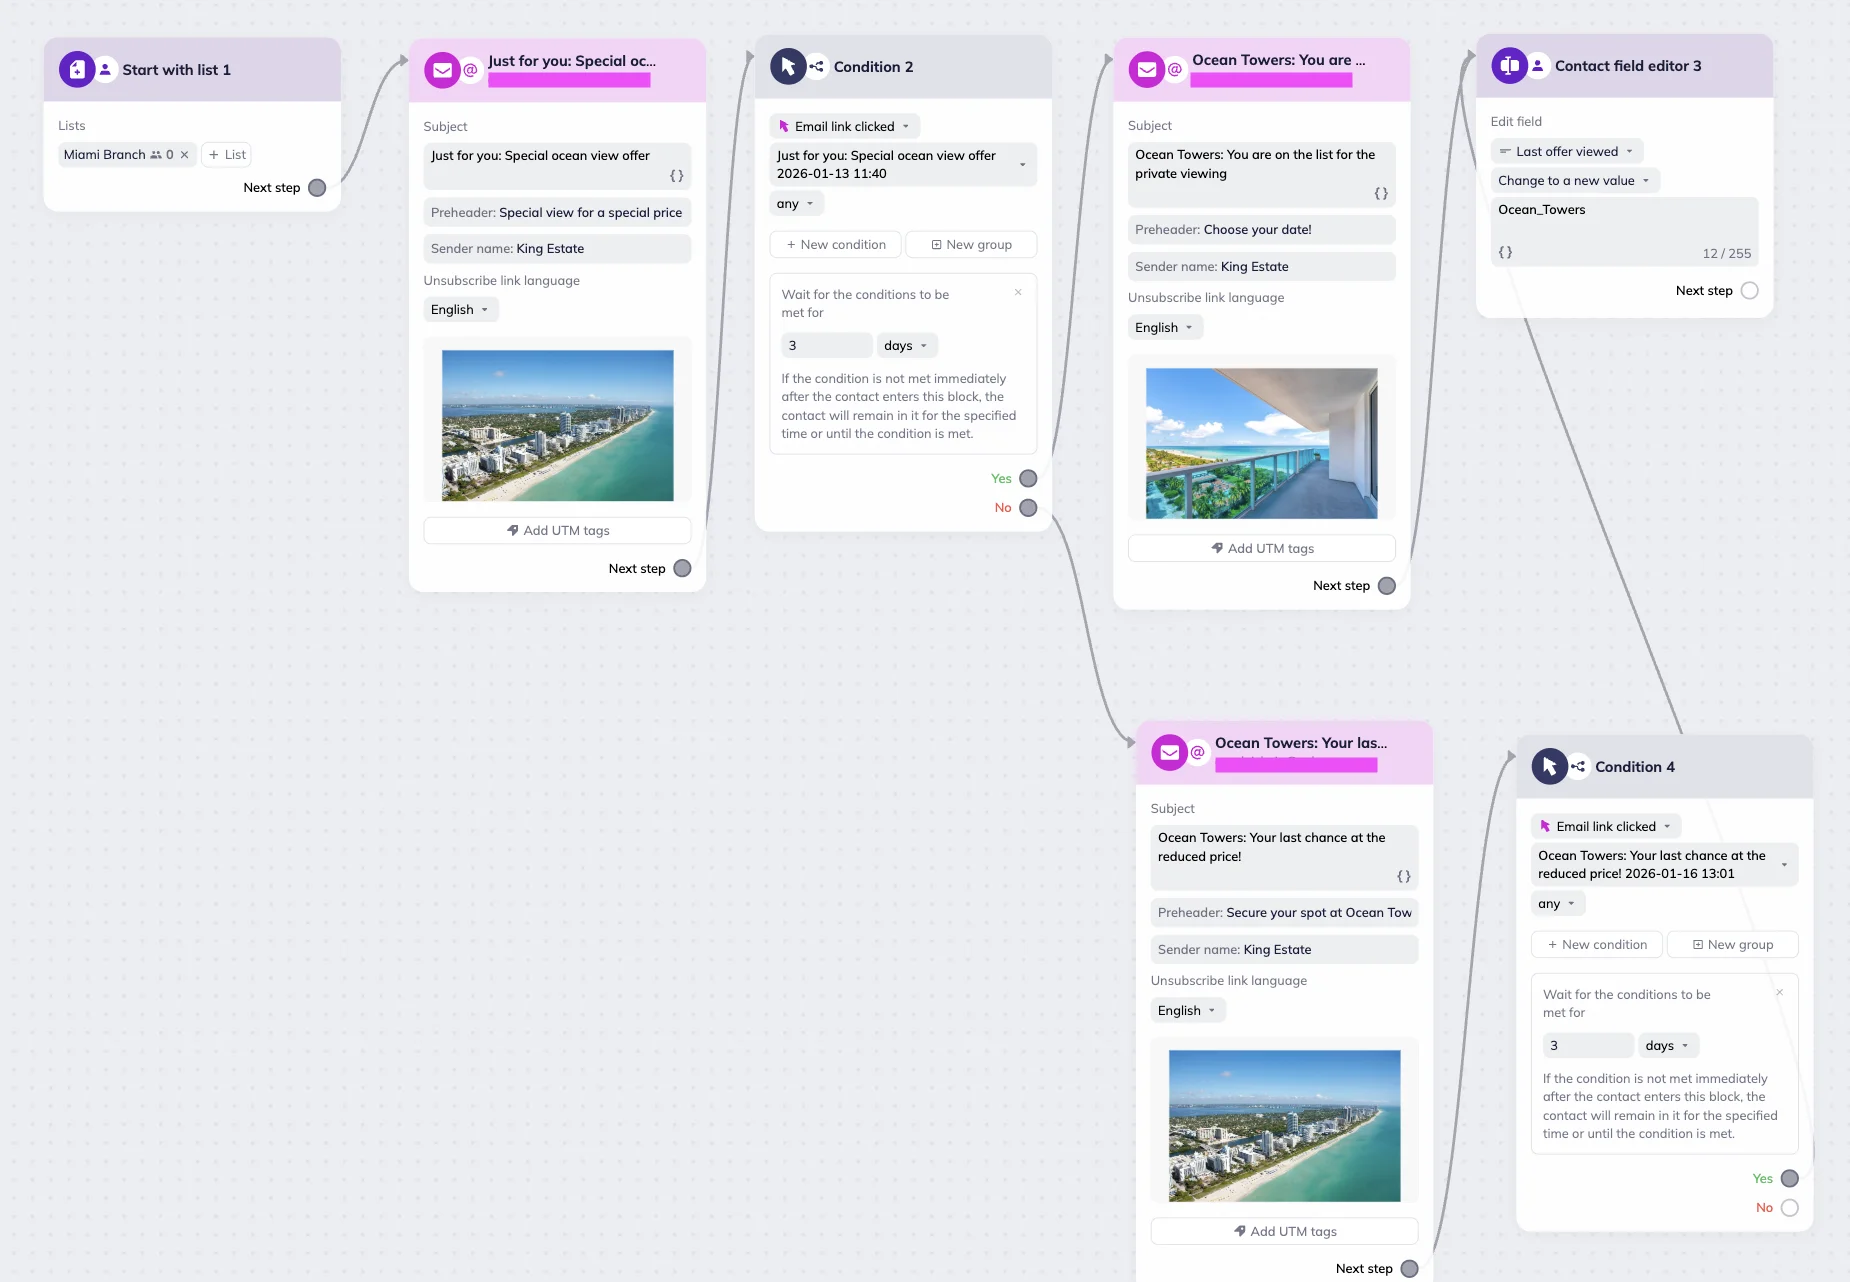
They then set up a Bulk scenario and send a promotional email to their Miami branch contact list. If a client clicks the link in the email, they receive an invitation to a priority viewing. At the same time, the system updates the “Last offer viewed” field to “Ocean Towers.” This way, even if the deal doesn’t go through, the agency still knows what type of property the client was interested in and can use this information for future segmentation.
If a client doesn’t click the link within three days, they receive a reminder email. If the reminder catches their attention and they click the link, they’ll also receive an invitation to the priority viewing, and the custom field value will be updated accordingly.
Example: Updating clients data (Triggered scenario)
Let’s say a car repair shop wants to update its contact list and re-engage dormant customers. They use their Telegram bot to send a message to customers in the Inactive segment, asking what type of car they currently use.
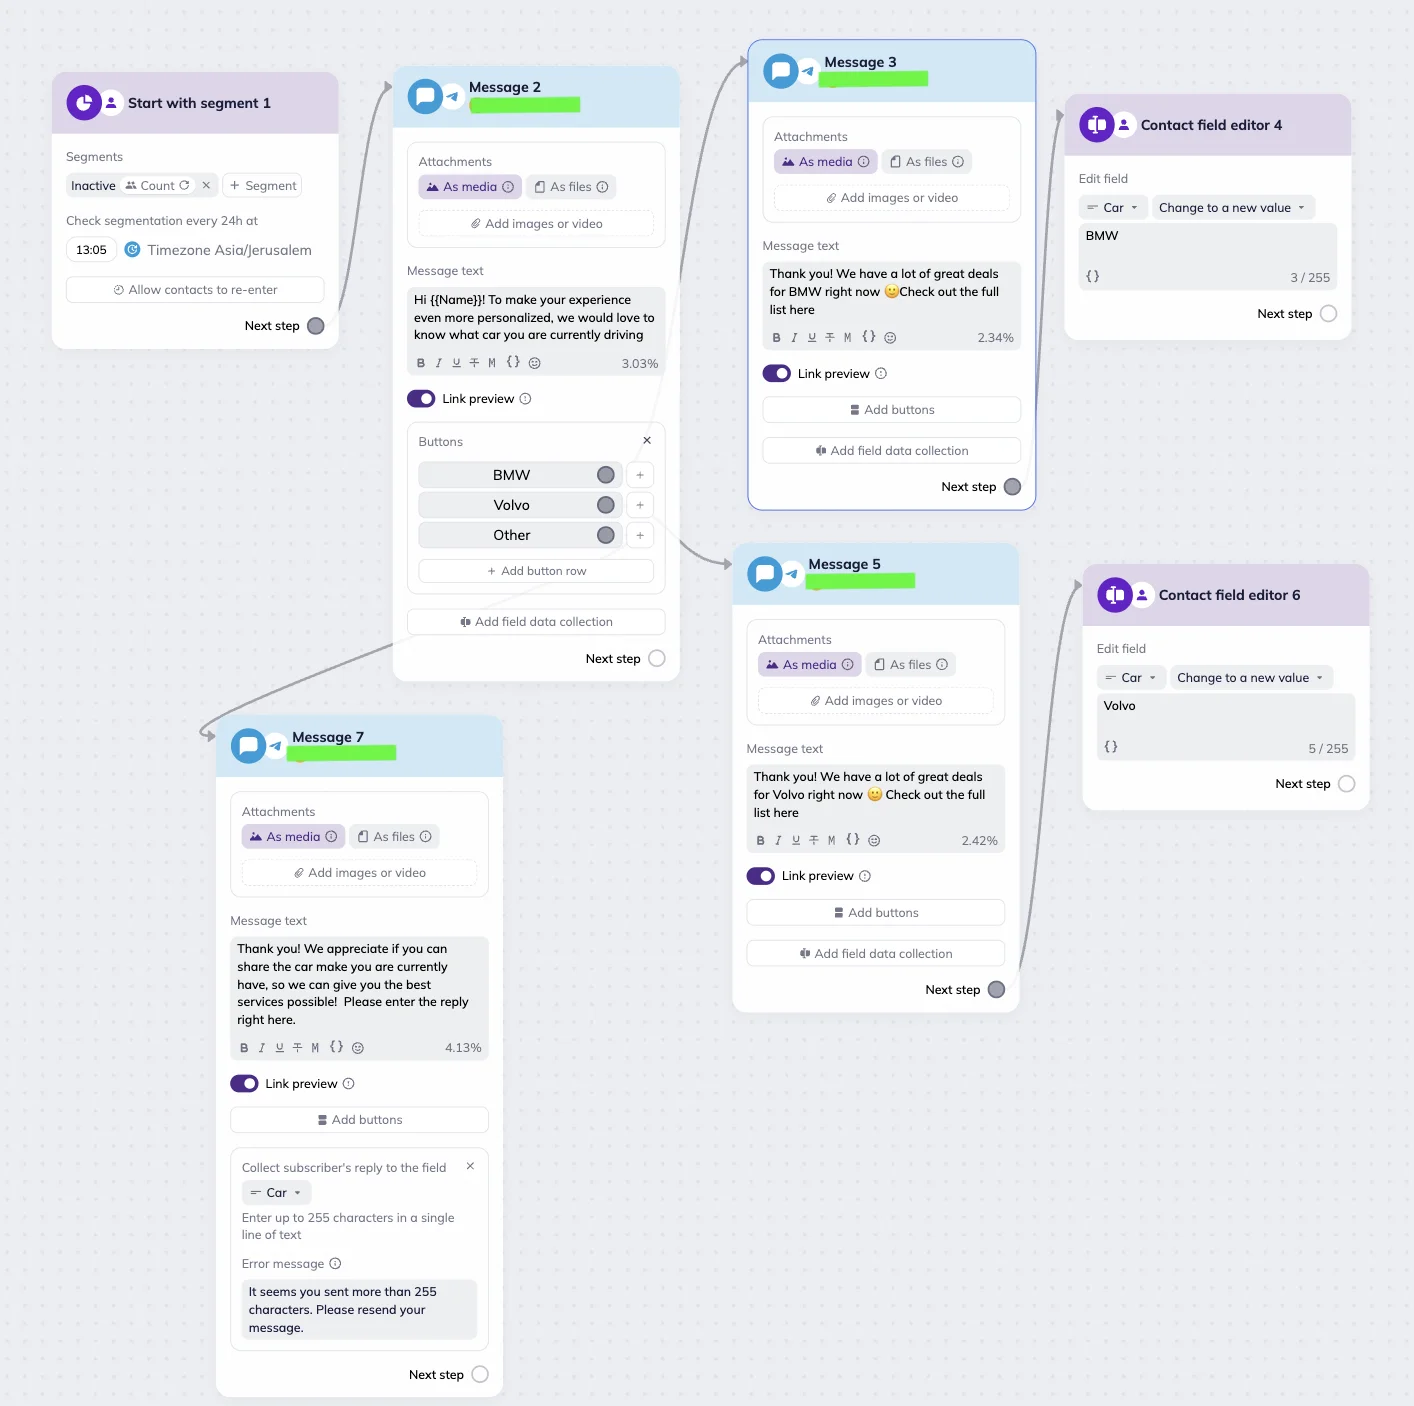
The shop provides three options. If a customer selects BMW or Volvo, they receive a tailored list of offers for that brand, and the system automatically updates their contact card. If a customer selects Other, they receive a follow-up message asking them to share their car make, and their reply is saved in the Car custom field.
Clear a value
This action is available for the Text, String, Number, Date, Yes/No, and Radio Button field types.
The Clear a value action removes the current value from a custom field. Use this to reset or clear data — for example, a status, or bonus points.
In the Contact field editor block settings, select the field you want to clear → Choose “Clear a value” from the “Select action” dropdown menu.
When a contact reaches the Contact field editor block, the system automatically clears the value in that custom field.
Add or subtract a number
These actions are available for the Number field type.
With these actions, you can add a specific value to the current field value or subtract a new value from it — for example, to award points for completing a quiz or deduct a bonus balance.
In the Contact field editor block settings, select the Number-type field you want to update → Choose “Add number” or “Subtract number” from the “Select action” dropdown menu.
Next, enter the value to apply. Only whole numbers and decimals with a dot are supported (e.g. 2 or 1.5). Spaces or special characters are not allowed.
When a contact reaches the block, the system recalculates the field automatically.
Example: Online store credits
Let’s say an online bookstore uses a Number-type custom field called “Reading credits.”
To encourage engagement, the store gives subscribers 1 credit each time they click a link in an email that leads to a new article, excerpt, or book chapter. Over the year, subscribers can collect up to 52 credits and redeem them for discounts, new books, or gift cards.
To set this up, the bookstore places a Contact field editor block after an “Email link clicked” Condition block.
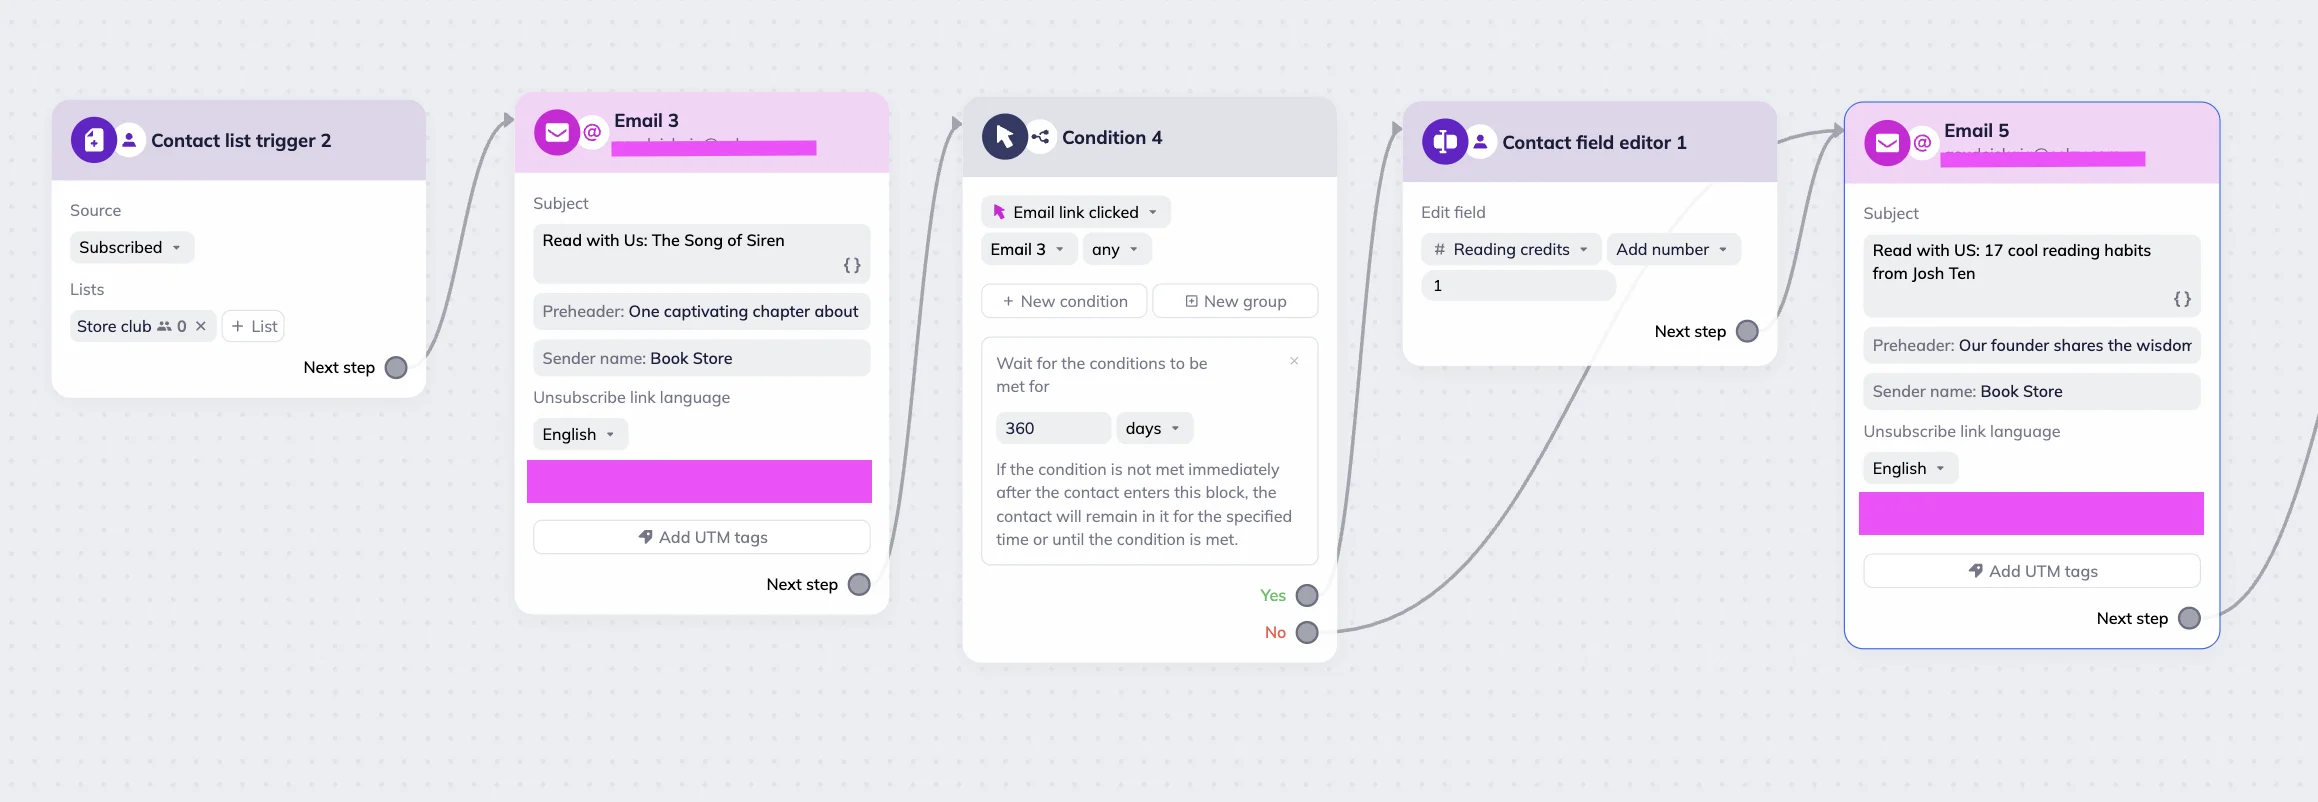
For the Yes branch, they select the Reading credits field, and choose Add a number with a value of 1. When the subscriber reaches this step in the scenario, the system automatically adds the credit — for example, increasing their balance from 12 to 13.
For the No branch, no specific action is needed. If the subscriber skipped the link, they will receive the next email without any credit added.
Change a number using a formula
This action is available for the Number field type.
This action modifies the field value using a custom formula.
Use this for more complex calculations that go beyond addition or subtraction. For example:
- Calculate bonus amount using a formula: {{purchases}} * 0.1
- Combine two values: {{survey_points}} + {{purchase_points}}
- Apply a personal discount: {{price}} - {{discount}}
In the Contact field editor block, select the Number-type field you want to update → Choose “Change by a formula” from the “Select action” dropdown.
Next, enter the formula. To save time, click on the Merge tags icon and operator icons in the field menu.
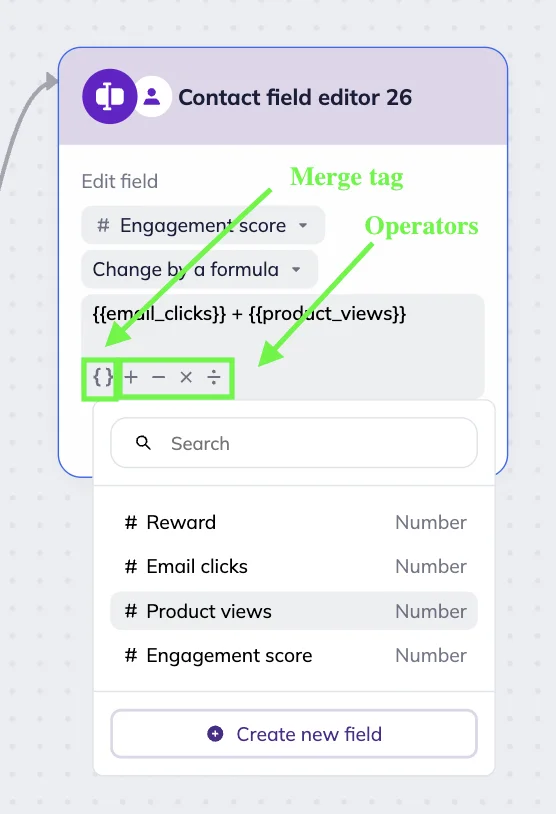
Formula must follow these rules:
- Use whole and decimal numbers with a dot only (10, -2, 3.14)
- Allowed operators: +, -, *, /
- You can’t start or end a formula with an operator (+10, 5*)
- No repeated operators (10 ++ 5, 5 // 2)
- Use merge tags of numeric fields without extra space or typos (e.g., {{bonus}})
- Maximum formula length: 255 characters
When a contact reaches the block, the system recalculates the field according to the formula.
Change or replace a date
These actions are available for the Date field type.
Depending on your goal, you can:
- A specific date you set manually — for example, the start date of a course
- A date from another block — for example, the date a contact completed a survey, registered for a webinar, or clicked a button
In the Contact field editor block, select the field you want to update.
Depending on your goal, choose “Change date” or “Replace with the date from another field” from the “Select action” dropdown.
Set a date manually or select a custom field to replace the date from.
When the contact reaches the block, the system automatically replaces the date according to your settings.
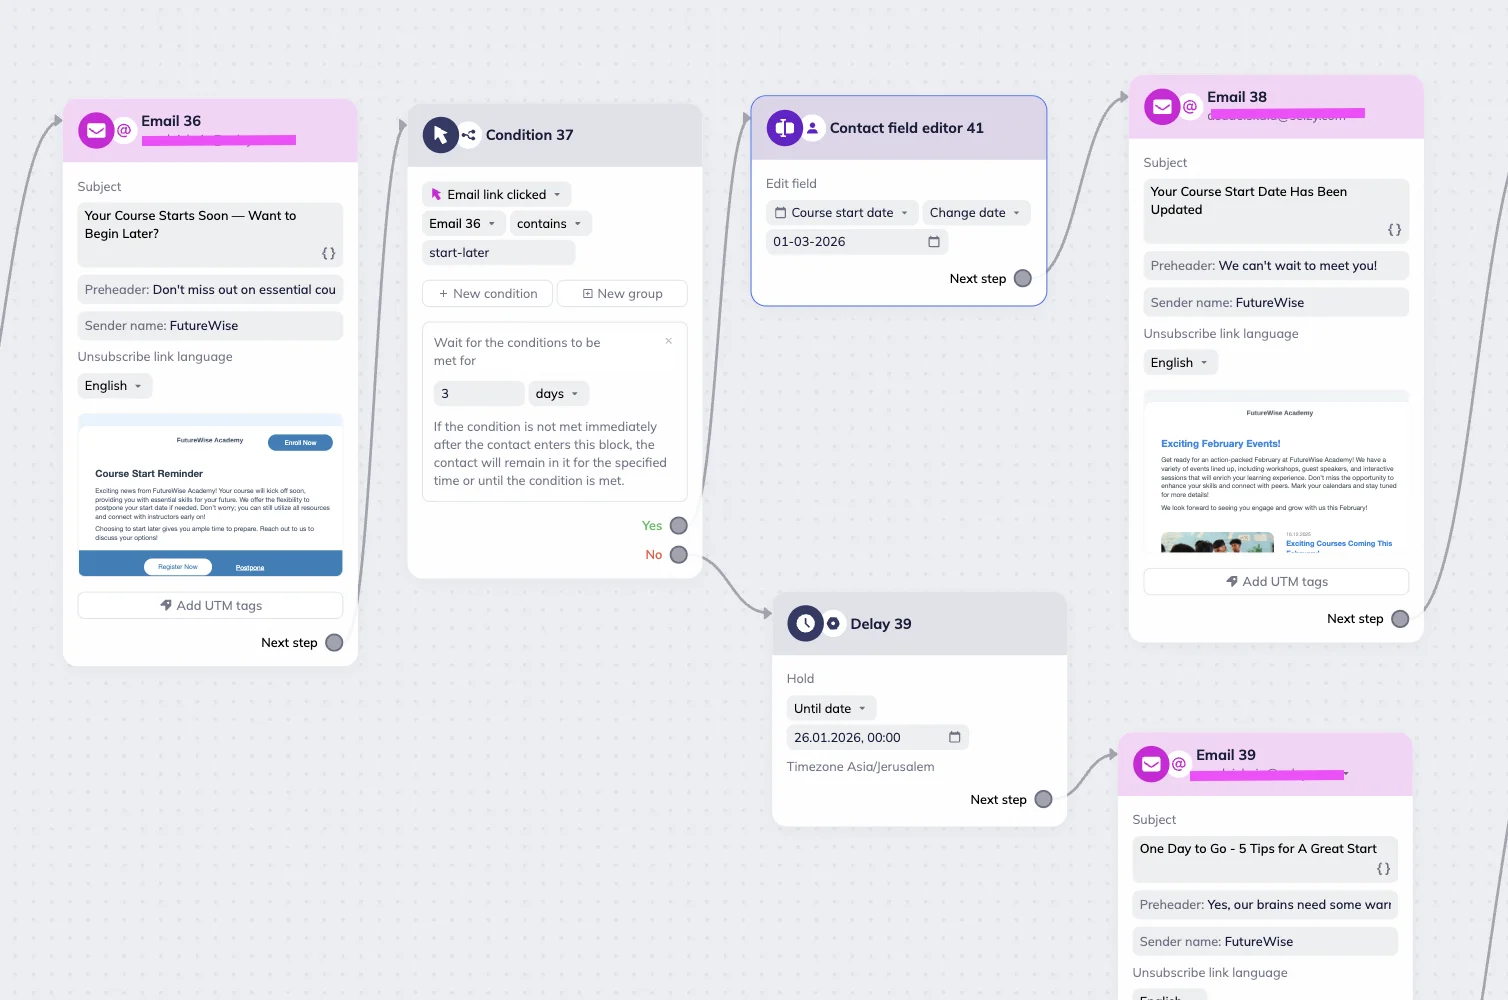
Example: Course start date change
Let’s say a course platform gives subscribers the option to delay the start of their program. Subscribers receive the reminder email “Your Course Starts Soon — Want to Begin Later?” with a link saying “Want to change the date to March 1st? Click here.”
When a subscriber receives the email, the system checks for the click and waits up to 3 days for the action to occur.
If the link is clicked, the contact hits a Contact field editor block where the Course start date field is updated using the Change date action. In this example, the start date is changed to March 1, 2026. After the date is updated, the subscriber receives a confirmation email letting them know their start date has been changed.
If the link is not clicked, the course start date remains unchanged, and the subscriber continues through the standard course onboarding.
Here is what the relevant part of the scenario looks like.
Set the date of the block passing
This action is available for the Date field type.
This action automatically records the date when the contact passes the Contact field editor block in the scenario.
Use this action to store the key milestones such as registration date, survey completion date, or any other important action in the scenario.
In the Contact field editor block, select the Date-type field you want to update → Choose “Set the date of the block passing” from the “Select action” dropdown.


