To make sure that your emails reach your subscribers’ inboxes and not their spam folders, it is important to properly set up the email you will use for email marketing.
If you send emails from freemail domains like @gmail.com, your campaigns are more likely to end up in spam.
Some email service providers prohibit bulk emails from freemail domains, so if you do that, your campaign will be rejected by the recipient's service and the email will not be delivered. This is because freemail domains are meant for personal use, not for business.
Selzy allows limited use of freemail domains, mainly for testing purposes. We strongly recommend creating a professional email at your domain and setting up email authentication, if you are planning to send regular campaigns with Selzy.
If you already have a corporate email address, go to the "Set up email authentication" section and follow the setup instructions.
To set up your corporate email address, you will need a website and access to the control panel of the website hosting.
Register a professional email address
The campaigns sent from a professional email address, such as @uber.com or @booking.com, don’t raise suspicions in email service providers.
If you already have a professional email address, go to the “Add your email to confirmed emails” section and follow the setup instructions.
If you want to register a professional email using Google, follow their instructions on how to create an email address at your domain.
To set up a professional email address, you will need a website and access to the control panel of the website hosting.
The benefits of email authentication
Email authentication is the process of verification of an email sender. It is used to improve sender reputation and campaigns deliverability.
If you want complete control over your campaigns’ deliverability and sender reputation, we recommend using a dedicated IP.
Email authentication works as an ID. Email service providers check whether you have authentication or not and decide whether to allow a campaign to go to their inboxes or not. If you set up authentication, the fraudsters won’t be able to send emails using your domain name.
Authentication gives you two benefits:
- Increases the chances for your campaigns to end up in the inbox. Authentication helps an email provider understand who sent the email — a reliable sender or a fraudster. If you are not sending spam, your chances of getting into the inbox grow.
- Allows you to use postmasters. Postmaster Tools from Gmail is an example. These are special services from email providers that show the domain reputation, the percentage of emails of ending up in spam, and the deliverability for a specified email service provider. You will not be able to access this data without email authentication.
Follow the steps below to set up email authentication. You can also watch a short excerpt from our certification course:
If you do not have enough time or experience difficulties with the process, you can always order the setup service from Selzy.
Add your email to confirmed emails
Before setting up email authentication, add a professional email address at Confirmed Emails in your Selzy account. Go to Account → Settings → Account setup → Confirmed emails.
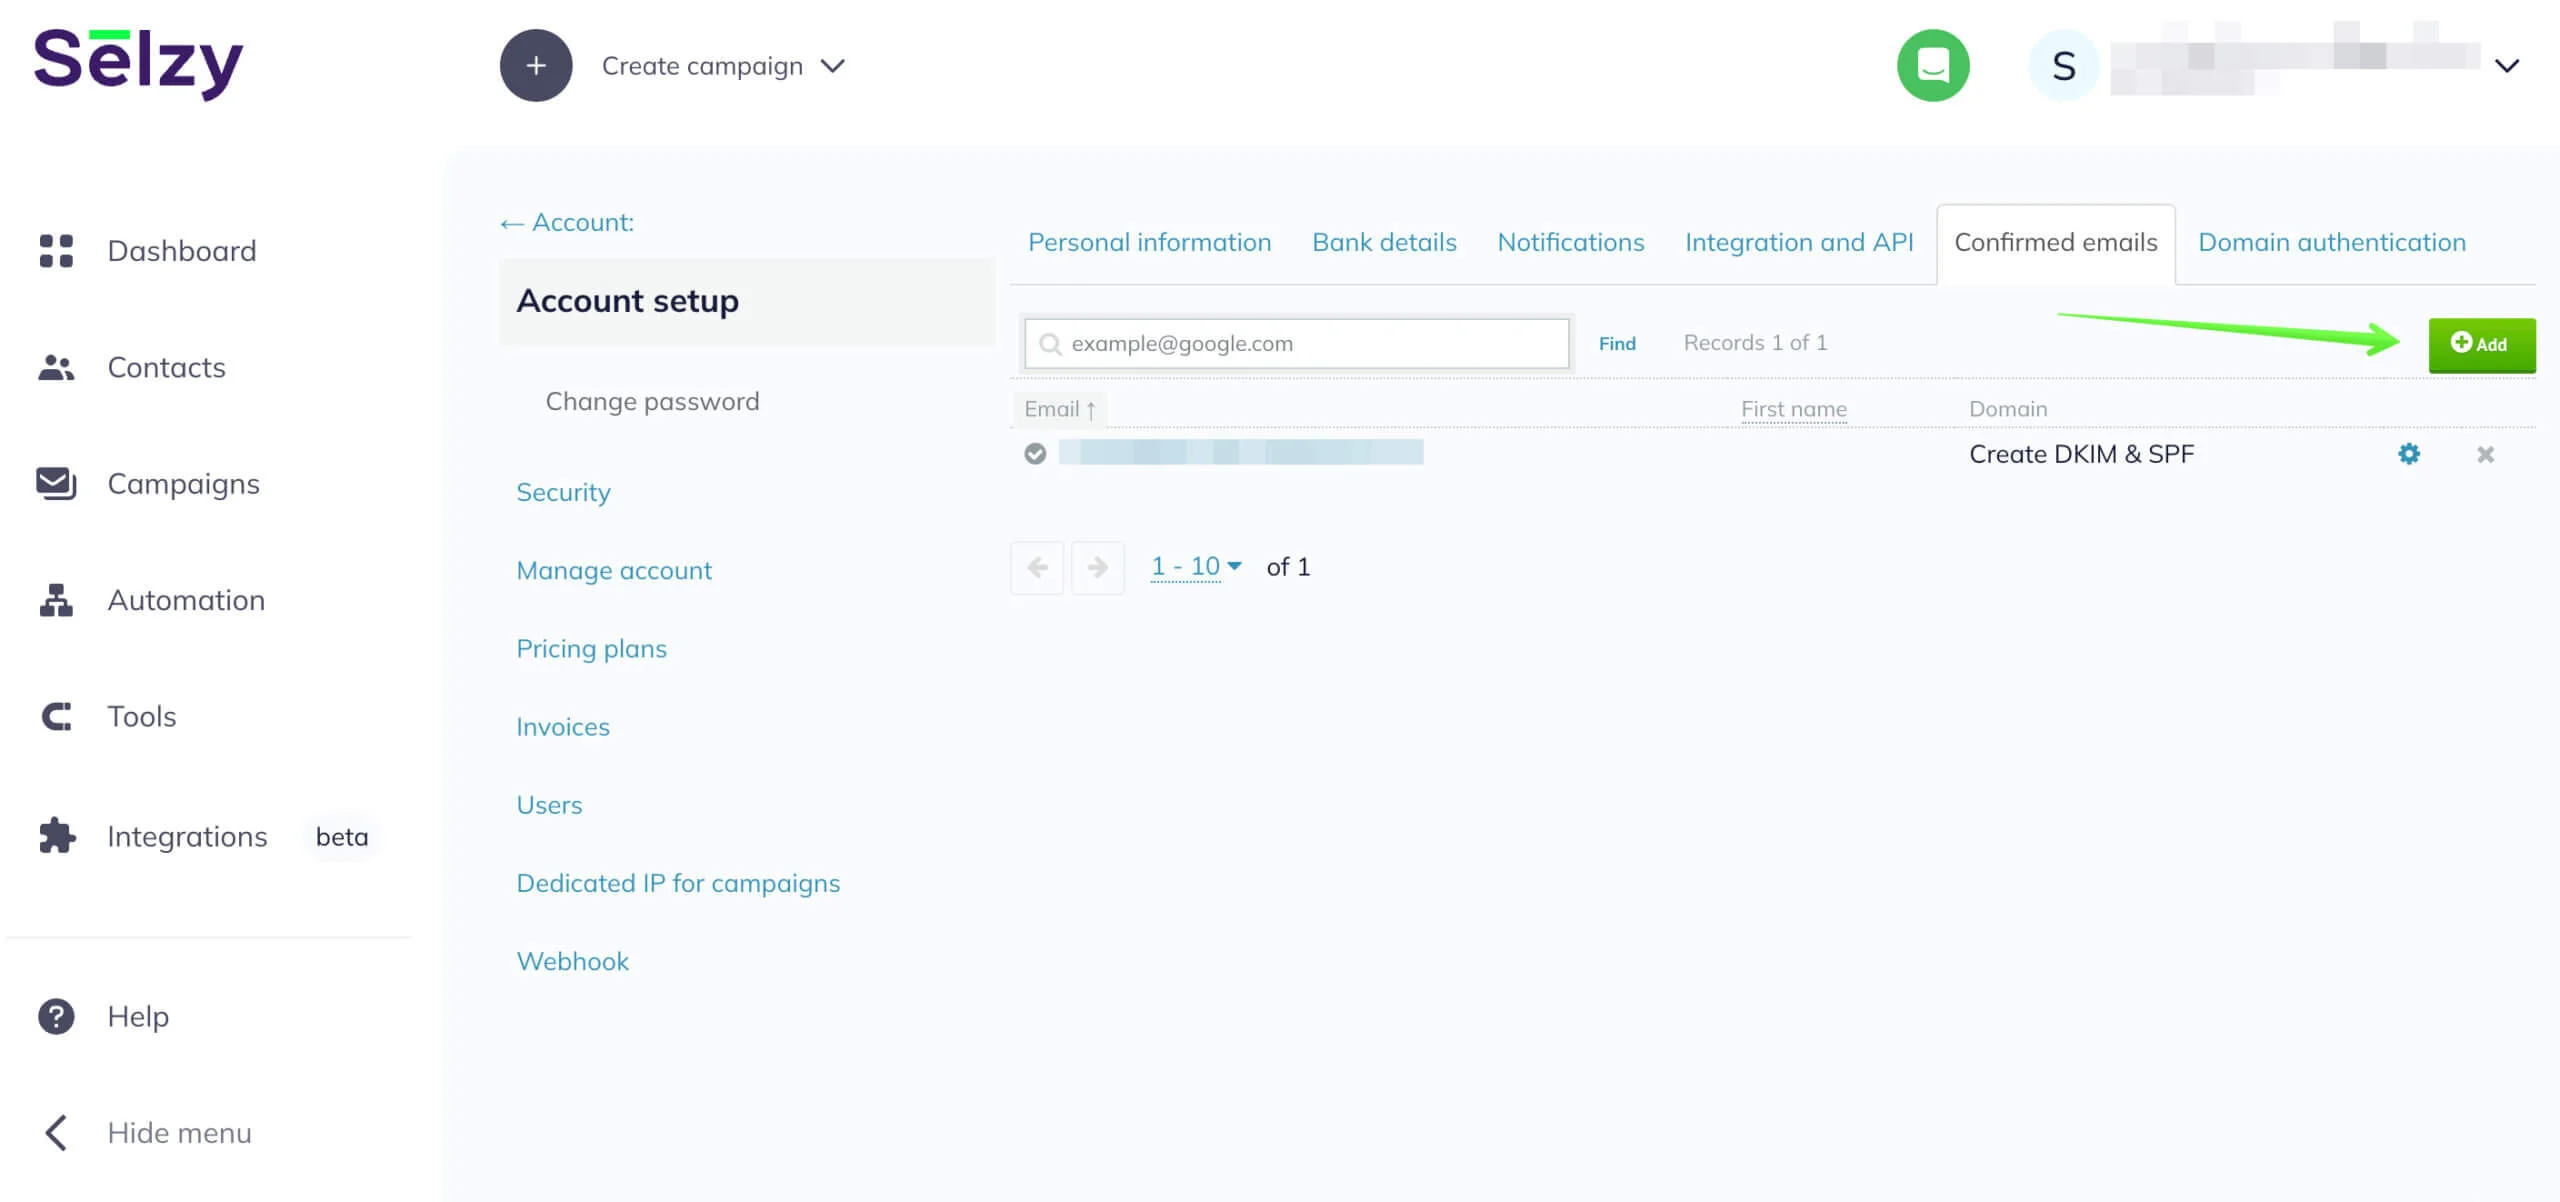
Click Add. Next, enter your email and name. In the Name field, you can enter your name or the company name. This is the sender’s name that will be indicated in your emails when sending. The name helps your subscribers to determine the sender of the campaign. You can change the sender’s name in the Confirmed emails section of the Settings.
Click the Confirm button.

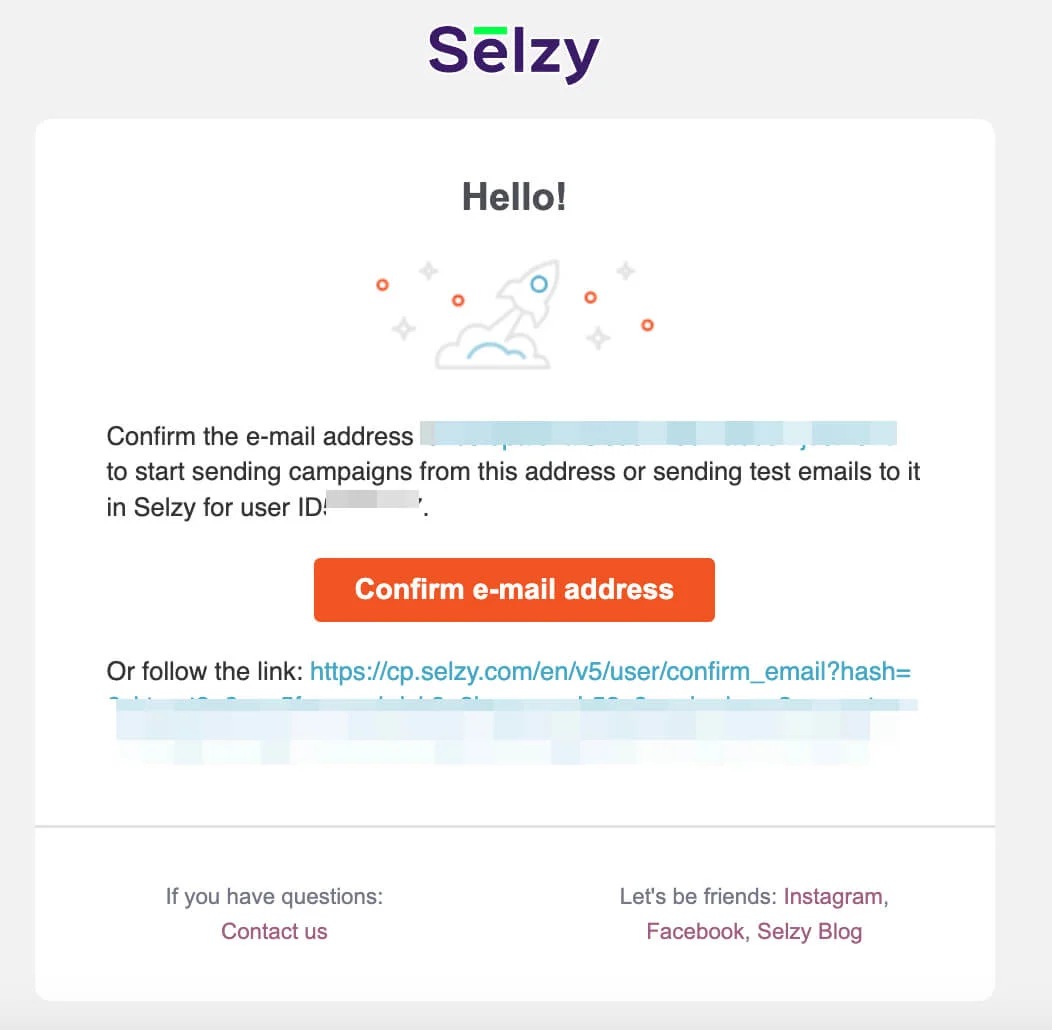
You will receive a confirmation email to the specified email address.
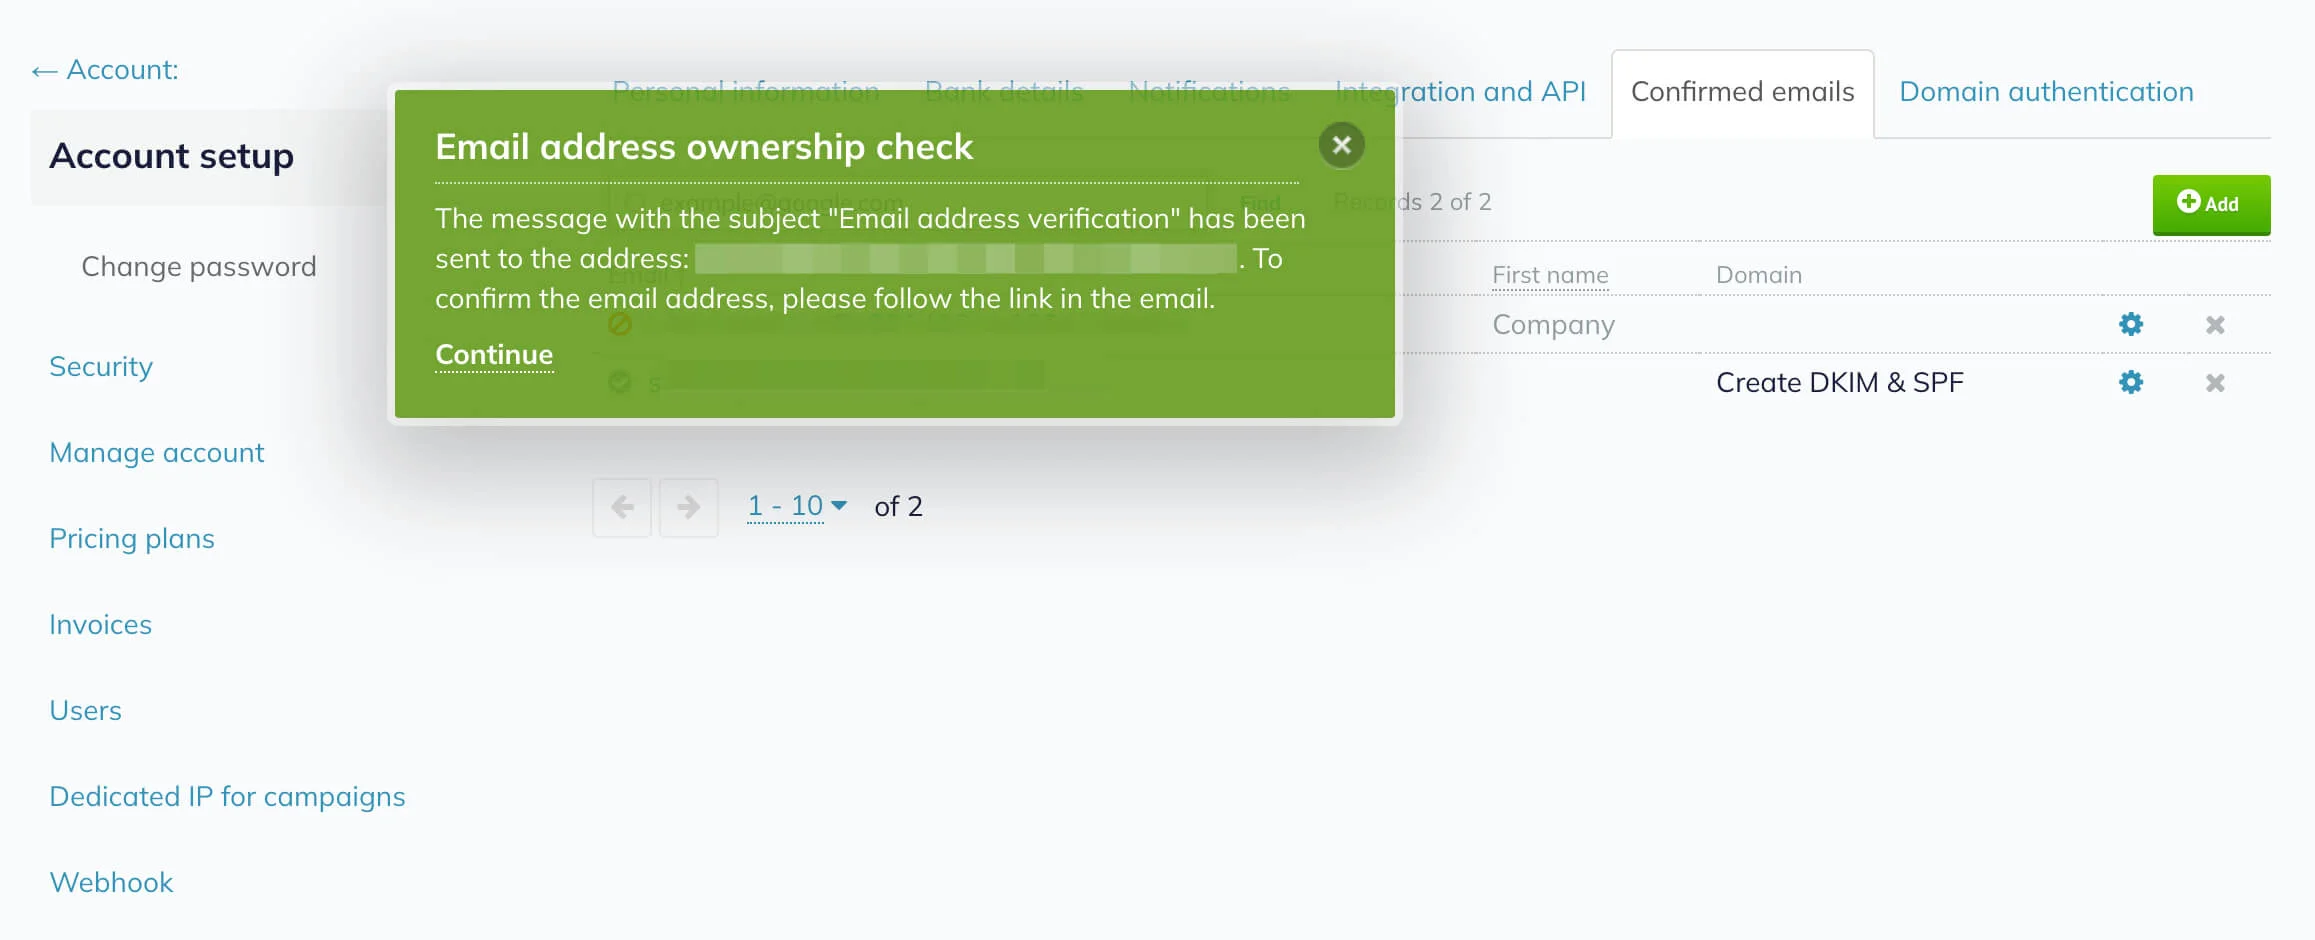
Check the inbox for the Selzy email and click on the Confirm e-mail address button.
Set up SPF and DKIM
In your Account, go to Settings and choose Domain Authentication. To set up domain authentication for the corporate email address you use to send your campaigns, click on the Create button.
You will be able to add a domain only if you have a confirmed email with this domain at Selzy.
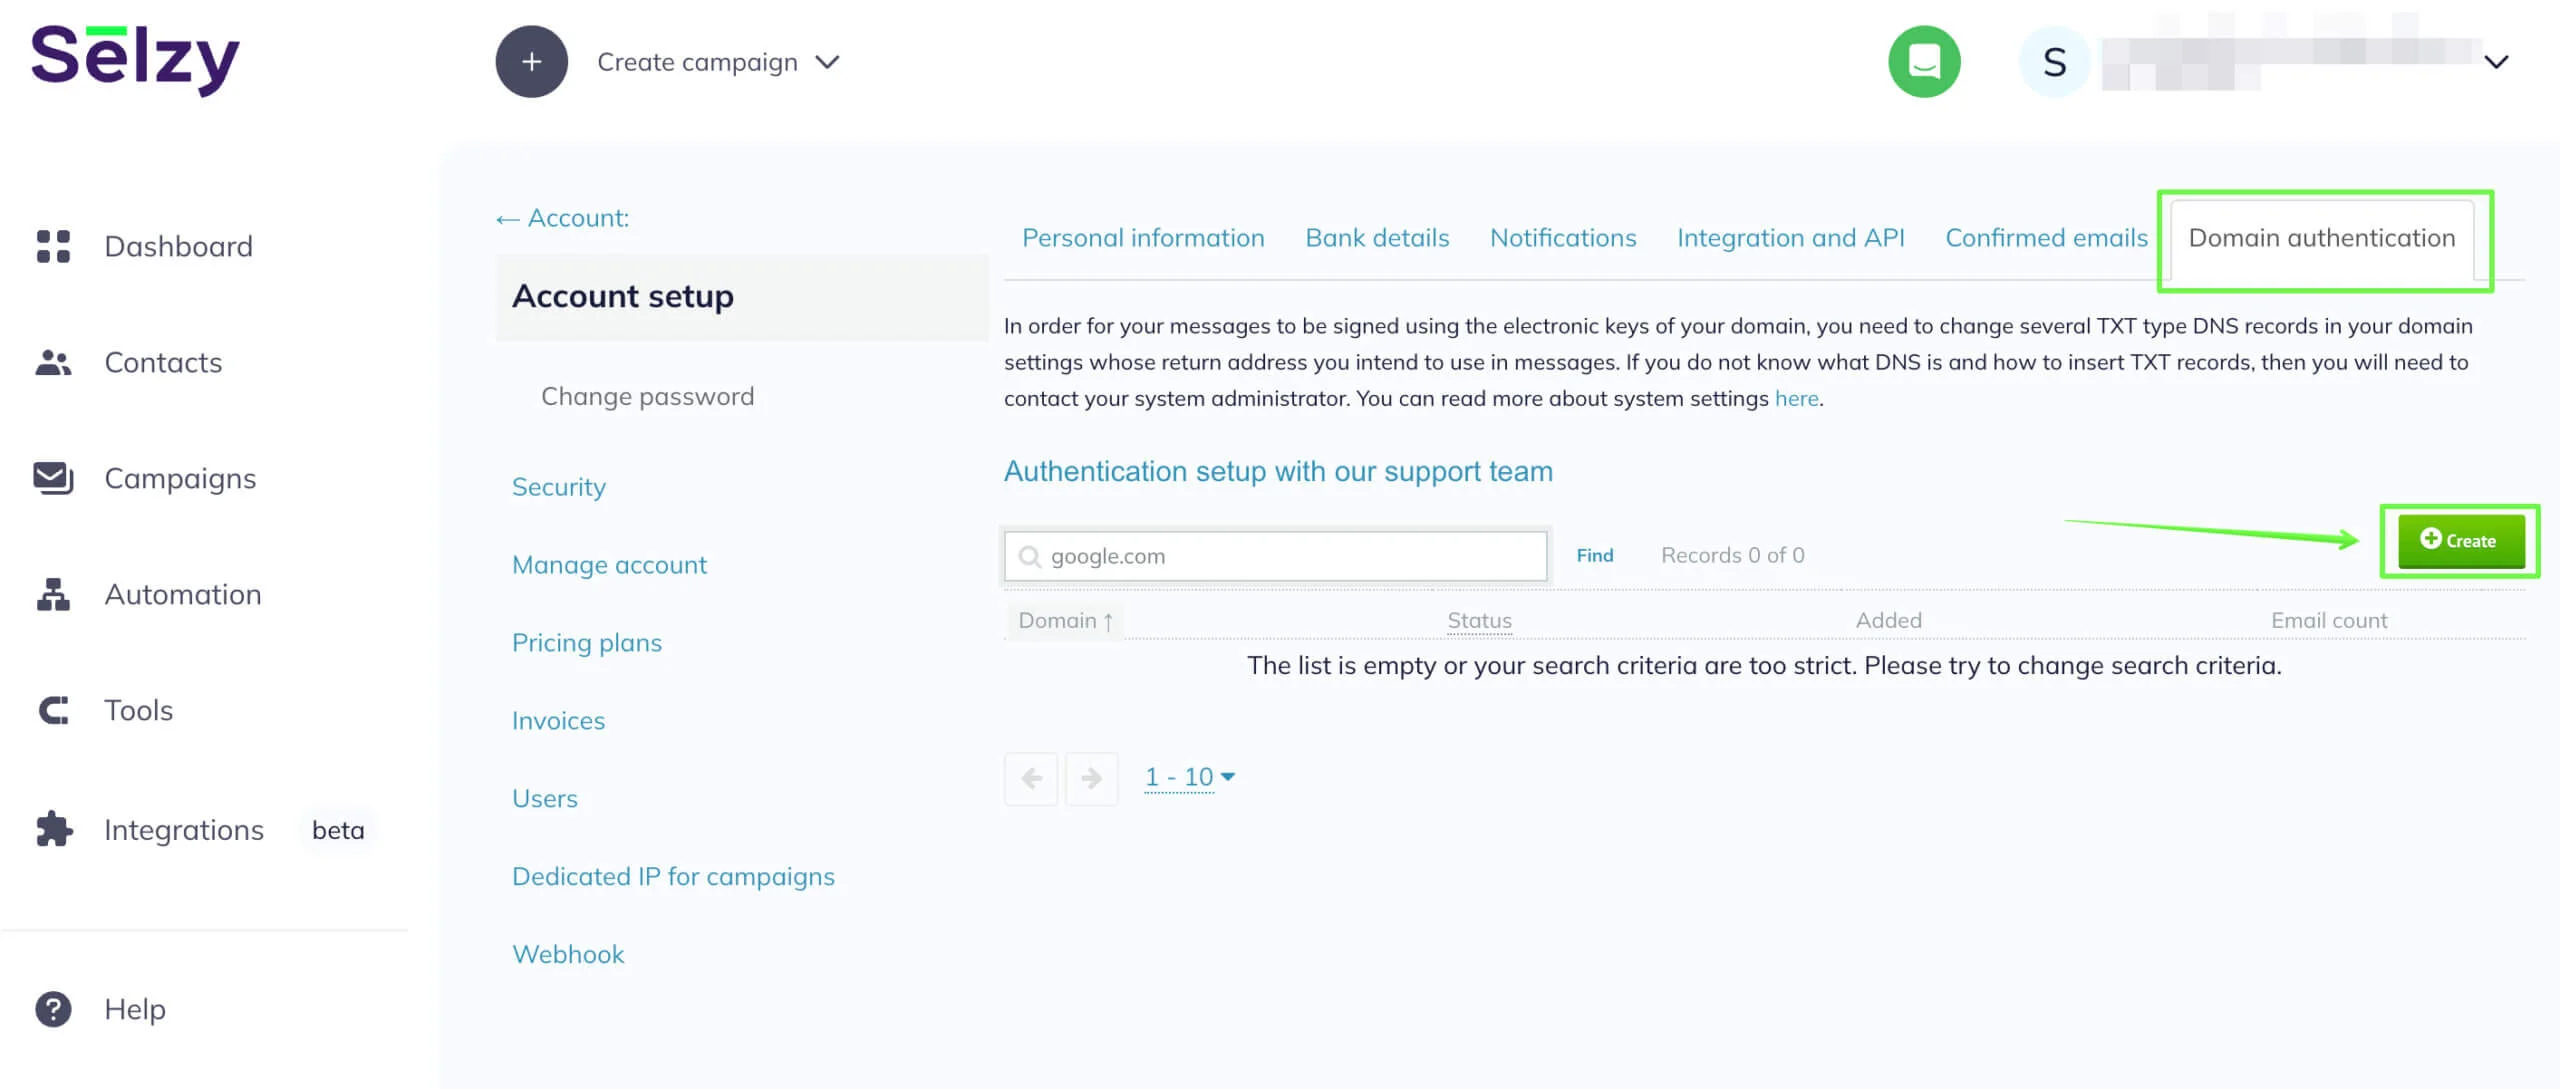
Add the domain name (the address of the website without the protocol), and click on the Obtain Settings button.
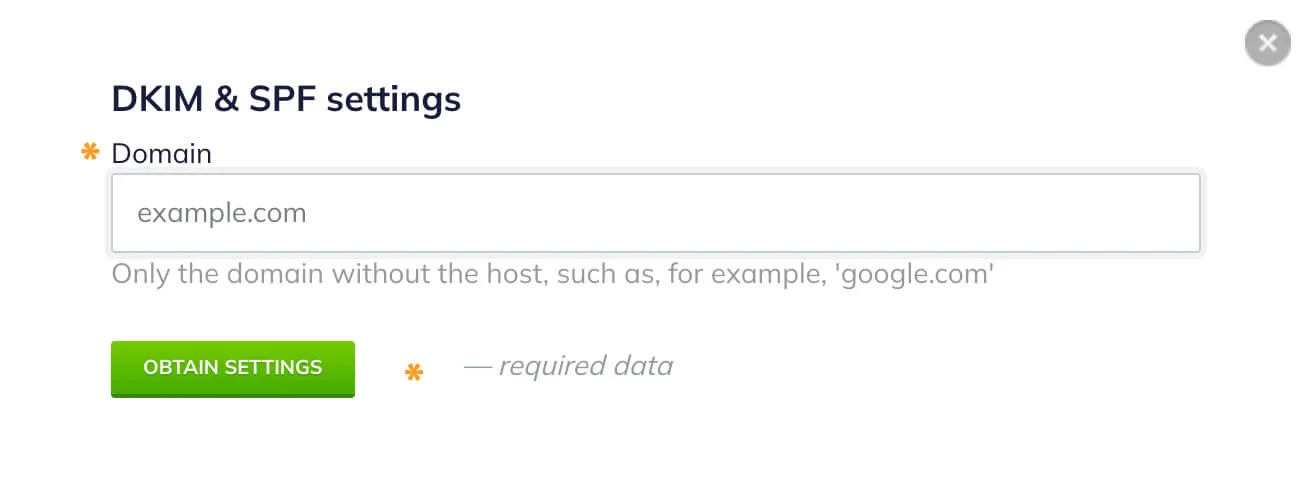
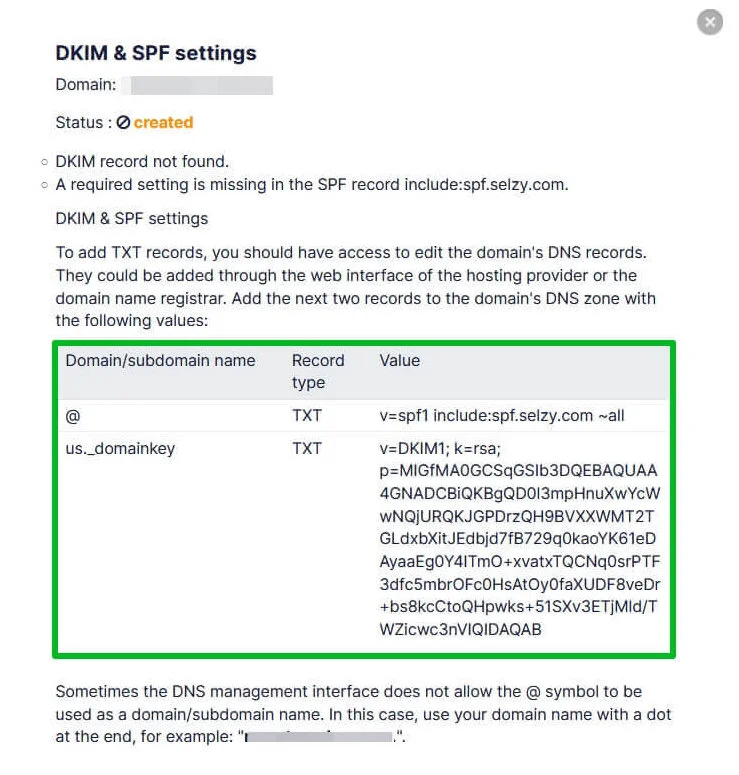
You will see the window with the information you need to copy to the domain hosting.
SPF shows which email servers are allowed to send emails on your behalf. If you use an email marketing service, you should state it in the SPF.
DKIM allows the sending server to sign your emails with a unique key. If someone decides to send an email using your domain name, they will not have this key. So email service providers will detect that and put the fraudster’s email in the spam folder.
To complete the setup of DKIM and SPF authentication, add TXT records using the information obtained from your Selzy account to your domain hosting account.
If you don't know what hosting you are using, go to NsLookup to look it up.
For example, let’s find out the hosting for Reserved.com.
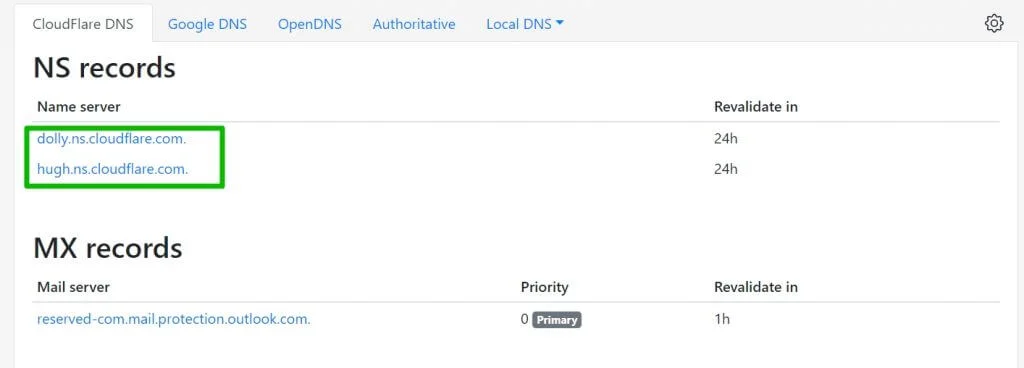
After the check-up, we see that according to NS records, the authentication should be set up in the Cloudflare hosting.
Let’s take Hostinger to show how to add records. You can do it with any other hosting, only the interface will be different.
Go to the hosting homepage, find the domain you need in the Domain tab, then click on the Manage button next to it.
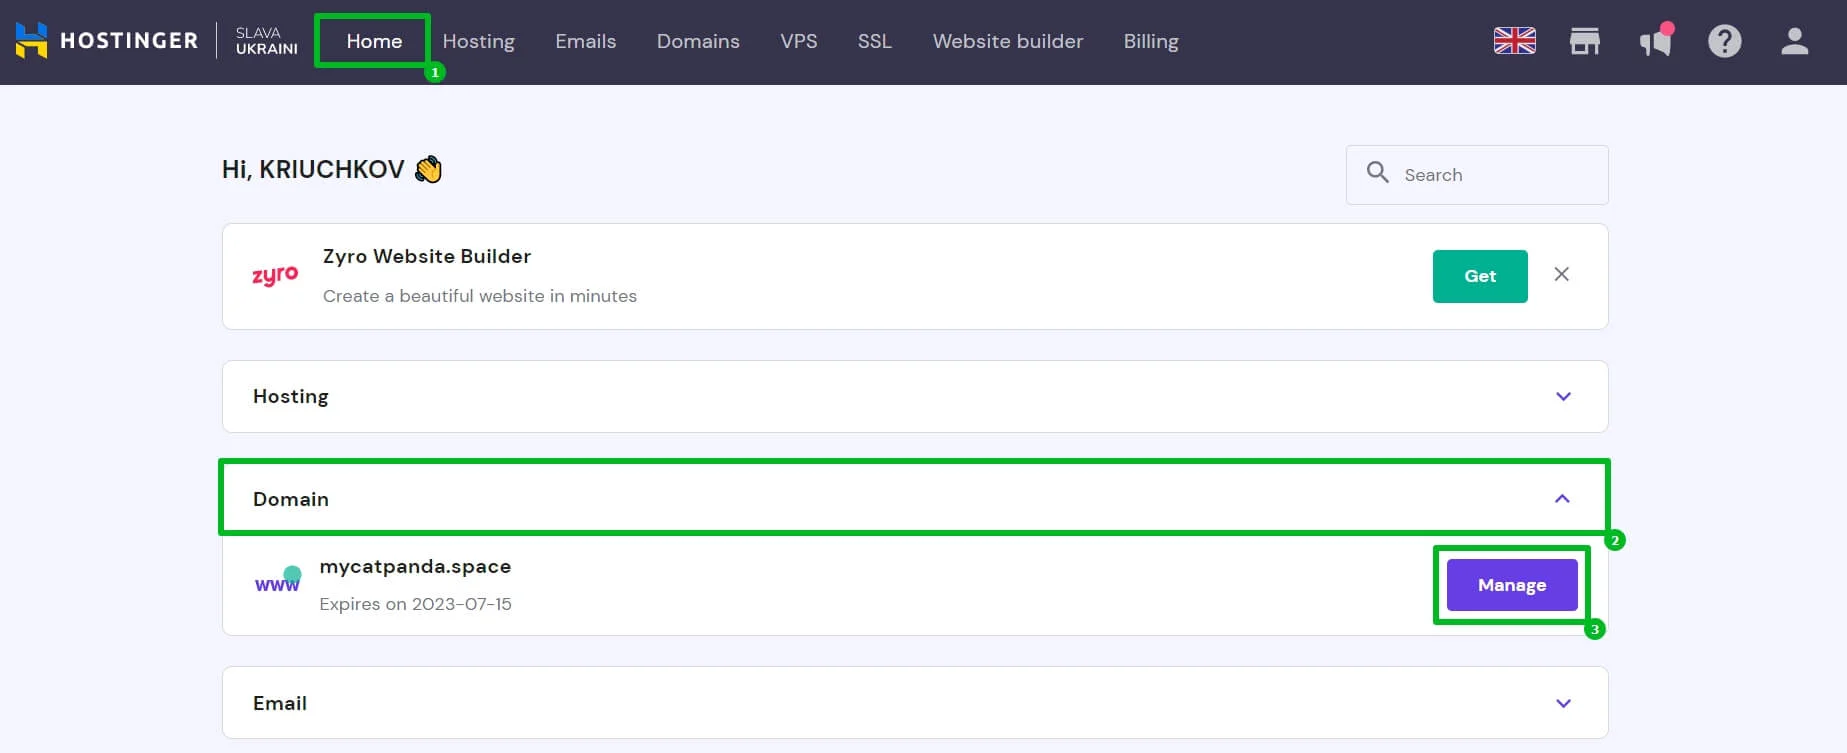
Domain management panel at Hostinger
Then, go to the DNS / Nameservers tab where you can manage DNS records of the domain.
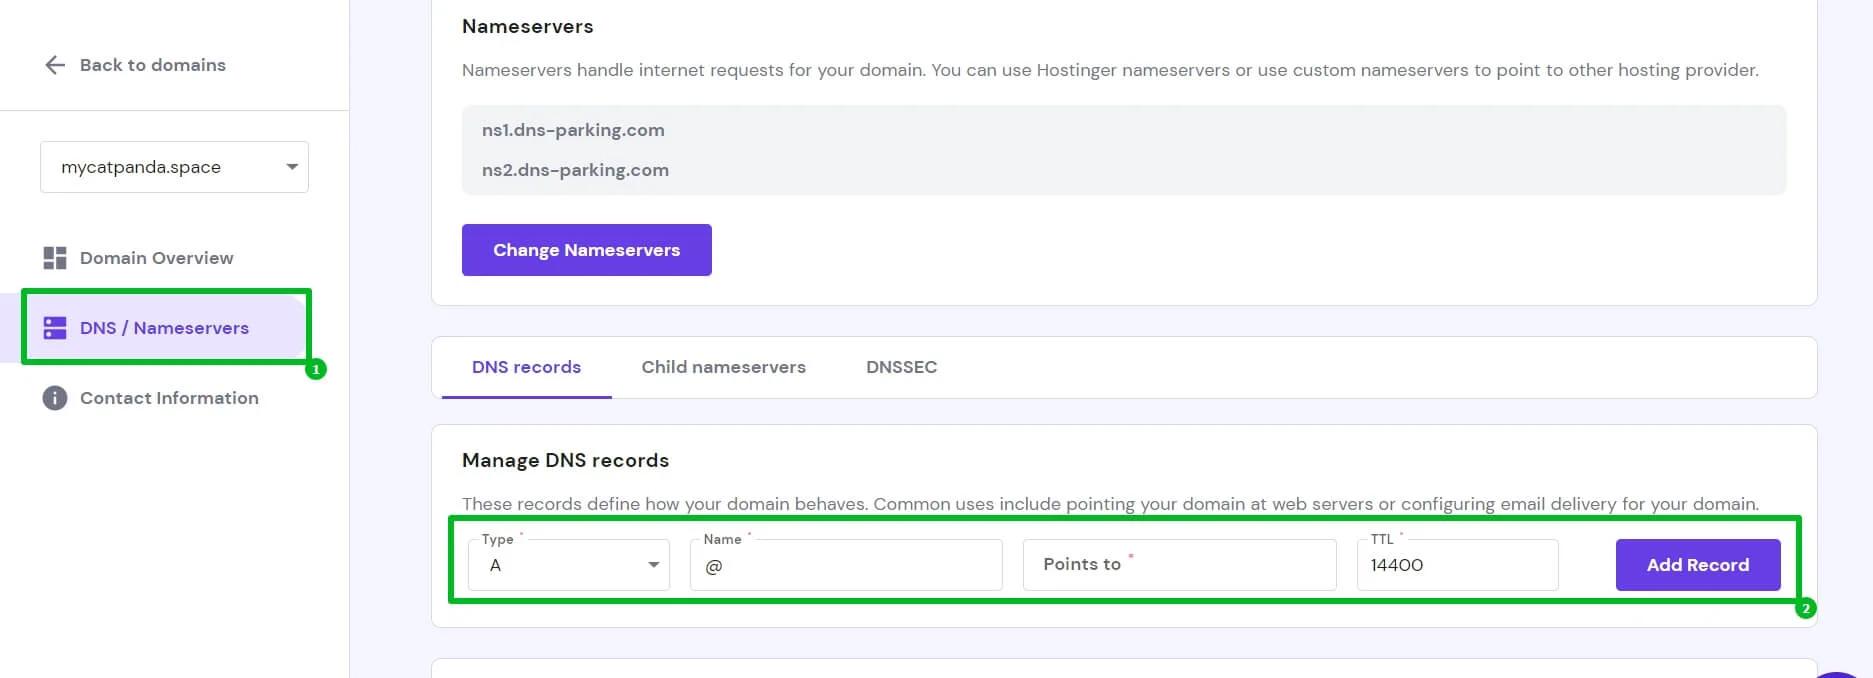
From the DKIM & SPF settings window in your Selzy account, copy @ TXT v=spf1 include:spf.selzy.com ~all and paste it to the hosting.
- @ — the name of the record (host) or subdomain. If @ is not allowed, use your domain name in the Host (Subdomain) field.
- TXT — the record’s type.
- v=spf1 include:spf.selzy.com ~all — the record’s value.
Enter the SPF record’s data into the fields. In the TTL field, you can leave the default value. This value is the record data refresh time in seconds.
Fill in all the fields and click Add Record.

Even if you use different services, you must have one merged SPF record. This record includes all services you are going to use for your campaigns.
In the example below the SPF record includes 2 services: Selzy and mail.hostinger.com.
Here is what the merged SPF record looks like

Now, you need to create another record, just as you did with the SPF record before. To create the DKIM record, take the record data from your Selzy account and add it to the hosting.
| us._domainkey | TXT | v=DKIM1; k=rsa; p=MIGfMA0GCSqGSIb3DQEBAQUAA4GNADCBiQKBgQD0l3mpHnuXwYcWwNQjURQKJGPDrzQH9BVXXWMT2TGLdxbXitJEdbjd7fB729q0kaoYK61eDAyaaEg0Y4ITmO+xvatxTQCNq0srPTF3dfc5mbrOFc0HsAtOy0faXUDF8veDr+bs8kcCtoQHpwks+51SXv3ETjMld/TWZicwc3nVIQIDAQAB |
- us._domainkey — the name of the record (host) or subdomain. The record must contain us._domainkey.
- TXT — the record’s type.
- v=DKIM1; k=rsa; p=MIGfMA0GCSqGSIb3D… — the record’s value, unique for each domain in the system. This is the DKIM key.
Some domain control panels require entering your domain (the one you are setting up the authentication for) next to us._domainkey, e.g., us._domainkey.yourdomain.com. However, for the majority of hostings, entering us._domainkey as the name is enough.
Choose the same type of record as for the SPF — TXT. Copy and paste the DKIM key in the TXT value field and click Add Record when you are ready.

After setting up the hosting data, return to your Selzy account. Go to Settings → Domain Authentication and check whether the status has changed to Enabled, signaling that the authentication is successful.
The status update takes time. You might need to wait from half an hour to a couple of hours for the status to change.
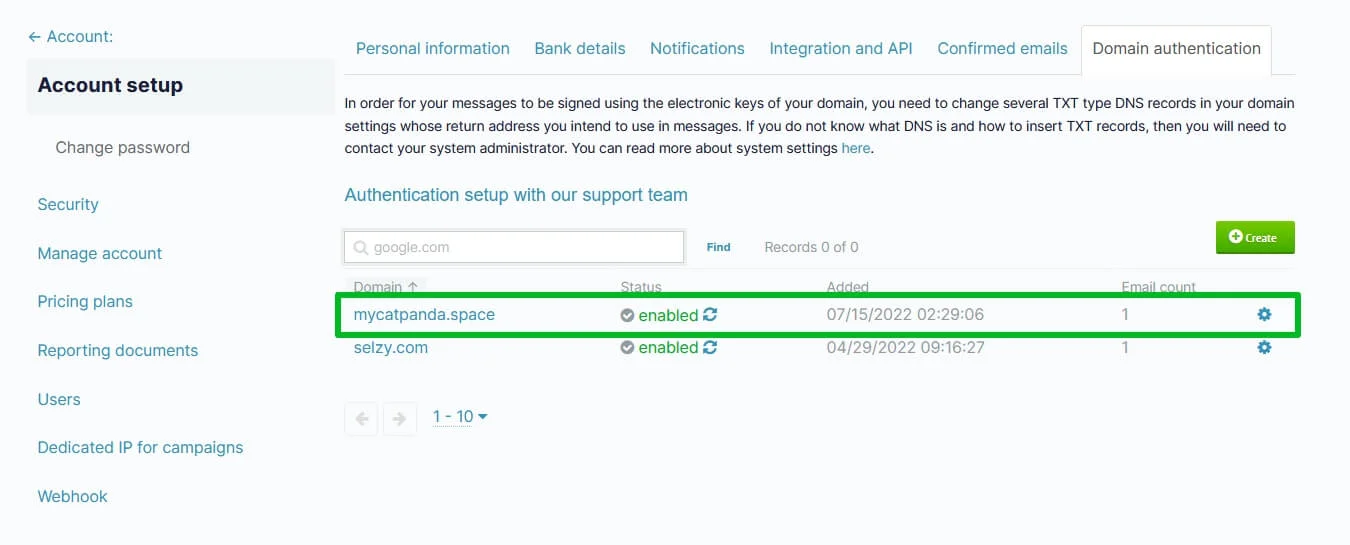
To refresh the status manually, click on the circular arrows icon next to the status.
Set up DMARC
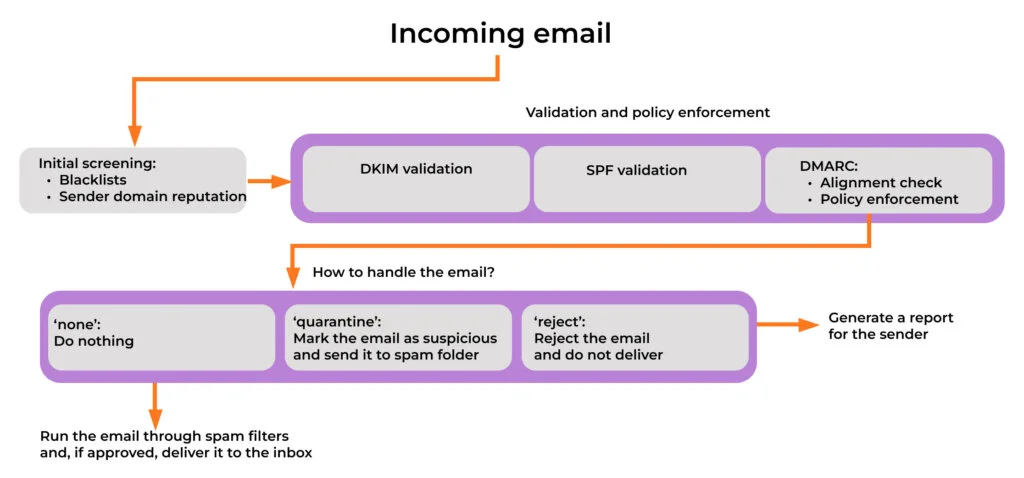
In addition to SPF and DKIM, you can set up DMARC, an additional email authentication protocol, to specify the policy for interpreting these records. The three main policies are "none," "quarantine," and "reject."
This way, email providers will receive instructions on how to handle situations where an email is sent from your domain but SPF and DKIM authentication fail, typically indicating an attempt to send spam using your domain. With DMARC in place, you will also receive aggregate reports about failed checks.
If you send more than 5,000 messages per day to Gmail accounts, you must set up DMARC to comply with the Google policies for bulk senders.
If you have configured the SPF and DKIM just now, wait for a couple of days before configuring DMARC. DKIM and SPF should be authenticating messages for at least 48 hours before you can turn on DMARC.
Unlike with DKIM and SPF, you should create a DMARC record yourself. Open a text editor and create a DMARC TXT record for your domain.
A basic DMARC record looks like this:
v=DMARC1; p=none; rua=mailto:your@email.com
- v=DMARC1 — Indicates that this is a DMARC record.
- p=none — Specifies the policy for messages that fail DMARC checks. In this example, it's set to "none," meaning no action will be taken. You can later change it, if you need to.
- rua — Specifies the email address to which aggregate reports should be sent.
Start with a DMARC policy of "none" to monitor and gather reports without impacting your legitimate emails. This is sufficient to meet Google requirements for bulk senders.
Once you are confident that your legitimate emails pass authentication checks, consider moving to a more restrictive policy like "quarantine" or "reject."
Store the record in your domain’s DNS settings. Again, as with DKIM and SPF, go to your hosting account, in our example it’s Hostinger, choose the domain and add a new TXT DNS record, containing the DMARC record you created.

Common questions
What should I do if I already have an SPF record from a different service?
Even if you use multiple services, you will have one SPF record. This record should include all services you are going to use for your campaigns.
For example, you might be using Selzy together with your Outlook mailbox.
In this case, add “include:spf.selzy.com” to the already existing record of “v=spf1 include:spf.protection.outlook.com ~all”. If there is “redirect=” in your record, you must change it to “include:”. The merged record must end with “~all”.
As a result, your SPF record will look the following way:
v=spf1 include:spf.protection.outlook.com include:spf.selzy.com ~all
You can edit the standard SPF record for any other email provider in the same way.
I have followed the instructions, but the Selzy status is still "created" or "disabled". What should I do?
If you refresh the status and see the notification that no errors were found, wait for 30 more minutes. The status will be updated to "enabled".
When you refresh the status, the following errors might occur:
- DKIM record not found.
- SPF record missing.
- The mandatory parameter “include:spf.selzy.com” is missing from the SPF record.
In this case, you should check whether your records at the domain hosting are correct.
We recommend you to double-check for extra spaces, as they are taken into account when reading the record. You can also check whether you have added the records to the right hosting.
Why was my “From” email address replaced when sending my campaign?
Selzy may substitute the domain in your “From” email address with one of our shared domains, such as sendwithselzy.com. This ensures the uninterrupted delivery of your campaign and compliance with Google and Yahoo’s sender requirements.
Common scenarios when this domain substitution may occur:
- Your DKIM status is not “enabled”
This happens if you haven’t authenticated your domain; the authentication process is incomplete, or an error occurred on your hosting provider’s end.
With the substituted “From” address, you can still send your campaign on schedule and address the DKIM status issue at a later time.
Example
If you currently send from promo@bestpetstore.com, your “From” address will be replaced with promo-bestpetstore.com@sendwithselzy.com when you send your email.
- You are sending your campaign from a freemail domain
If you are using a freemail domain, such as @gmail.com or @yahoo.com, either for testing purposes or because you haven't set up your own domain yet, Selzy will substitute your "From" address.
Example
If you currently send from bestpetstore@gmail.com, your “From” address will be replaced with bestpetstore-gmail.com@sendwithselzy.com when you send your email.
We understand that setting up a professional email address at your own domain can take time, especially for new users testing the platform. To ensure smooth deliverability of your test campaigns, we allow the use of freemail domains with certain limitations, including substituting the "From" address.
Please note that freemail domains are meant for personal use, not for business.
We strongly recommend you setting up a professional email address associated with your own domain and completing the domain authentication process. This step will remove Selzy’s limitations and help you step up your email marketing game with added credibility and a stronger brand identity.
How can I receive replies from subscribers if my “From” address is being replaced?
If you’ve already set the “Reply-to” address, the system will keep it, and you will receive subscriber replies there.
If you haven’t set up a “Reply-to” address, the system will automatically use your original “From” address as the “Reply-to” address when your “From” address is replaced by a Selzy shared domain. You can then keep it, change it manually, or leave it empty if you do not want to receive replies from your subscribers.
Useful links:
Google & Yahoo Introduce New Requirements for Bulk Sending
What is a Dedicated IP, and Will It Improve Your Email Campaign Stats?
The Importance of SPF Record and How To Set It


