The easiest way to collect your contacts is to put a subscription form on your website. With Selzy, you can create an embedded or a pop-up subscription form.
Follow the instructions to create subscription forms.
Never buy email lists. This harms your sender’s reputation as email service providers block campaigns sent to purchased lists. Moreover, users will not open these emails or, what is even worse, mark them as spam.
Read this article to learn more about why you should not buy email lists.
If you already have a contacts base, you can upload it to Selzy.
In Selzy you can:
- Import contacts from a file.
- Add one contact manually.
- Upload contacts while creating your campaign.
Let's explore each method in more detail.
When you import a contact list from a file, bulk copy-and-paste contacts, or use the API method importContacts, Selzy checks the contacts for spam-traps, technical and role-based addresses.
For example, addresses like info@, sales@, no-reply@, or all@ will be recognized as potentially dangerous. They negatively impact the deliverability of your emails and both your sender and domain reputation: since such addresses don’t belong to individual users, the risks of email bounces and spam complaints are much higher.
Potentially dangerous email addresses will not be imported. You can find more information about them in the import error report.
If you want to send campaigns to role-based addresses, use Double Opt-In.
Import contacts from a file
Prepare a document for import
To successfully upload contacts from a file, you need to first prepare the document for import.
General requirements for the file for import:
- Appropriate formats: .csv, .txt, .xls, .xlsx.
- Max file size — 20 Mb.
- If your file is more than 20 Mb, use an archive (.rar, .zip, .7z).
We recommend you use the .csv format. The tables in this file format are simplified (no formulas, merged cells, links, etc.) which means the possibility of error is lower than with other, more complex, file formats.
Requirements for the archive:
- The archive must contain only one file.
- The appropriate format of the file in the archive: .csv, .txt, .xls, .xlsx.
Requirements for the table with your contacts list:
- Clear structure
- No unnecessary details
- One column — one type of data
- Оnly one sheet per file
- The date has the format of DD.MM.YYYY
- File coding (universal) — UTF-8 or Unicode
EXAMPLE
You know the emails, the names, and the birth dates of your clients. Fill these fields out like in the table below. If you lack some information about a client, just leave the cell empty.
Upload contacts
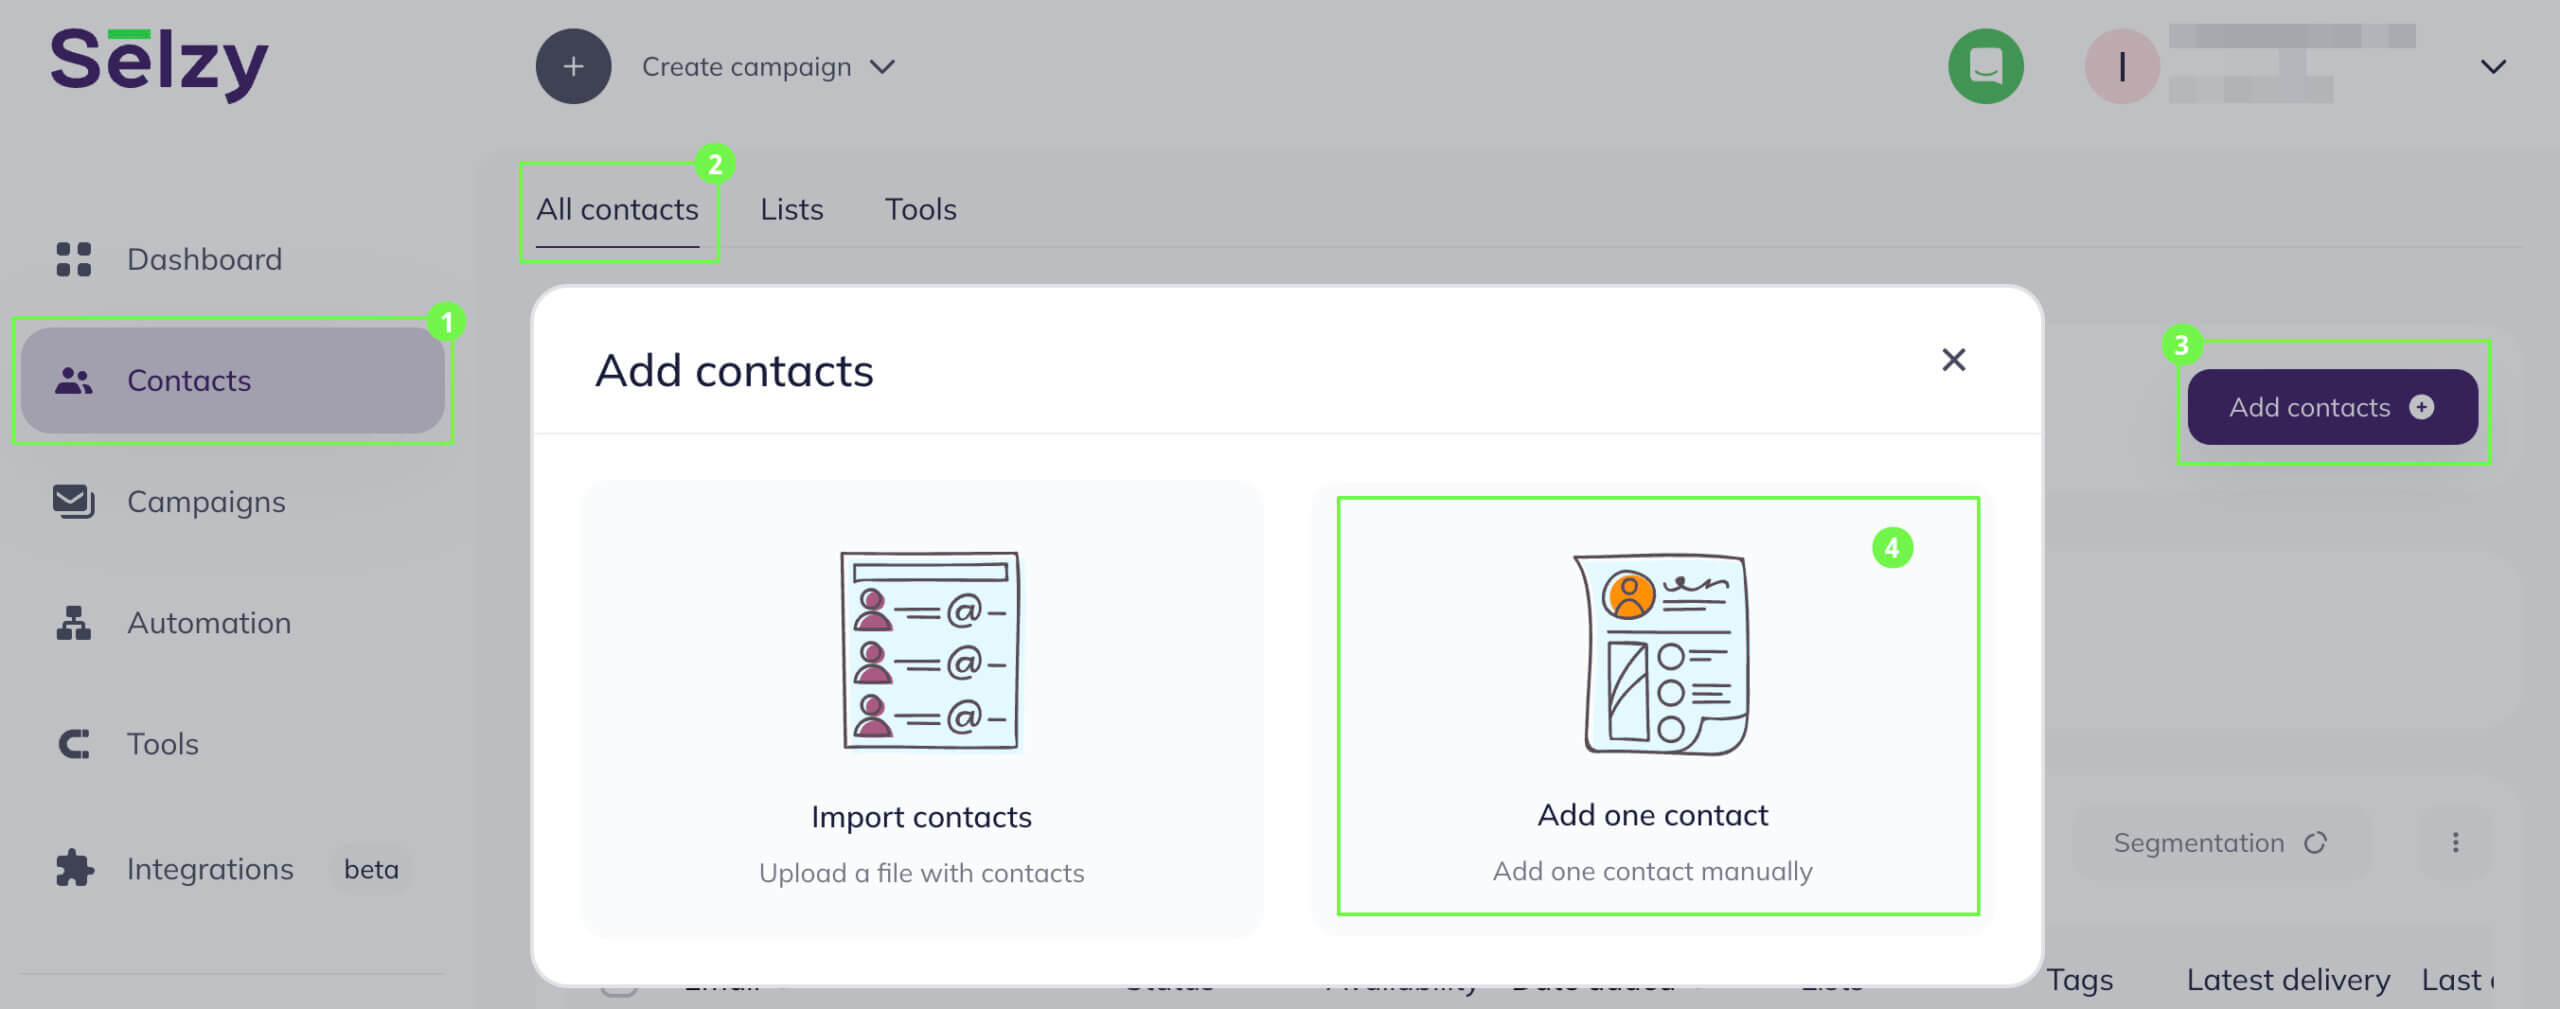
Go to the Contacts section, choose All contacts, and click on the Add contacts button.
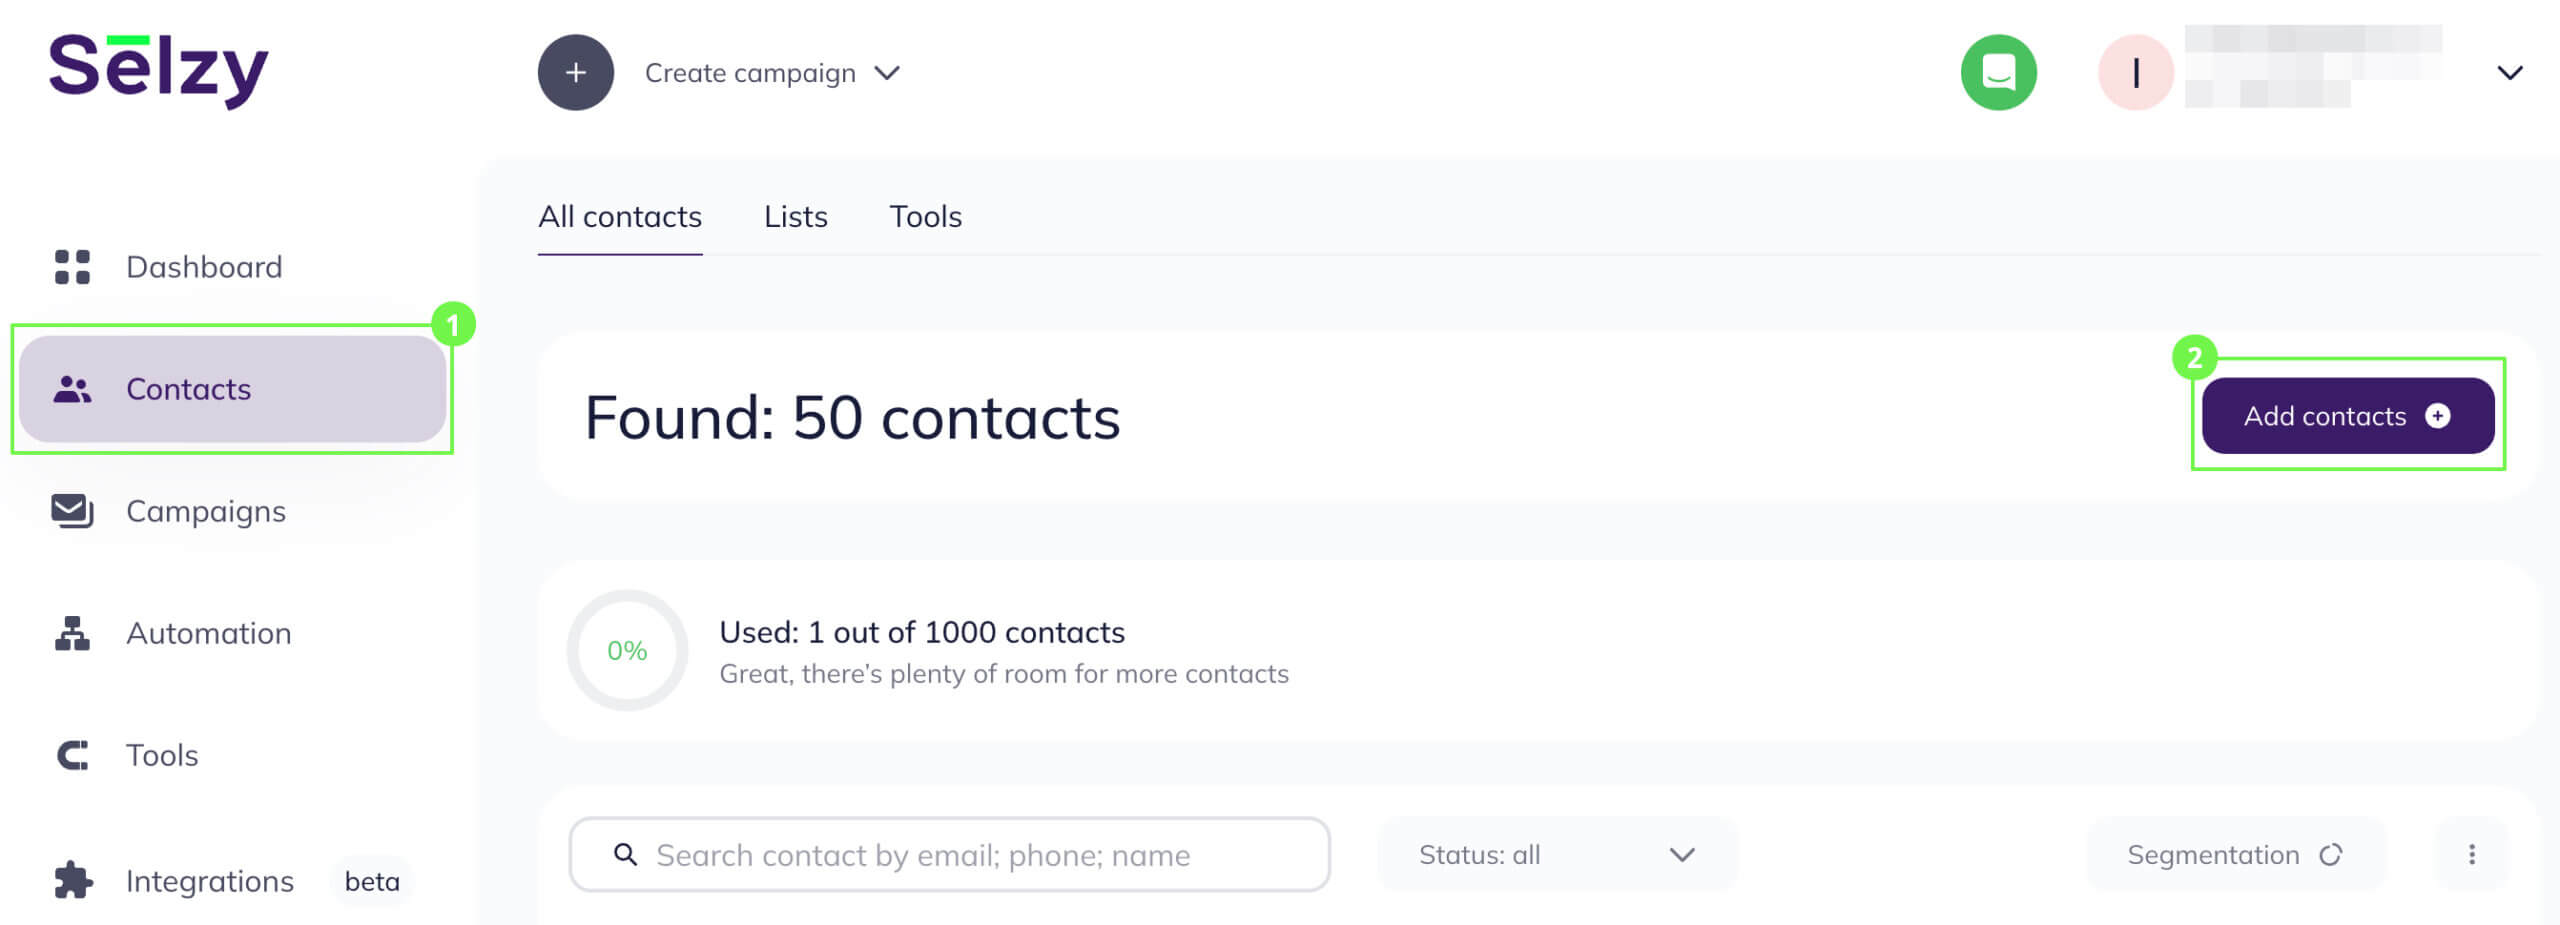
Choose Import contacts.

You can upload a file with contacts prepared beforehand or add contacts manually from a document.
To upload the contacts from a file, choose From file tab at the top and drag or select your file for import.
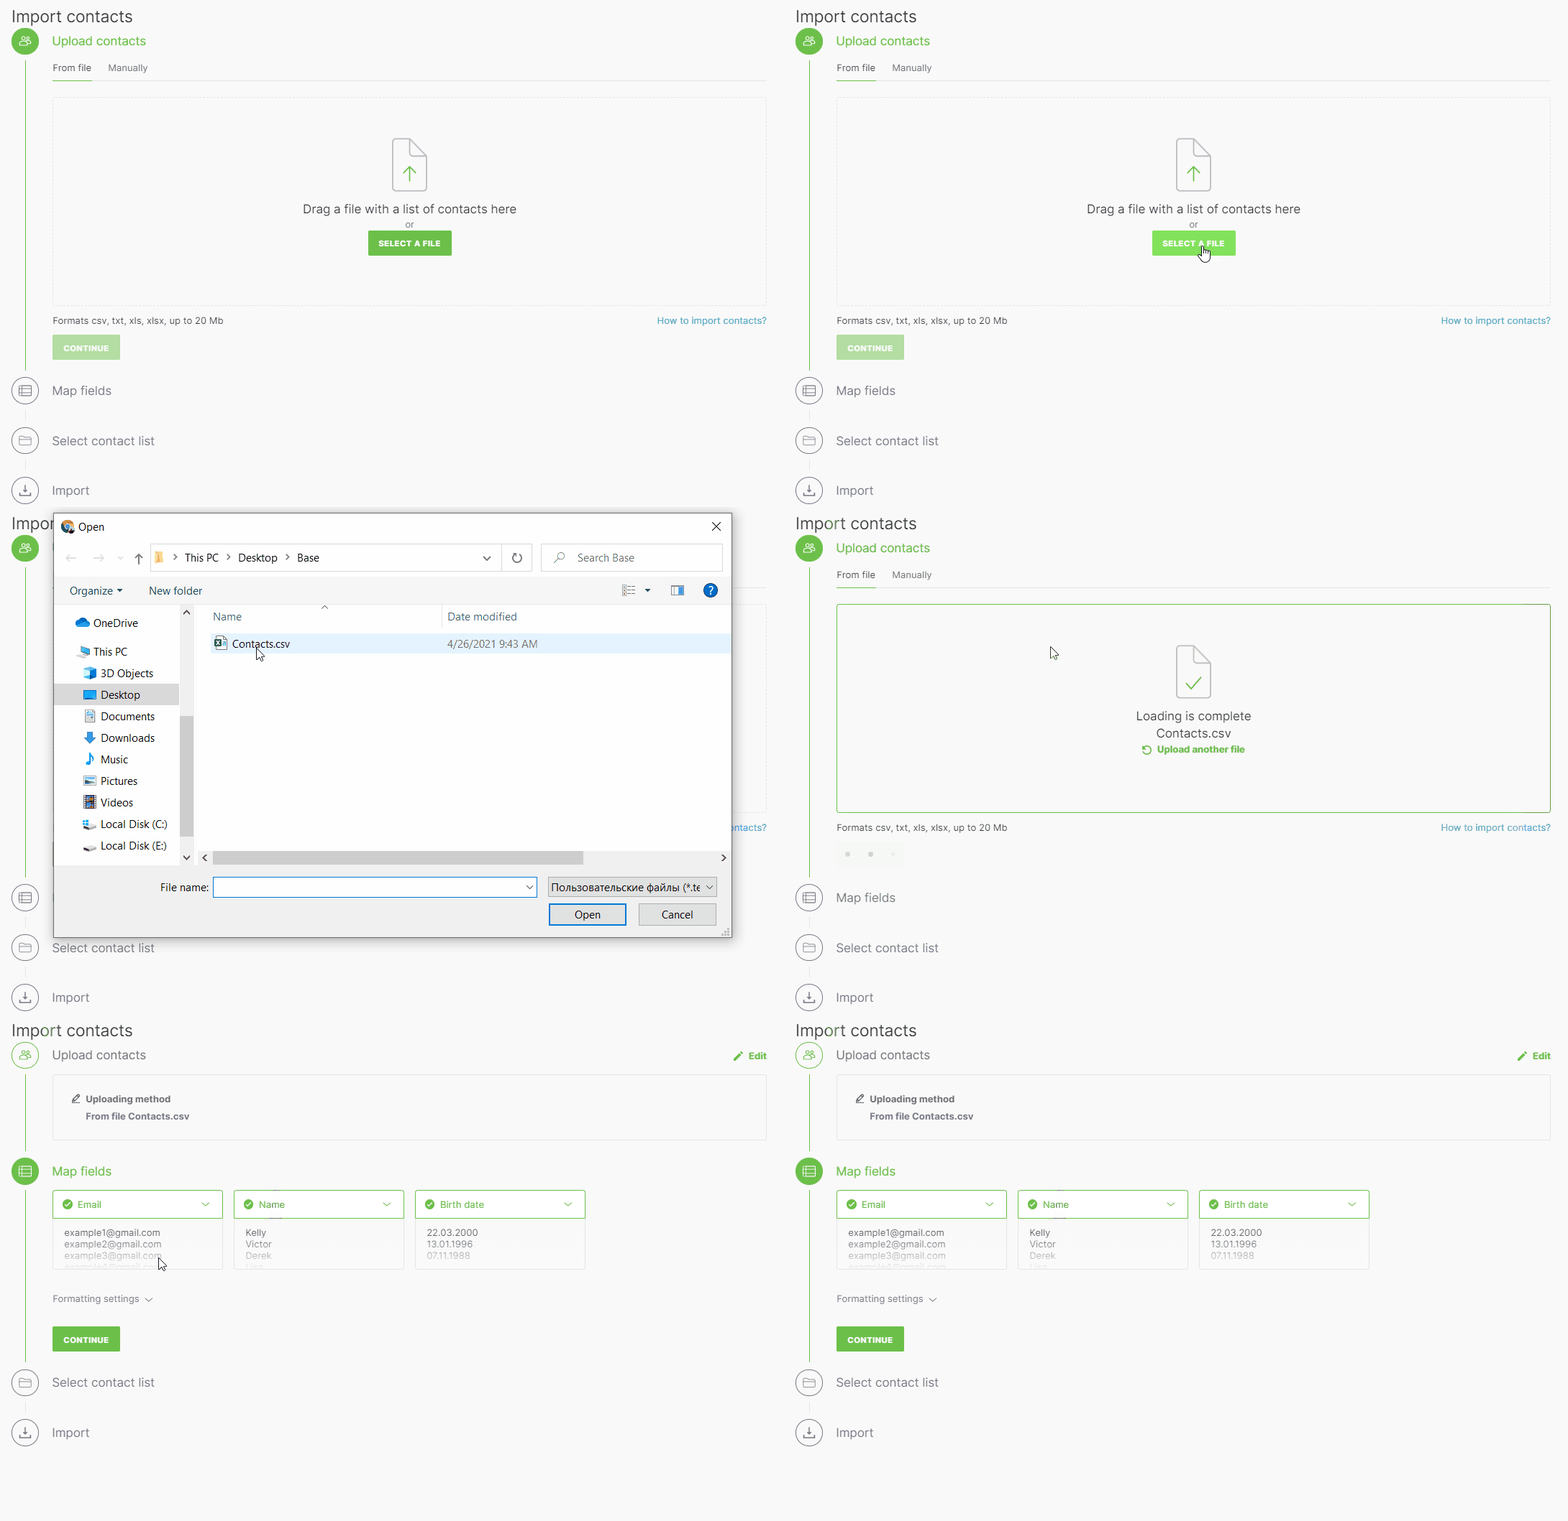
To upload the contacts from a file without uploading it to Selzy, go to the Manually tab, copy the contacts from the file, and paste them into the designated field. Information about each new contact should be given in a new line.
Separate contact information with a comma, a semicolon, or a tab. You cannot upload more than 50,000 contacts at a time.
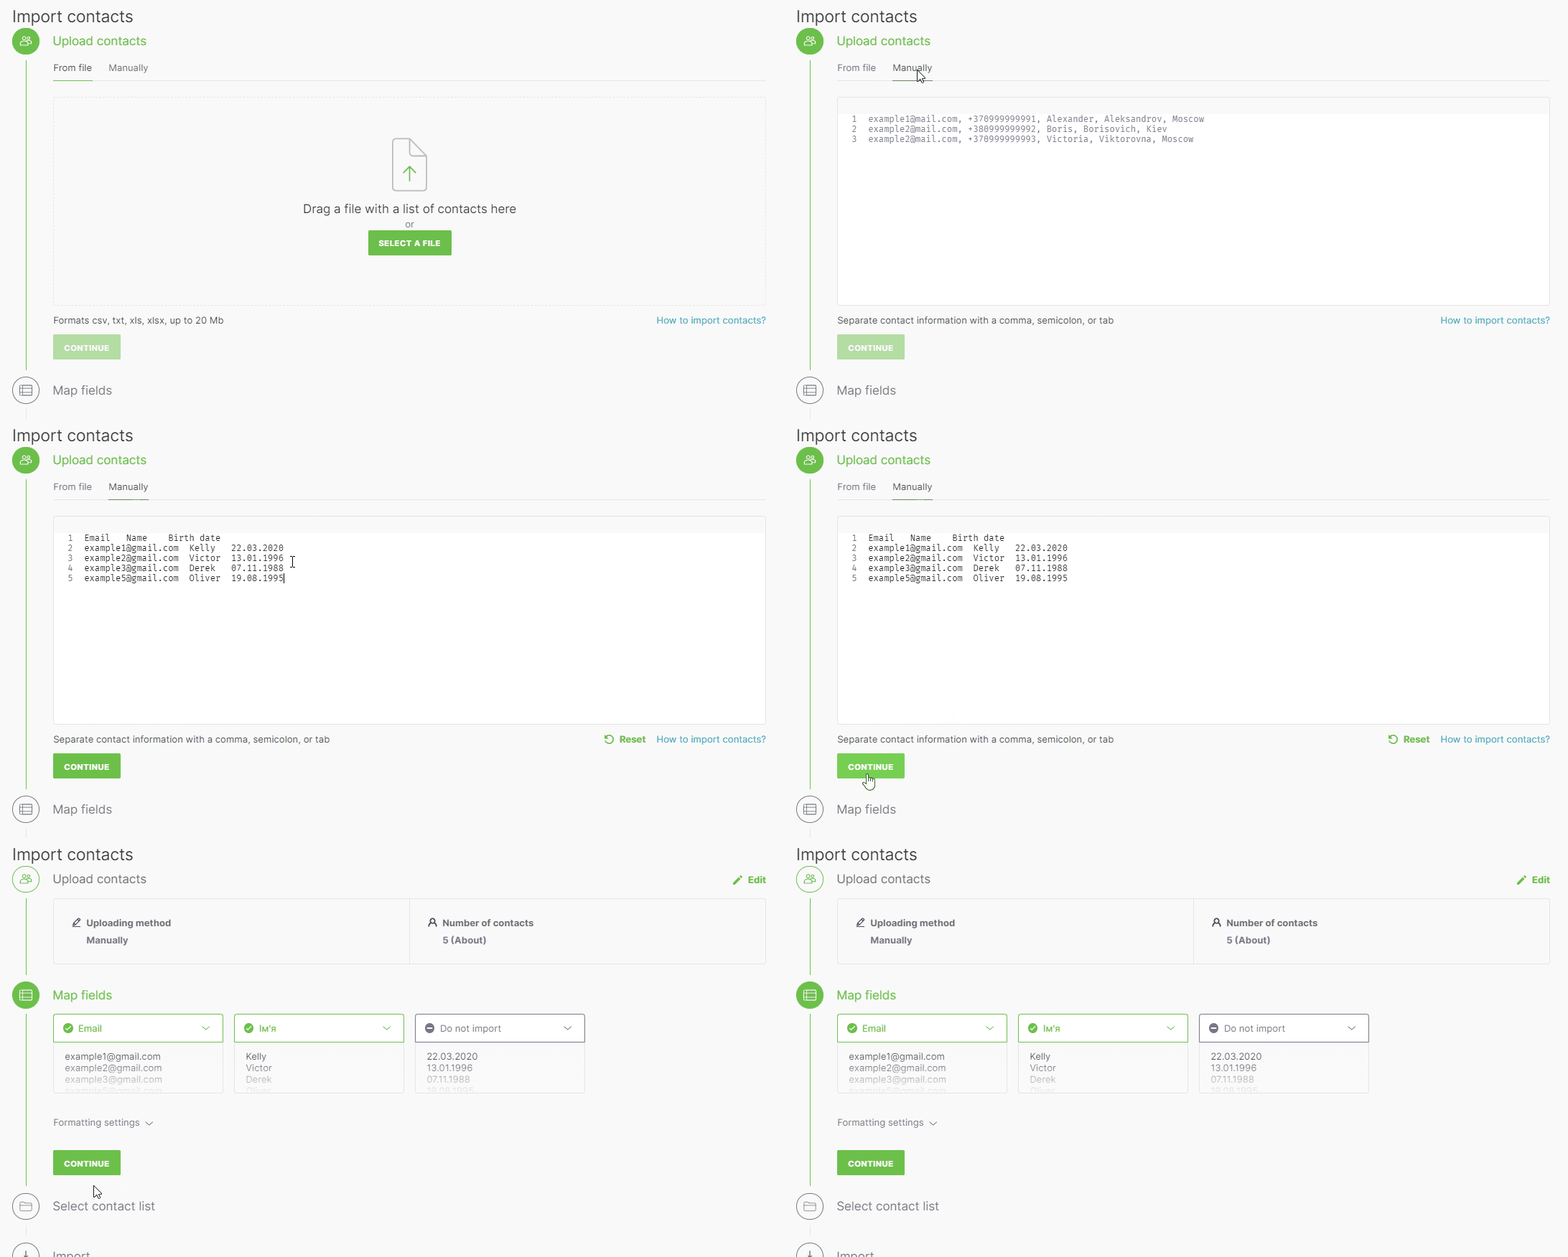
Click Continue to go to the next step.
Configure the fields
After uploading the contacts, you need to configure the fields for the correct contact import. Choose one of the existing fields for each data type or follow the instructions to create custom fields.
If you don’t want to import some contact information, choose the Do not import.
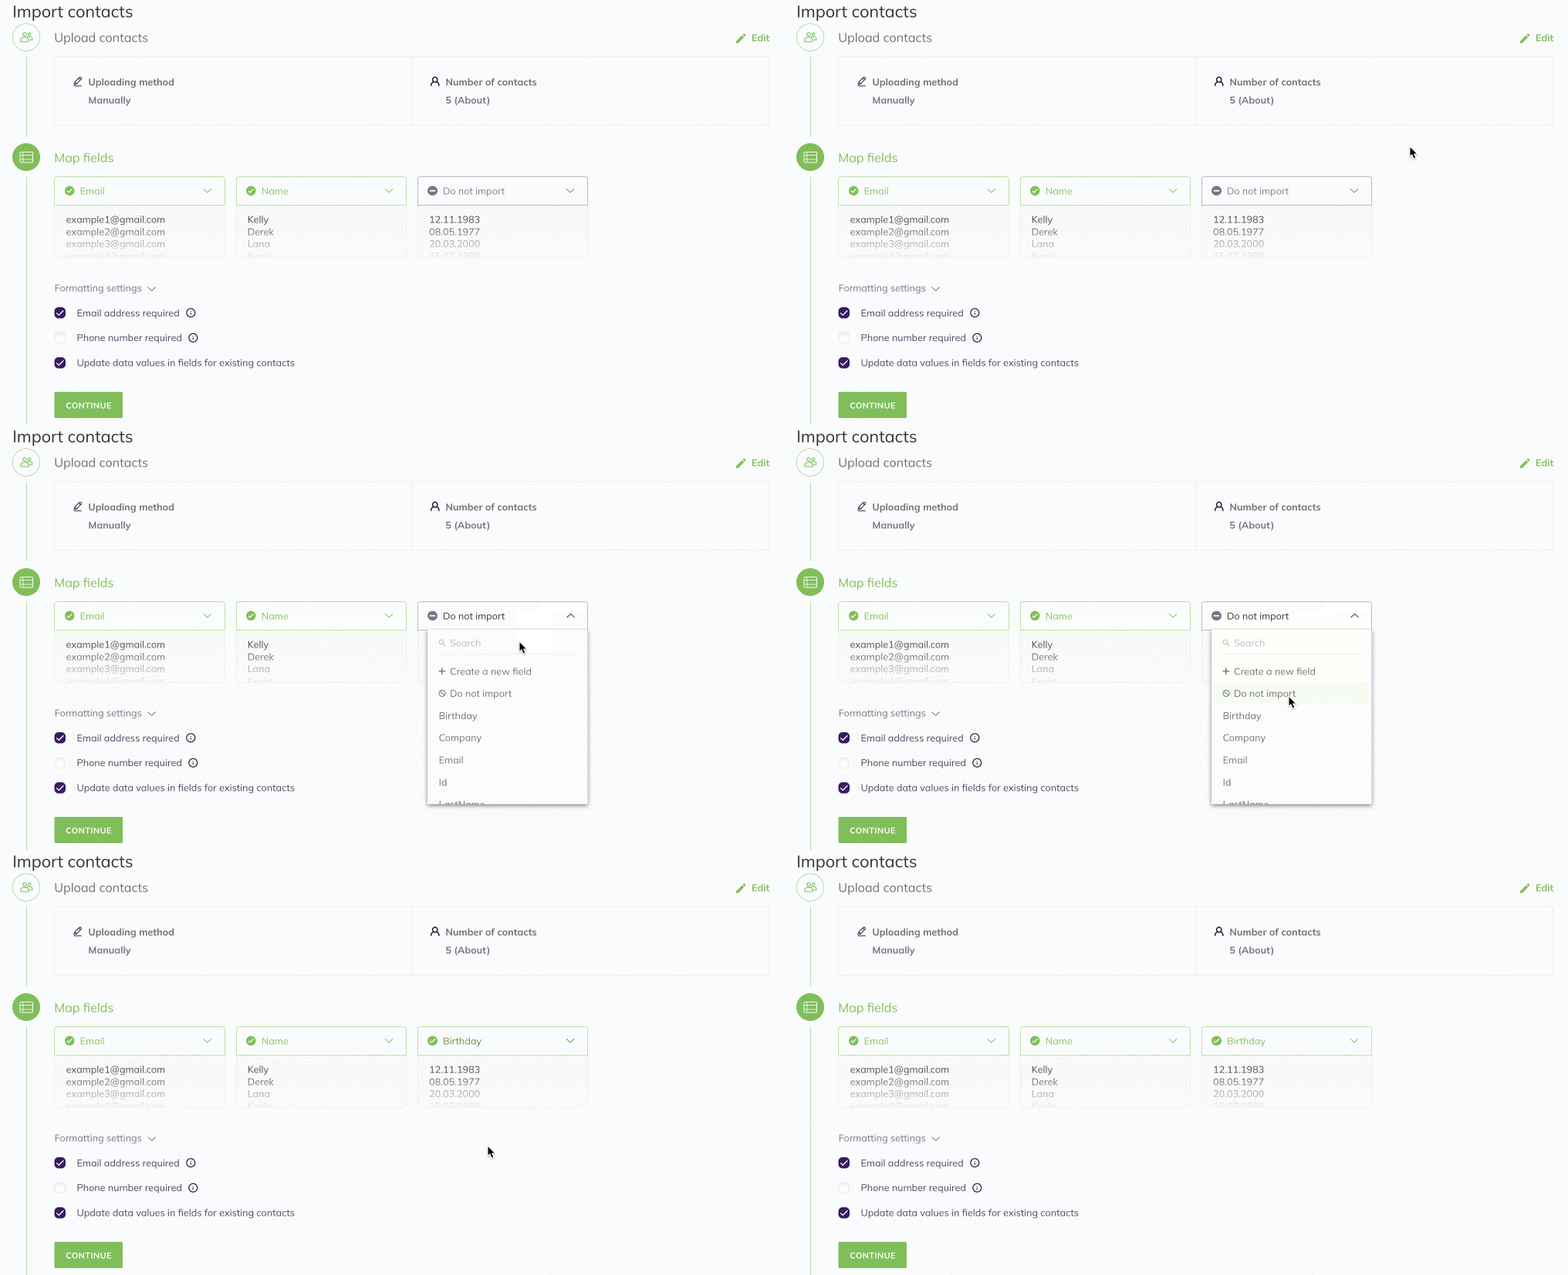
If necessary, you can specify the formatting settings in the dropdown menu. There, you can check the box The first row contains field names to exclude the first row of the table during import. You can also specify the field separators.

You can further configure using checkboxes:
- Required import of email addresses. When this feature is activated, contacts without email addresses will not be added to the database.
- Required import of phone numbers. When this feature is activated, contacts without phone numbers will not be added to the database.
- Updating data for contacts already existing in the database. When this setting is activated, the system will automatically update and supplement the data for contacts that have previously been added to the database.
Please note:
- These settings are intended for bulk importing contacts from a file and do not affect the import of contacts through the API method importContacts.
- When the update function is activated, existing contact data may change, including previously added information such as name, phone number, or email.
For example, you are importing a contact:
Phone number Name +15555551234 Alex And in the system, there is a previously added contact:
Phone number Name [email protected] +15555551234 John If you checked Update data values in fields for existing contacts, the contact's name will be changed from John to Alex.
To avoid making changes to previously added data, uncheck the update function. This way, only new information about the contact will be added, and existing data will remain unchanged. In this example, there will be no changes made to the existing data entry.

Click on the Continue button.
Select a contact list
Now it’s time to choose one of the existing lists or create a new one for your imported contacts.
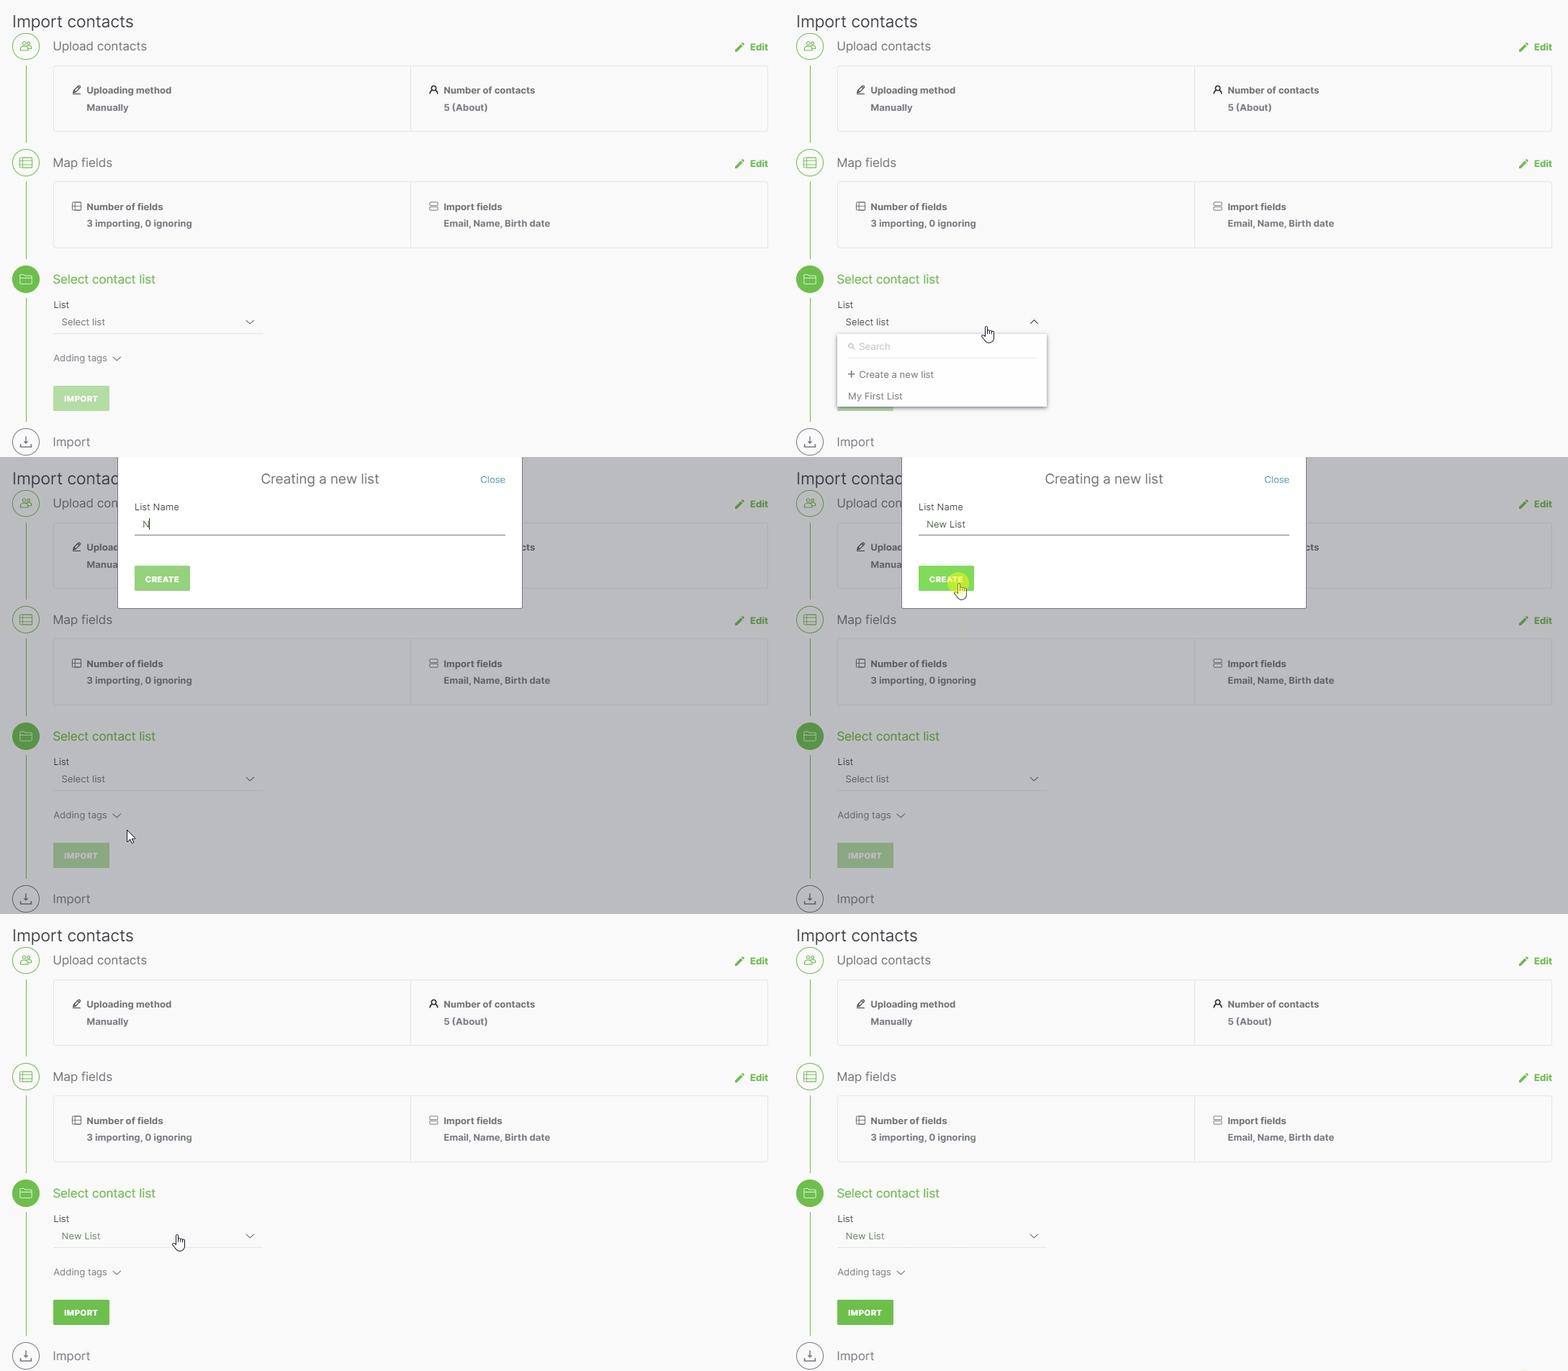
You can add tags to the contacts you import. You can choose an existing tag or create a new one.
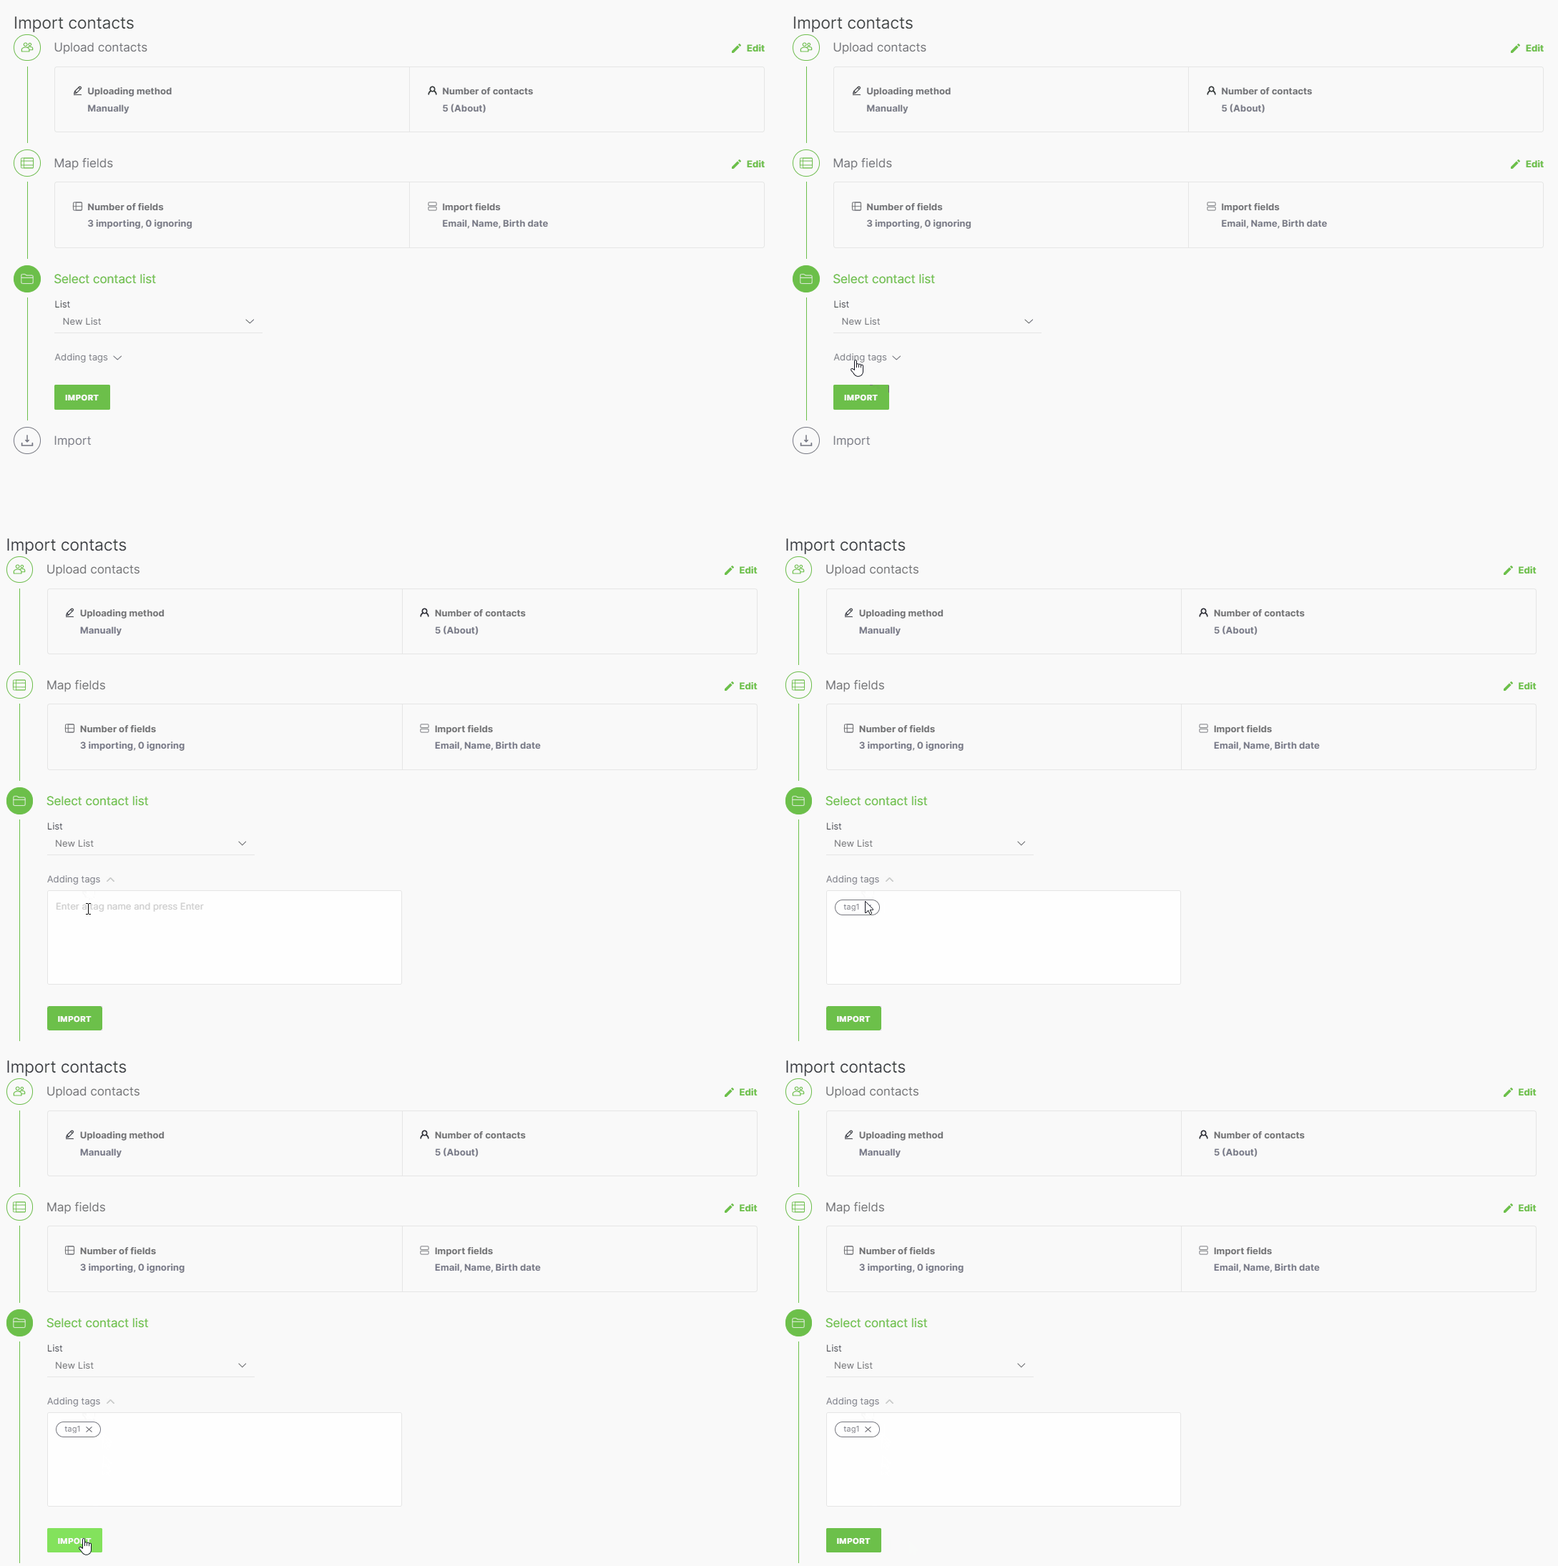
Import and view the statistics
To complete the import, click on the Import button.
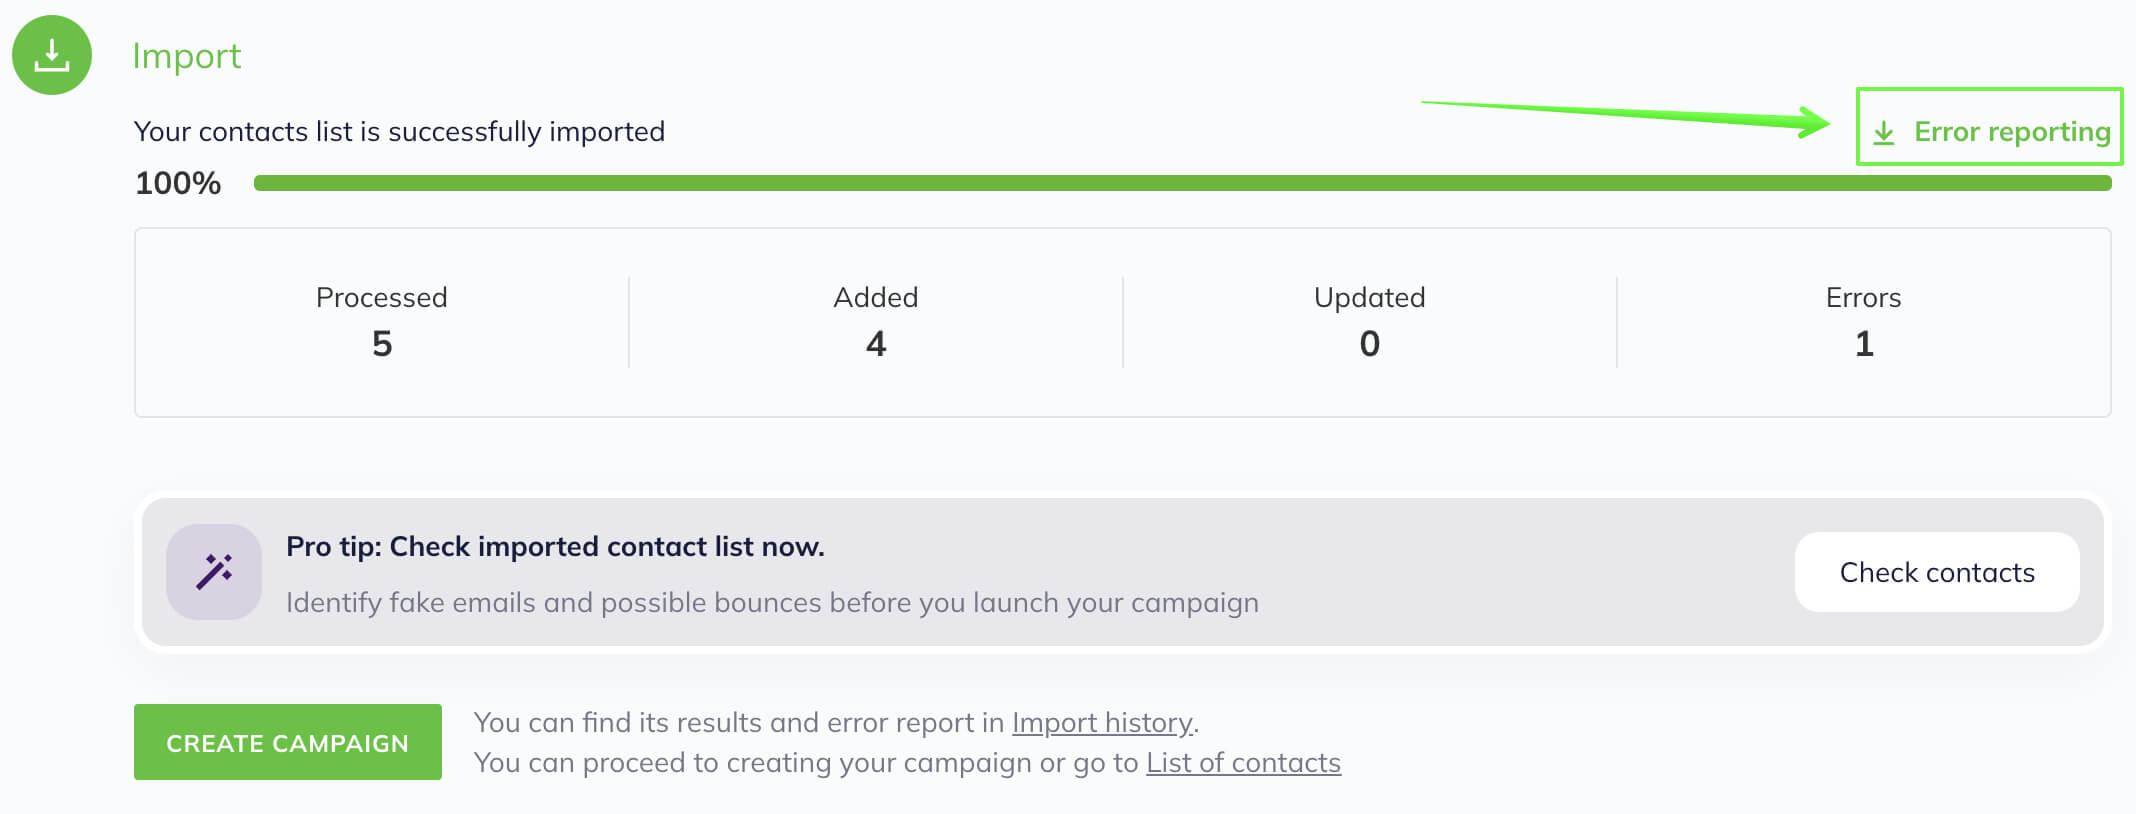
During the process, you will be able to see the import progress and the following statistics:
- Processed — all imported contacts.
- Added — contacts new to the lists.
- Updated — contacts that were already in the lists.
- Errors — the number of errors.

After you have imported the contacts, you can do the following:
- Check imported contacts (identify fake emails and possible bounces).
- Create a campaign.
- Check the import history.
- Go to the list of contacts that you have imported your contacts to.
How to Remove the Inactive Contacts From Your Database

If any errors occur during the import, you will be able to download a detailed error report on the same page (the information is stored for 7 days).
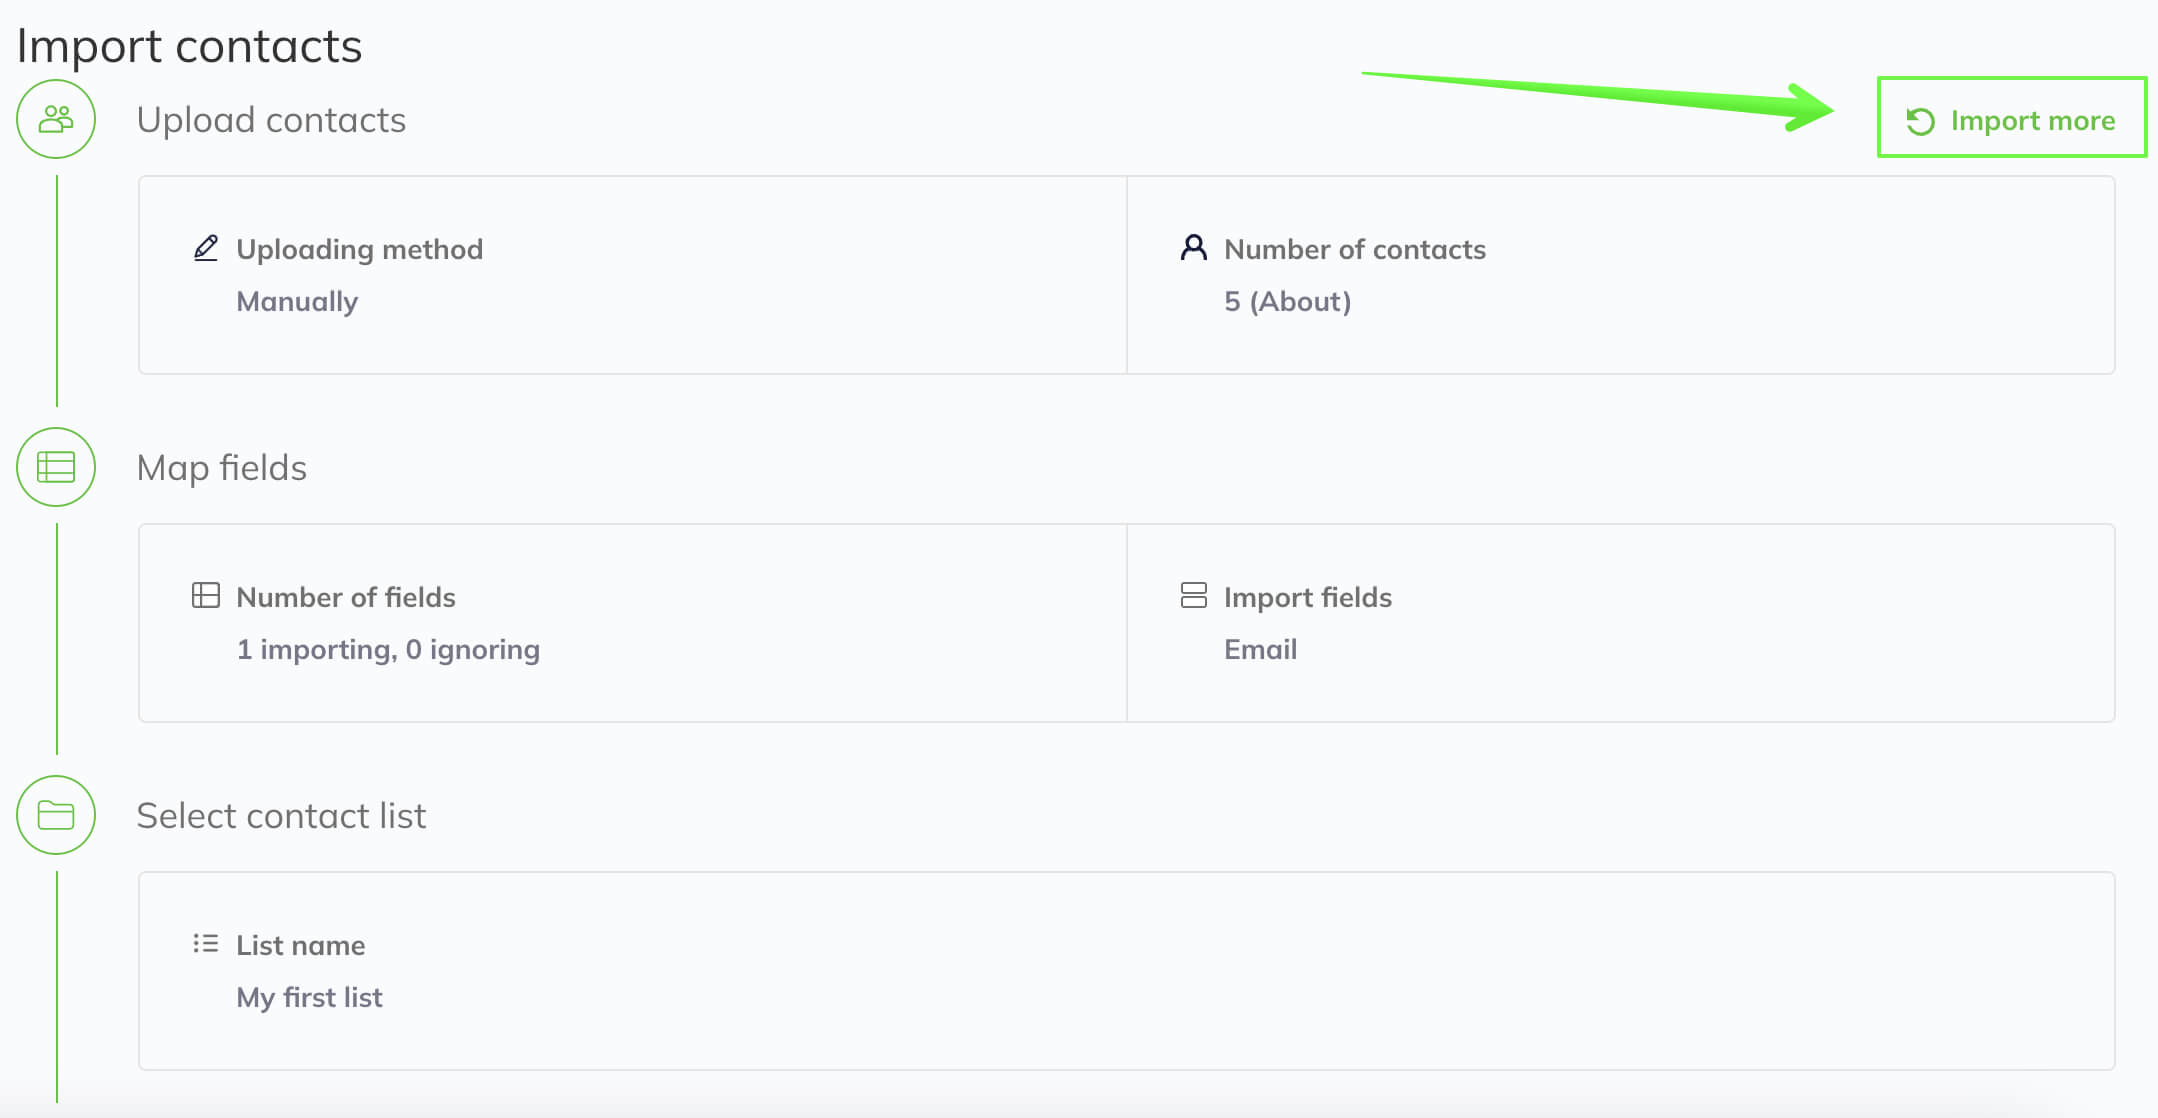
If you decide to add more contacts, scroll the page up to click on the Import More button.
Add one contact manually
To add contacts one by one, go to the Contacts section, choose All contacts, click on the Add contacts button, and choose Add one contact.
Next, add contact information (email, phone number, and name) and choose or create a list where the contact will be imported.
For the contact, you can choose existing tags or create a new one.
Previously created additional fields will be displayed in the Fields section. You can fill in if necessary. If you have not added any additional fields yet, the section will remain empty.
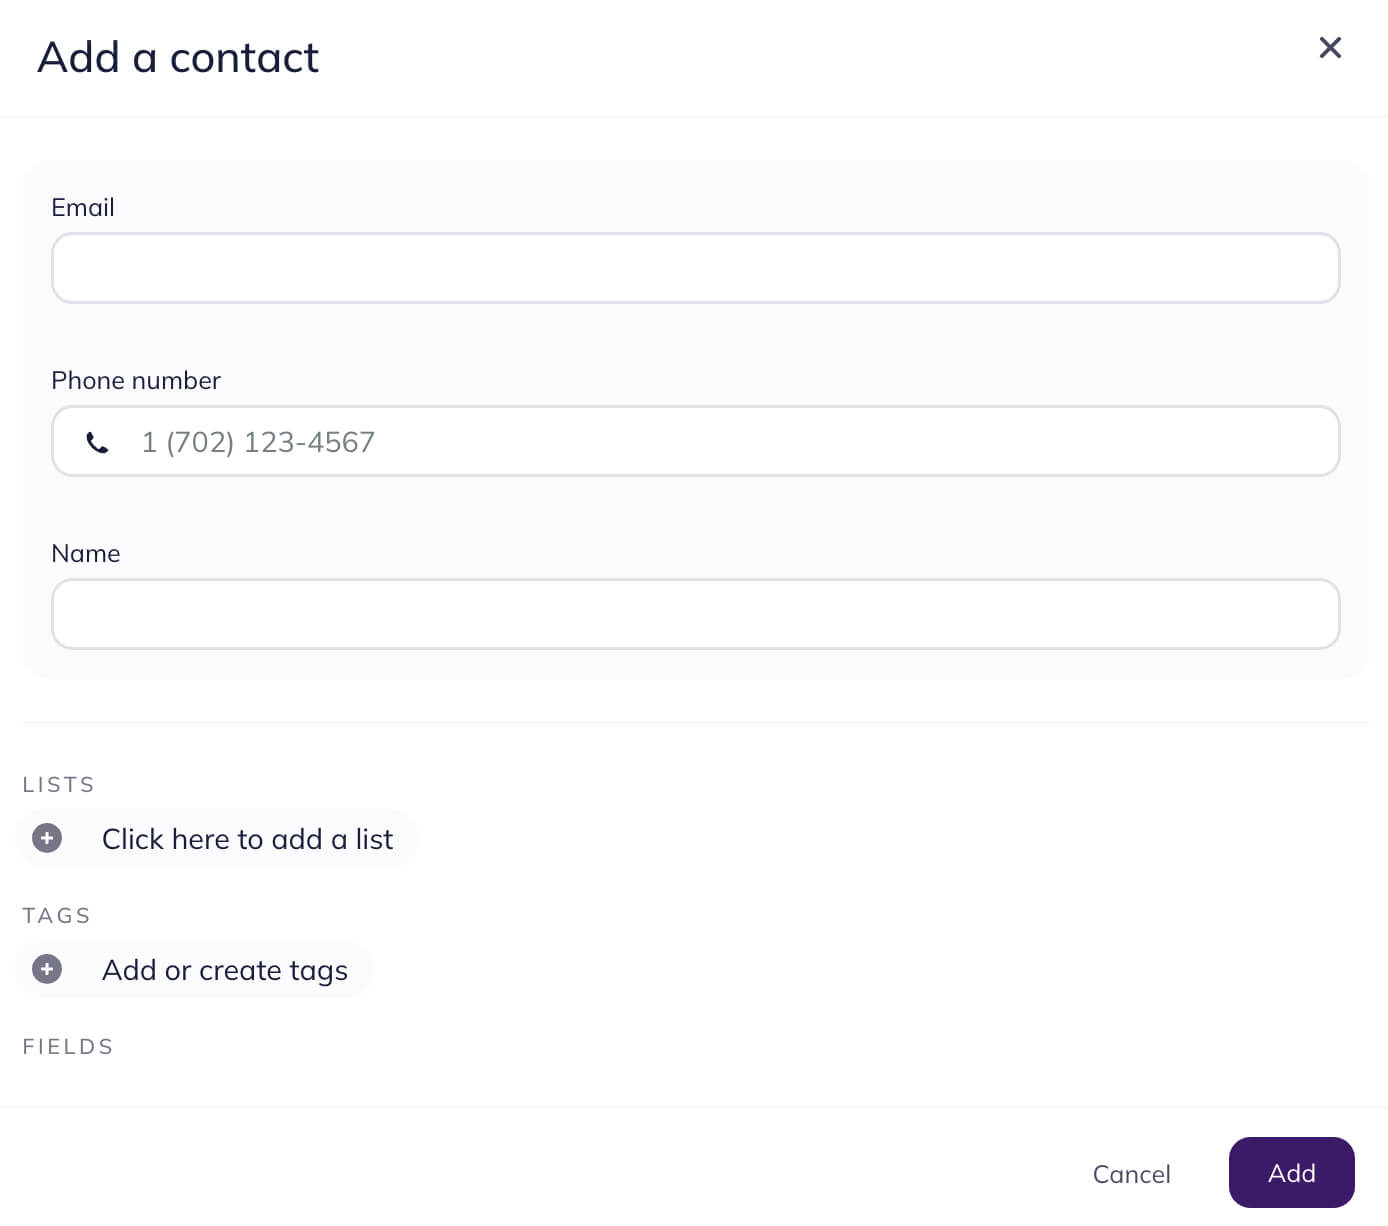
Then, click the Add button.
Upload the contacts while creating your campaign
You can also add contacts to the list right before sending a campaign. At the Choose recipients stage, click on the Upload contacts button and then follow the instructions from the Import contacts from a file section.

Segment the contact base
To personalize your campaigns, use segmentation. It allows targeting a particular audience from the whole list of contacts. For example, you can send your campaign to women only or to those people who have read the previous email. You can combine several criteria as well.
In Selzy, there are two types of segmentation:
You can find more information about segmentation in the article How to Segment Your Contacts.
Common questions
What if the contact I am importing already exists in this or another list in Selzy?
The import results will be different depending on the settings you choose.
If you check the Update data values for existing contacts checkbox, the existing contact’s data will be overwritten with the new data. In this case, the contact details will be updated. Let’s say, you have a contact with the email of [email protected] and the name Johnny. When you upload the same email with the name Robert, the contact name will change in all the lists.
If you uncheck this checkbox, the existing contact’s data will remain the same.

How to correct a jumbled text in the file?
Sometimes when you have imported your contacts, you can see unreadable symbols like these, for example:
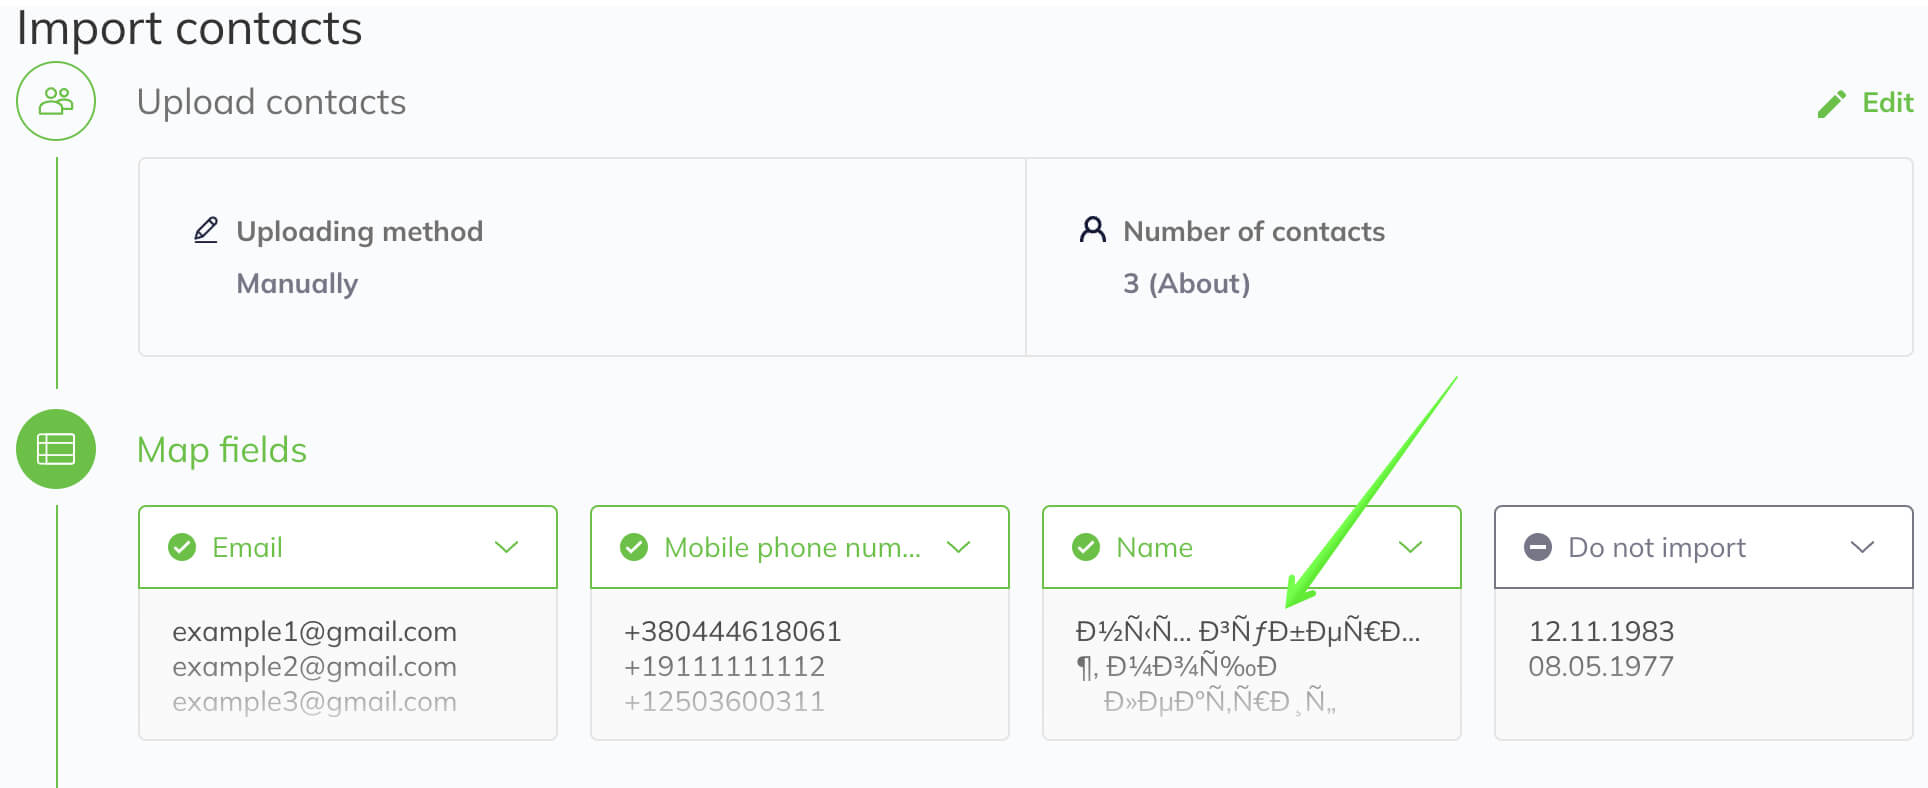
The reason lies in the wrong encoding. In such cases, you need to transcode it into UTF-8.
How to Change File Encoding to UTF-8
I have uploaded contact phone numbers but I can’t send SMS campaigns (there are no phone numbers in the list). What’s wrong?
The phone numbers should be uploaded into the automatically created system field — Mobile phone number, which is available for all accounts. If a phone number gets into an additional field, it cannot be used to send SMS.
What format should a phone number have?
The uploaded phone numbers should have an international format with respective country codes. For example, +7 921 123 45 67.
What does it mean when the contact email status is Blocked, or Unavailable, or Temporarily Not Available?
Each contact in Selzy is marked according to two characteristics:
- Status — the state of the recipient engagement (active, unsubscribed, or disabled).
- Availability — the state of the email address (whether the email address exists, whether the inbox is full or not).
![]()
Your emails can be sent only to the recipients that have an Active/Available or an Active-New/Available status.
To learn more, feel free to go to the What Does Email Address Status Indicate and how it Changes page.
How to add the contacts to a different list?
Open the list you need. Select Contacts in the List that you want to copy to a different list. Click on the Action and choose Add to lists or Move to a list.

How to delete a contact list?
To delete a contact list, go to the Contacts section and choose Lists. Select the list you need. On the right-hand side click on three points and choose Delete a list.

