Selzy’s omnichannel automation lets you build scenarios that combine emails and Telegram bots. With scenarios, you can deliver marketing messages across multiple channels and collect more subscriber data for future use.
This feature is still in active development, and Selzy continues expanding its capabilities.
What is a scenario
A scenario is a sequence of actions or conditions that the system will carry out without your involvement. The foundation of a scenario is blocks — they define what actions will happen and in what order.
Any scenario starts with a trigger. When triggered, the system will perform predefined tasks such as sending messages, collecting data, or adding tags. Multiple triggers can be used in one scenario.
Bulk vs Triggered scenarios
In Selzy’s omnichannel automation, you can create two types of scenarios depending on the goal:
- Bulk — designed for time-bound campaigns and bulk actions on contacts. For example, you can use a bulk scenario for a once-a-year sale, where all subscribers enter the flow at the same time. You can also use it when you need to change many contact tags at once.
- Triggered — designed for transactional, retention, and other automated communications. In this case, each subscriber enters the scenario whenever the trigger event happens. For instance, a Triggered scenario can start after a first purchase — every new client receives a receipt and a series of onboarding messages.
To choose the scenario type, click on the arrow icon in the Scenarios section of the main menu. Alternatively, you can click “Scenarios” and switch between the “Triggered” and “Bulk” tabs on the omnichannel automation scenarios page.
The principles of Bulk and Triggered scenarios are similar. Both are built in an intuitive visual editor, and, based on the parameters you set, the system will guide subscribers through the scenario automatically. The difference lies in the functions of the blocks.
Types of blocks in a scenario
To create any scenario, you can use blocks from five categories: Triggers, Communication, Actions, Scenario logic, and Saved.
Triggers
A trigger is an event that launches a scenario. For example, you can use such triggers as:
- Contact list trigger — runs the scenario when a contact is added to a selected list, either through subscription or manually. Or, when you select a list to perform bulk actions on the contacts in it.
- API trigger — launches the scenario based on the event in an external system, such as making an order or payment. The received data can also be used for personalization.
- Start by command — starts the scenario when a subscriber opens the Telegram chatbot and sends the set command to start interaction.
Communication
Communication blocks let you send different types of content automatically when a subscriber reaches a certain point in the scenario. Messages can include:
- Email — sends an email with the set sender address, subject line, and name. You can add UTM tags and customize the unsubscribe link. Emails must be sent from a corporate domain.
- Message — sends a Telegram message with formatting, emojis, links, buttons, or attachments (images, video, price lists, etc.). You can also collect subscriber data (email, phone number, birthday, etc.).
- Video note — sends an OGG voice message in Telegram with optional text, buttons, or data collection.
- Voice message — sends a short MP4 video message (“circle” video) in Telegram with buttons or data collection.
Actions
Action blocks let you update subscriber data or send notifications. For example:
- Change tags — automatically add or remove tags in the contact card based on subscribers’ actions.
- Change lists — move contacts between lists depending on activity. For example, add active subscribers to a topic list or remove inactive ones.
- Contact field editor — update values in contact card fields. For example, it allows you to manage updated information or create a reward system.
- Email & Telegram notifications — send alerts about subscriber actions directly to your email or Telegram. You can also collect data from the subscribers or choose to see the data that was previously collected from them.
Scenario logic
Scenario logic blocks control how subscribers move through the scenario:
- Condition — split the scenario into “Yes” or “No” branches based on the set rules (e.g., field value, email activity, list inclusion, tags). Supports simple, compound, and grouped conditions. You can add multiple conditions and condition groups, and set a waiting period.
- Delay — pause the scenario for the set time to space out messages or actions.
Saved
Saved blocks store blocks, elements, or notes you’ve set up and saved. You can reuse saved blocks in other scenarios without creating them from scratch.
How to create a scenario
You can create a scenario:
Create scenario from scratch
To create a new scenario from scratch on the Scenarios page, select Triggered or Bulk, then click the New scenario button. Next, you’ll see the scenario visual editor with the step-by-step guide and the interactive first step.
Choose one or several triggers to start your scenario in the Start with the trigger section or in the Triggers tab in the toolbox.

Once you select a trigger, the next-block options will immediately appear.

Fill in and check all the fields in the block before proceeding to the next step. If you miss any of the required fields, the system will flag it as an error, and you won’t be able to start the scenario.
💡You can rename any block in your sequence. For example, the trigger can be “Form” or “Abandoned cart”, and the first email block — “First Reminder”. This will help you keep your scenario clean and easy to follow. Block names are visible only in the editor.
Example: a simple onboarding scenario
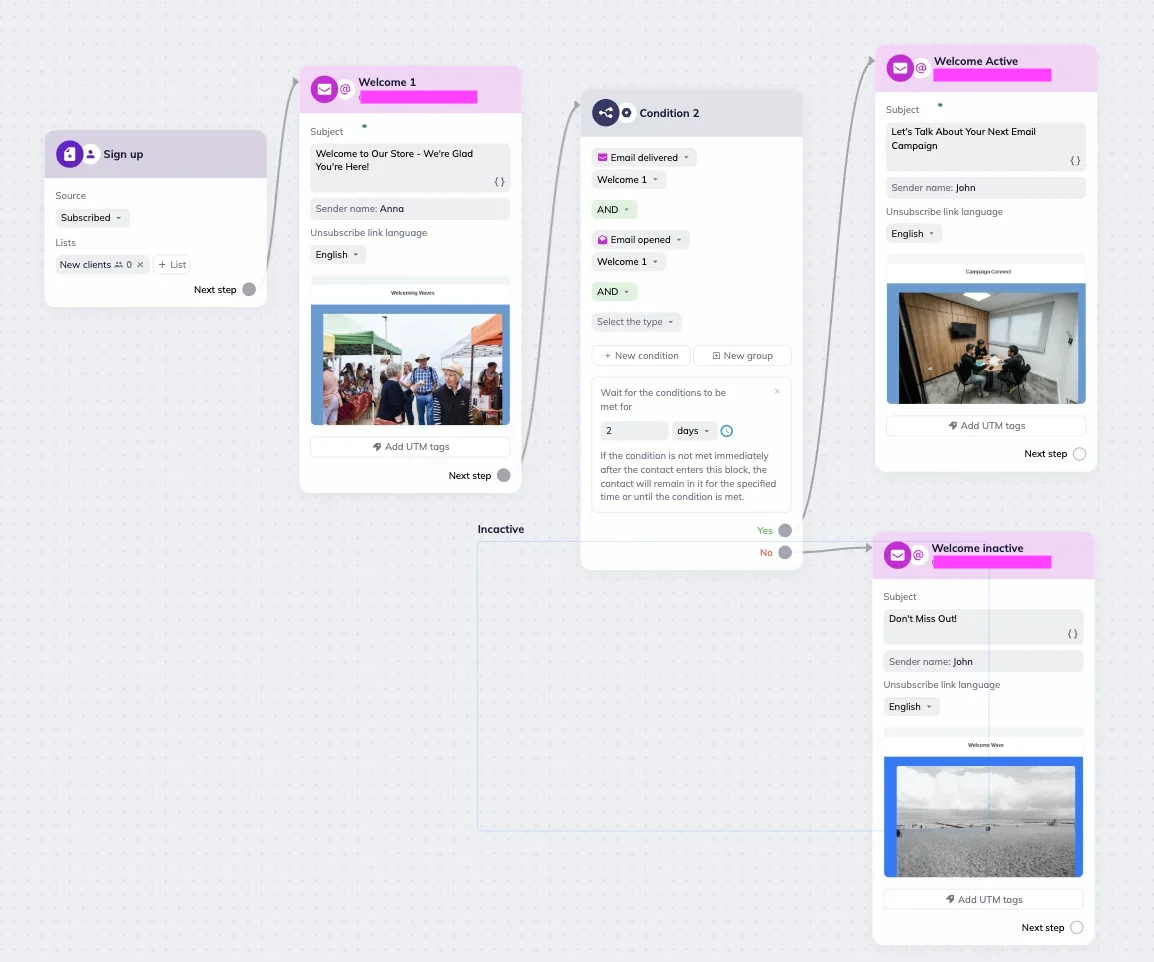
To create a simple onboarding automation, choose the Contact list trigger block and “Subscribed” as the source of new contacts. As soon as a new subscriber signs up and appears in the “New clients” list, they will go through the scenario.
Next step — the Email block, so any new subscriber receives a welcome email. We’ve renamed the block for clarity and filled out the fields: sender’s email address and name, and subject line. The subject line is personalized — you can personalize your message by clicking the “Merge tags” icon — { } (braces).

Add the email body in the same block by clicking the “Add the email” button. You can choose either a template or a recent email you’ve already created. Whatever the choice, you’ll be automatically redirected to the AI email builder.
💡Omnichannel automation doesn’t support Selzy’s main email builder. While all your templates and campaigns will be visible, they will be automatically opened in the AI email builder. For a better experience, we recommend creating templates for omnichannel scenarios in the AI email builder. If you don't have access to the AI builder in your account, please contact our Support team.
Click “Continue” in the AI email builder to save the email and get back to the scenario editor.
Next, we set up the Condition block. If subscribers open the email in two days, they will receive the next onboarding message. If they won’t open the first email, they’ll receive the “Don’t Miss Out” email.
Create a scenario with a template
A template is a ready-made scenario that already contains the necessary blocks and is designed for a specific task.
To create a scenario with a template, go to the “Scenarios” section, choose the “Bulk” or "Triggered" tab, and click View templates. You can also start editing a template directly from the respective tab, Scenarios section, by clicking on any of the templates at the top of the page.
Choose the template that suits your goal. You can preview any template and either go back or click the “Use template” button to continue.
The template will open in the scenario editor (as in the example below), where you can adjust the scenario and fill the blocks with the required content.

To edit a block, click on it and fill out or set the fields required.
If needed, you can expand the scenario by adding new blocks, such as multiple triggers, separate branches, or different Telegram bots.
As a result, you’ll have a complete scenario tailored to your task — all that’s left is to launch it.
Frame and its use in scenarios
Frame is a tool for selecting a specific area of a scenario you want to work with.
In complex scenarios, frames help you:
- Visually separate content in the workspace
- Simplify navigation
- Perform bulk actions on blocks
Add a frame
In the toolbox, click the frame icon.

A frame will appear in the workspace. Drag the borders to resize the frame and add the blocks you need.

Save blocks with the frame
Put blocks in the frame, click on it, and then on the Save icon. They will immediately appear in the “Saved” tab of the toolbox. To use them again, click on the saved element you need or drag it to the workspace. Alternatively, right-click in the workspace to add saved blocks from the “Add next block” pop-up menu.

When you edit a saved block in a scenario, its original version in the Saved category remains unchanged.
Rename a frame
You can rename frames. To do it, click the current title and enter a new name.
Delete a frame
To remove a frame, hover over it and click the trash can icon.
How to launch a scenario
When your scenario is ready, click the “Apply and run” button in the upper-right corner of the workspace. From that moment, subscribers will start entering the scenario and receiving content.
⚠️ You can only launch a scenario without errors. If the launch button is unavailable, check the scenario for errors first.
After launching, you can edit the scenario at any time — add new blocks, update content, or adjust settings.
Scenarios with an active status are marked by the green status toggle.

How to check for errors in a scenario
A scenario cannot be launched if it contains errors. The “Apply changes” and “Apply and run” buttons stay disabled until all issues are resolved.
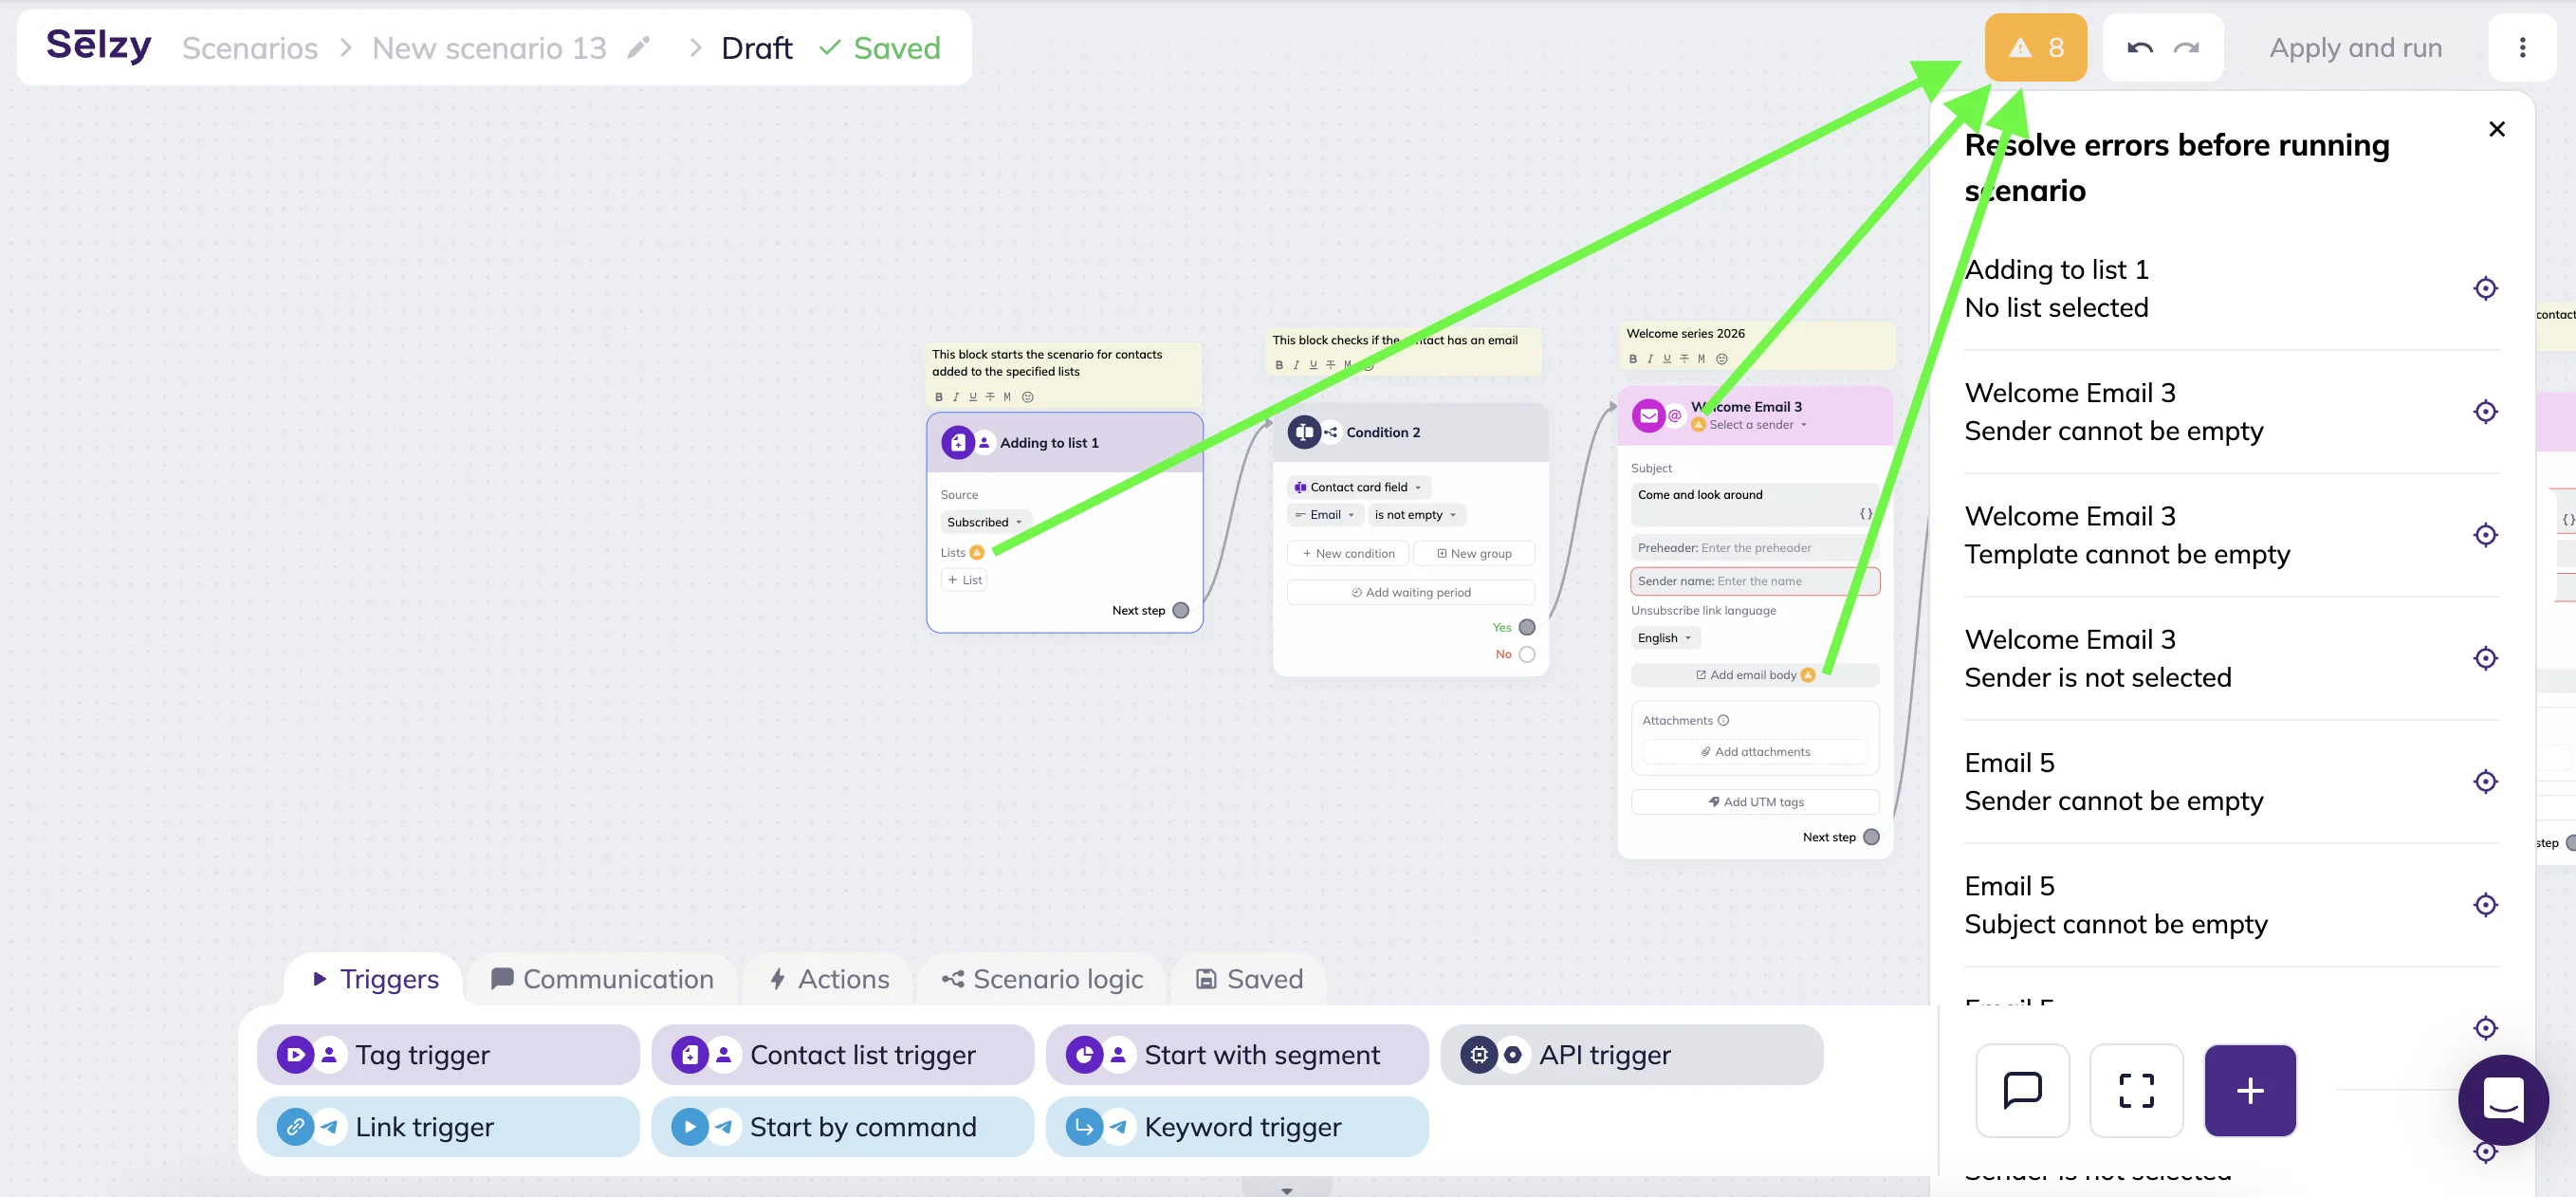
Find errors
To find errors, click the triangle icon with an exclamation mark in the upper-right corner of the workspace. A list of all errors will open, with descriptions of their causes.
Click every error in the list — the system will highlight the corresponding block and show what needs to be fixed.
Common errors
These errors may prevent your scenario from running:
- Required fields are not filled in
- Blocks are not connected
- No email addresses selected for sending campaigns
- No chatbot connected for sending messages
How to test a scenario
Before launching a scenario for subscribers, make sure it works correctly:
- The trigger activates and starts the scenario
- Messages are sent in the right order with the right content
- Subscribers move through the scenario without issues
To test the scenario, perform the actions of a real subscriber.
For Telegram, go to the Telegram bot and enter the command that activates the trigger. Check that the bot begins sending messages as expected.
For emails, use a test email address — you can create one or, for example, use your private email. Subscribe to your newsletter or campaign with the test email address or add it to your contact list manually, depending on the trigger you chose. Check that emails are received and displayed correctly.
Make sure there is no error in the scenario that could cause subscribers to receive incorrect messages or experience broken logic.
If your scenario collects subscriber data or uses tags, check that all changes appear correctly in the contact card.
For API triggers, first, check if data transfer works. We talk more about testing scenarios with API triggers and their distinctive common errors in our guide for API triggers.
How to organize scenarios
Use folders to group your scenarios. On the Scenarios page, click Add folder. A new folder will automatically appear below.

To rename a folder, hover over and click the pen icon.
To move a scenario to a folder, click on the three dots on the right and choose “Move to folder”. The scenario will be visible both in the folder and on the main page.
To remove a folder, hover over it and click the trash can icon.
How to track scenario performance
You can monitor the performance of each block in a scenario in real time.
To view basic statistics for each scenario, go to Omnichannel automation scenarios — All scenarios and review the following columns:
- Starts: The number of contacts who triggered the scenario at least once. While subscribers can trigger the same scenario multiple times, only their first interaction counts towards ‘Starts’ in the statistics.
- Active contacts: The number of subscribers who, within a specified period, interacted with any scenario’s blocks — for example, by reading messages, clicking buttons, or submitting their data.
- Errors: Any issues encountered during the scenario operation. These may include exceeding sending limits, using an expired token, or attempting to send messages to inactive contacts.
You can also view the detailed statistics for each block and track the subscriber progression, such as the number of contacts who reached each block, the number of messages delivered, and the number of clicks.
To do this, click the detailed statistics icon on the right next to the scenario.

The scenario editor will open, showing statistics for each block.

Click the statistics icon within any block to view a contact report for each metric in that block.

Contact reports can be used to create new lists, for example, to group together contacts who interacted with all emails in your welcome series or to separate those who didn’t show interest.
Contact reports also show errors for each contact individually.

You can also set custom date ranges. By default, both basic and detailed statistics show data from the past 30 days. You can adjust the period or filter to view data for the past 7 days, 30 days, 3 months, 6 months, or 1 year. You can also set a custom period from 1 day to 1 year using the date picker.