Use merge tags to tailor your content to each subscriber. These merge tags are unique pieces of code enclosed in double curly braces. Each merge tag corresponds to the data recorded in Selzy.
Selzy supports two types of merge tags:
- System merge tags can be used to include data such as “View this email in your browser" links, unsubscribe links, or subscription preferences.
- Custom merge tags pull content from custom contact fields, such as name, city, or birth date.
When you send a campaign, Selzy will replace each merge tag with the corresponding data. Here’s an example of how merge tags work in Selzy, both in the email and in its subject line:
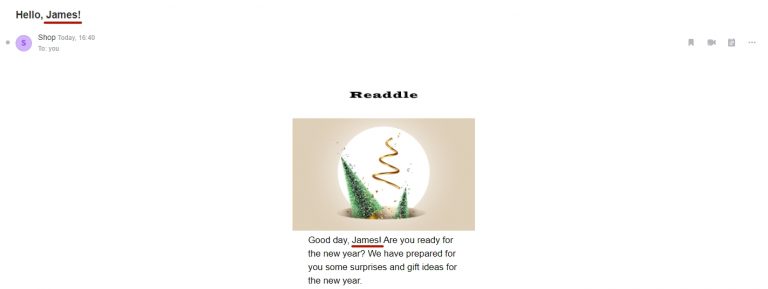
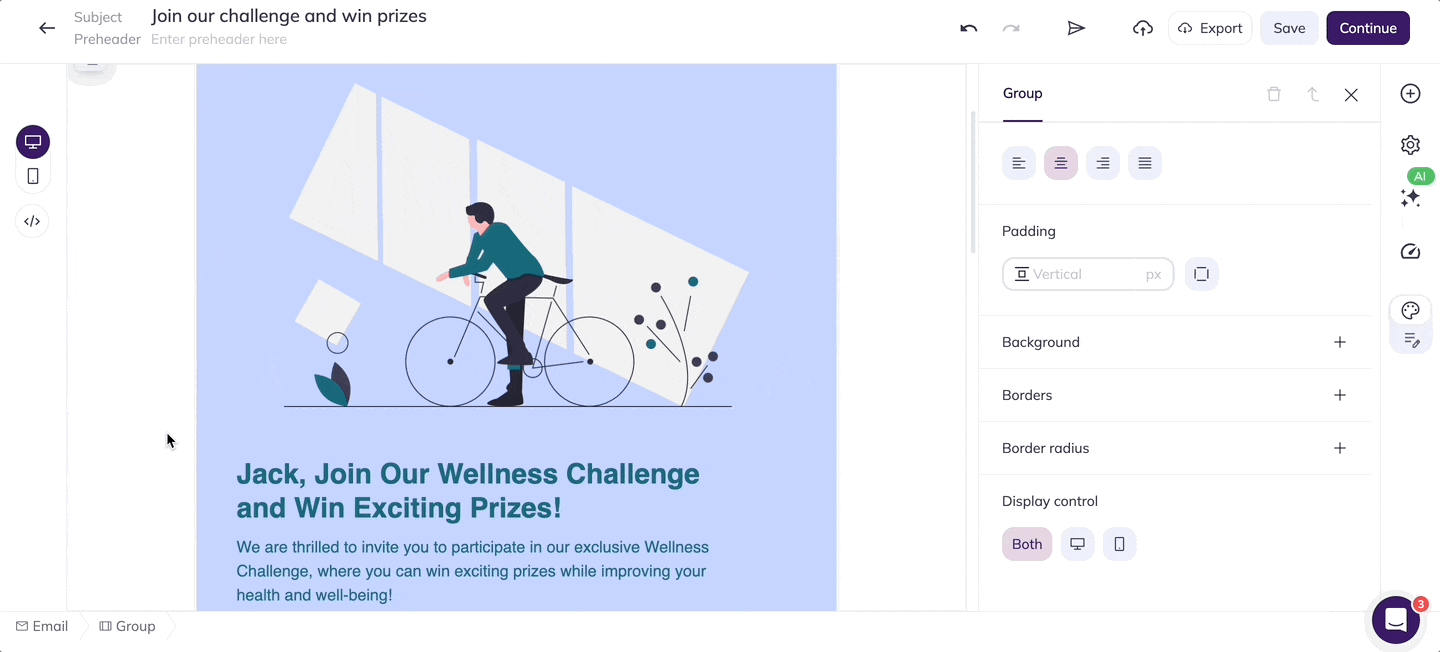
An email from an online store includes the recipient’s name in the subject line and in the email body
System merge tags
| Merge tag | What it refers to | What you insert in the HTML | What a recipient sees |
| {{_Telegram}} | The contact's Telegram username. Only if it’s available in the contact card. | Hello {{_Telegram}}! | Hello jackwilson! |
| {{ToName}} | The name displayed in the recipient’s email program next to their email address. Email recipients will see Name Surname <[email protected]> in the "To" field.
The text is limited to 78 characters. Any characters above the limit will be truncated. |
1.
The variable works in email programs regardless of the merge tag in an email. 2. Within the email, the merge tag works like the other tags: Hello {{ToName}}! |
1.
To: Andrew <[email protected]> 2. Hello Andrew! |
| {{ListTitle}} | The name of the list to which the campaign was sent. | Thank you for subscribing to our “{{ListTitle}}” newsletter! | Thank you for subscribing to our “Fashion Trends” newsletter! |
| {{Email}} | The contact's email address. Only works in email campaigns. | You’re receiving this email because you provided your email address, {{Email}}, at the Marketing Expo. | You’re receiving this email because you provided your email address, [email protected], at the Marketing Expo. |
| {{LocalPart}} | The part of the email address before the @. Only works in email campaigns. | Hello, {{LocalPart}} | Hello, john777 |
| {{Phone}} | The contact's phone number. Only works in SMS text campaigns. | Your phone number — {{Phone}} | Your phone number — +13101234567 |
| {{ConfirmUrl}} | The subscription confirmation link. Only used in subscription confirmation emails. | To confirm your subscription, <a href="{{ConfirmUrl}}">click here</a> | To confirm your subscription, click here. |
| {{SubscribeListUrl:NNN}} | The subscription confirmation link must be clicked by a potential subscriber to be added to a specific contact list. The NNN value is the ID of the list. You can get it under the list’s name on the Contact lists page, or copy it from the list’s page URL. | Subscribe to our <a href=”{{SubscribeListUrl:123}}” >Cats Newsletter</a>! | Subscribe to our Cats Newsletter! |
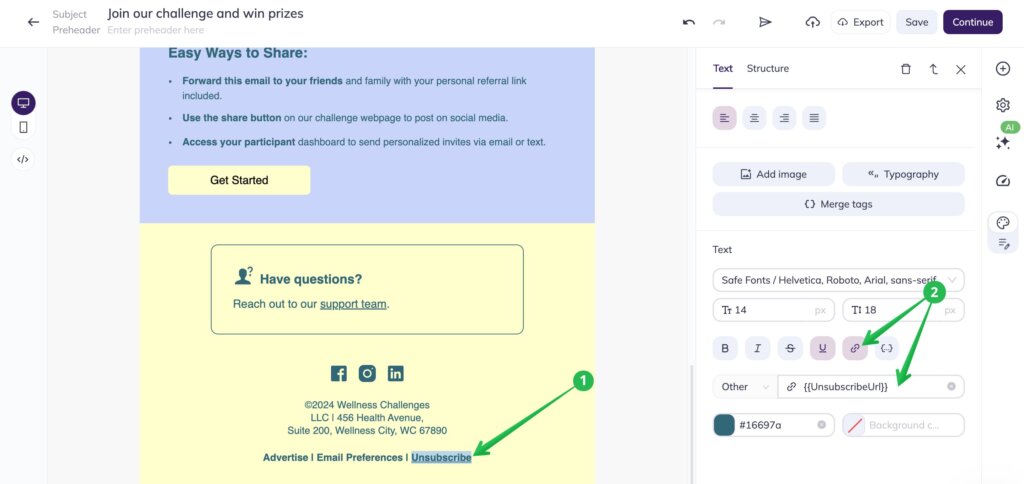
| {{UnsubscribeUrl}} | The unsubscribe link. Selzy automatically adds an unsubscribe link at the bottom of each email, so you don't have to add this tag manually every time.
However, if you use this merge tag, an automatic unsubscribe link will not be added to the email. |
<a href="{{UnsubscribeUrl}}">Click here</a> to unsubscribe. | Click here to unsubscribe |
| {{WebLetterUrl}} | The link to the browser-based version of the email. | If you have trouble viewing this email, please click here to <a href=”{{WebLetterUrl}}”>view the email in your browser</a> | If you have trouble viewing this email, please click here to view the email in your browser. |
| {{SendDate}} | The scheduled send date. You can set the format explicitly: {{SendDate:FORMAT}}, where FORMAT is the local time/date format according to php date() function, with 4 available modifications:
1.The q symbol implies the name of the month. 2.The _ symbol before D, l, F, M, q makes all letters lowercase. 3.The ^ symbol before D, l, F, M, q makes all letters uppercase. 4.Time zone symbols are not allowed. The date and time settings will use the settings in your personal account. |
1.
{{SendDate:F j, Y}} 2. {{SendDate:m/d/Y g:i a}} 3. {{SendDate:m-d-Y H:i:s}} |
1.
January 28, 2021 2. 01/28/2021 9:37 pm 3. 28-01-2021 21:37:47 |
| {{SocialBookmarks}} | Social media icons.
Here, you can set up additional parameters, such as, {{SocialBookmarks:"url", "title", "services"}}, where 1.url is the link to a social media page. If no value is entered, the link to a browser-based version of the email will be inserted. 2.title is a short text description of the URL. If no value is entered, the text from the Subject line of the email will be used. Quotation marks are not allowed with this parameter. 3.services is a comma-separated list of services to create icons for. Each service name must be enclosed in double quotes. Valid service names examples: google, facebook, linkedin, twitter. |
{{SocialBookmarks:”https://google.com”, “title”, “twitter,google”}} |
Custom merge tags
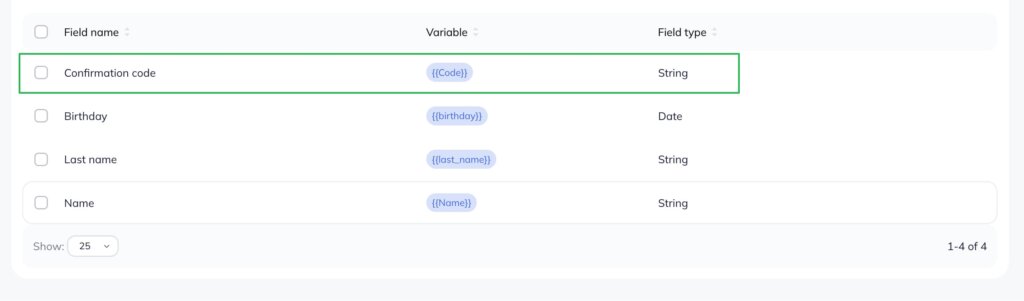
Custom merge tags use values stored in custom contact fields.
The Name, Last name, and Birthday fields are created by default in every Selzy account. You can use them in your campaigns if they are available in the contact card.
| Merge tag | What it refers to | What you insert in the HTML | What a recipient sees |
| {{Name}} | The contact's first name. It can be added to the campaign only if it is available in the contact card. | Hello {{Name}}! | Hello Jack! |
| {{last_name}} | The contact's surname. It can be added to the campaign only if it is available in the contact card. | Hello {{Name}} {{last_name}}! | Hello Jack Wilson! |
| {{birthday}} | The contact's date of birth. It can be added to the campaign only if it is available in the contact card. | Happy Birthday, {{Name}}! 🎈 We noticed your special day is on {{birthday}}, and we think it deserves a celebration | Happy Birthday, Jack! 🎈 We noticed your special day is on 01.12.1984, and we think it deserves a celebration. |
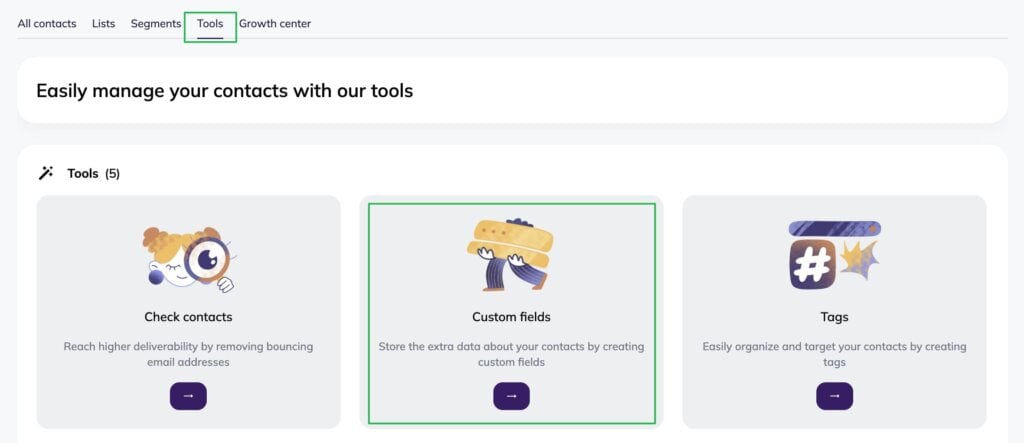
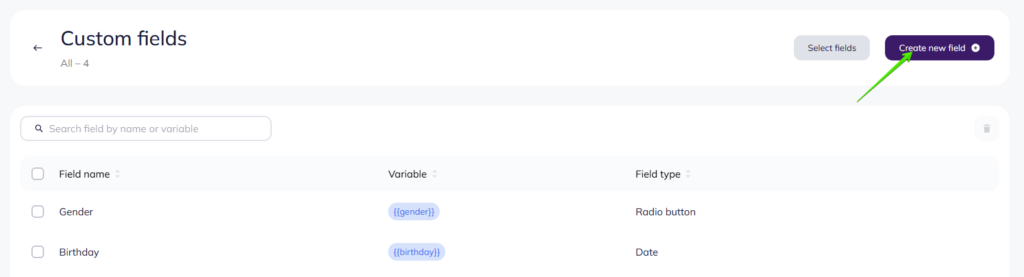
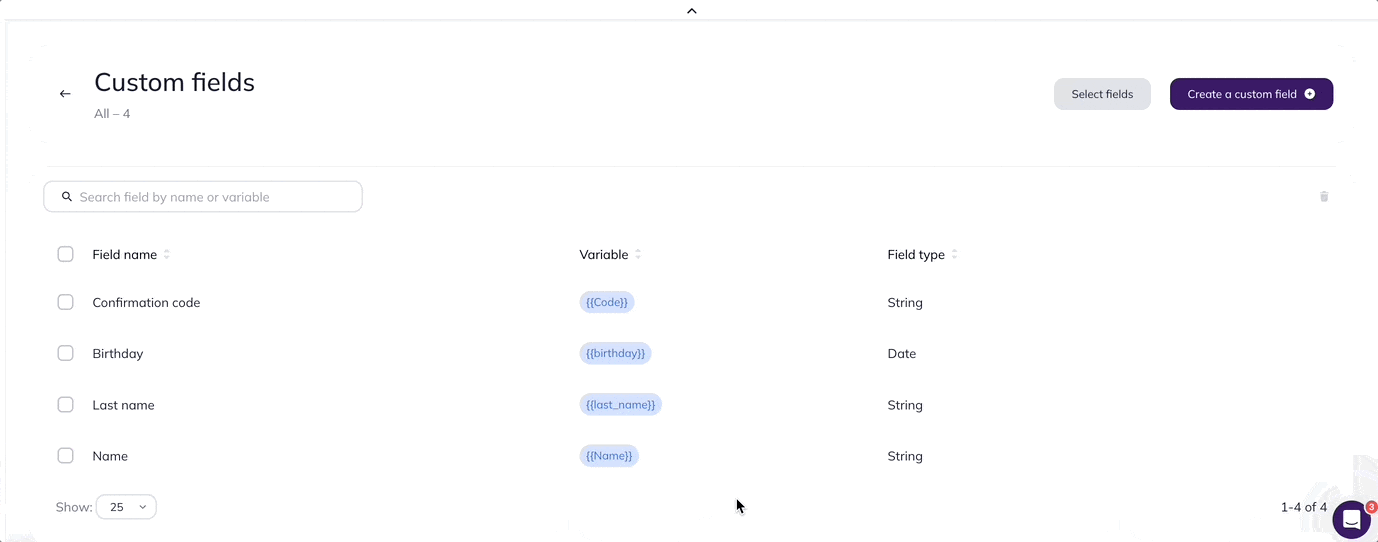
To create a new custom field, go to Contacts → Tools → Custom fields.
Click Create new field.
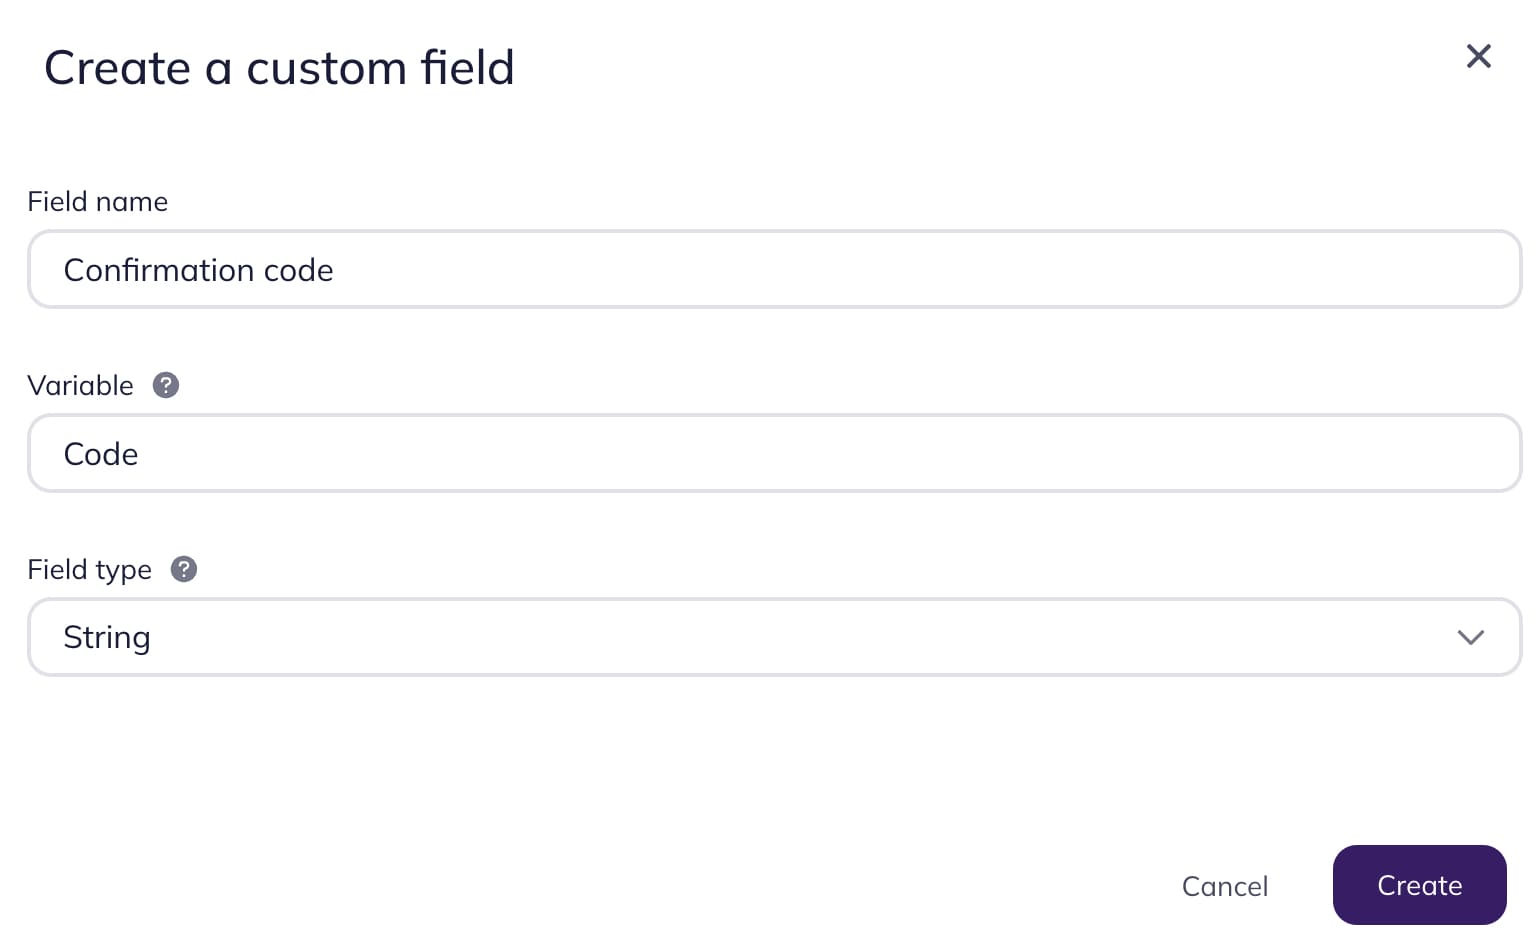
As an example, let's create a custom field that will store confirmation codes. To do this, fill out the following fields:
- Field name. It will be displayed as a column name in your contact lists in Selzy.
- Variable you want to use in your emails. It can only contain Latin letters, numbers, and underscores. Spaces are not allowed. Merge tags are case sensitive, which makes “Code” and “code” two different variables.
- Field type. Type of data that will be stored in this field. For text, select between String or Text, depending on the length of the stored text; for dates — Date, etc. For a confirmation code, choose String.
Click Create.
The newly created custom field will appear in the list of contact fields.
Add merge tags to an email
Currently, Selzy offers two email builders. The one released in February 2024 is referred to as the “new builder”. This article provides instructions for both builders. Navigate between the sections “In the new builder” and “In the old builder” to find information relevant to the builder you use.
We recommend using the new builder, if you are not already. You can explore its key features in the overview article available in English.
In the new email builder
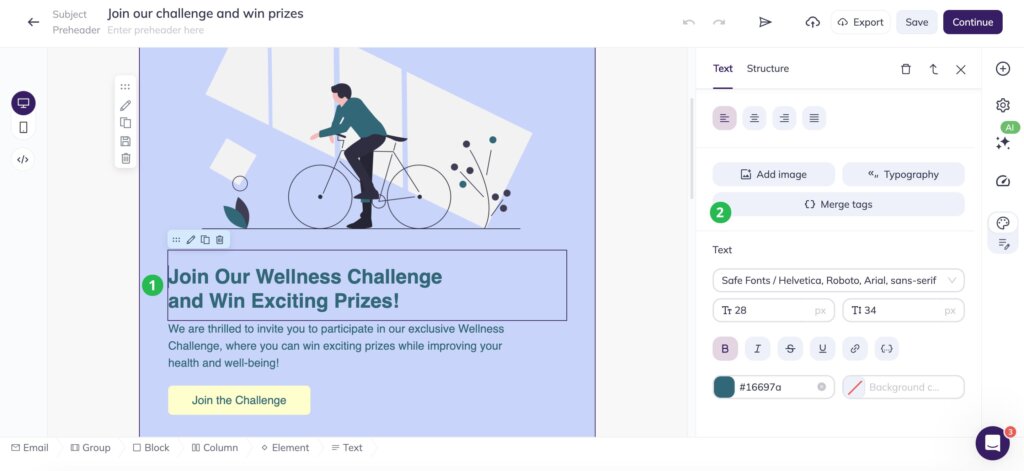
Create a new email following the instructions.
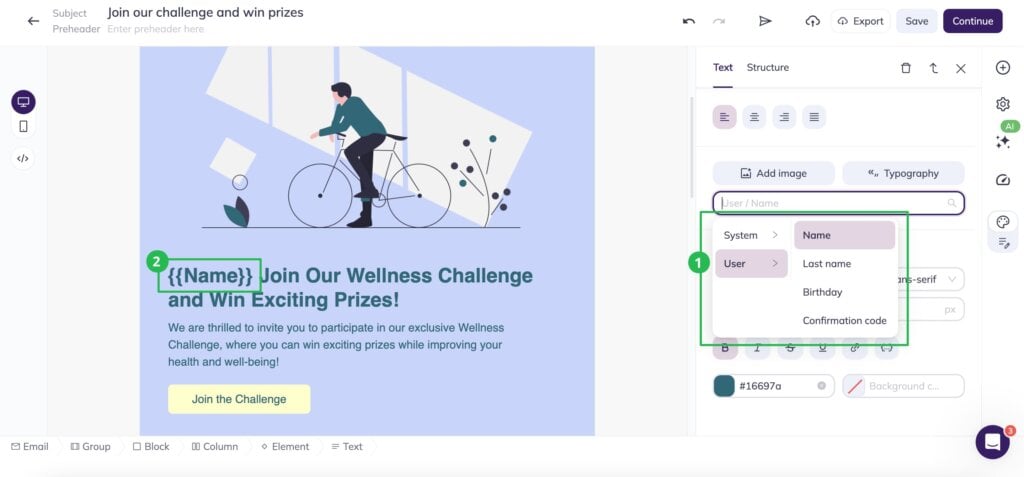
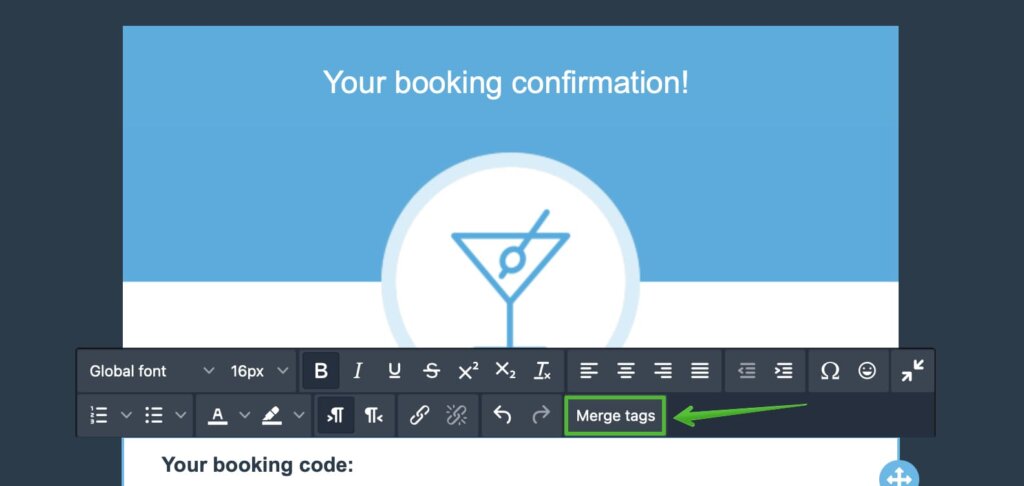
Click where you want to insert a merge tag in the text. Then, go to the text settings and click Merge tags.
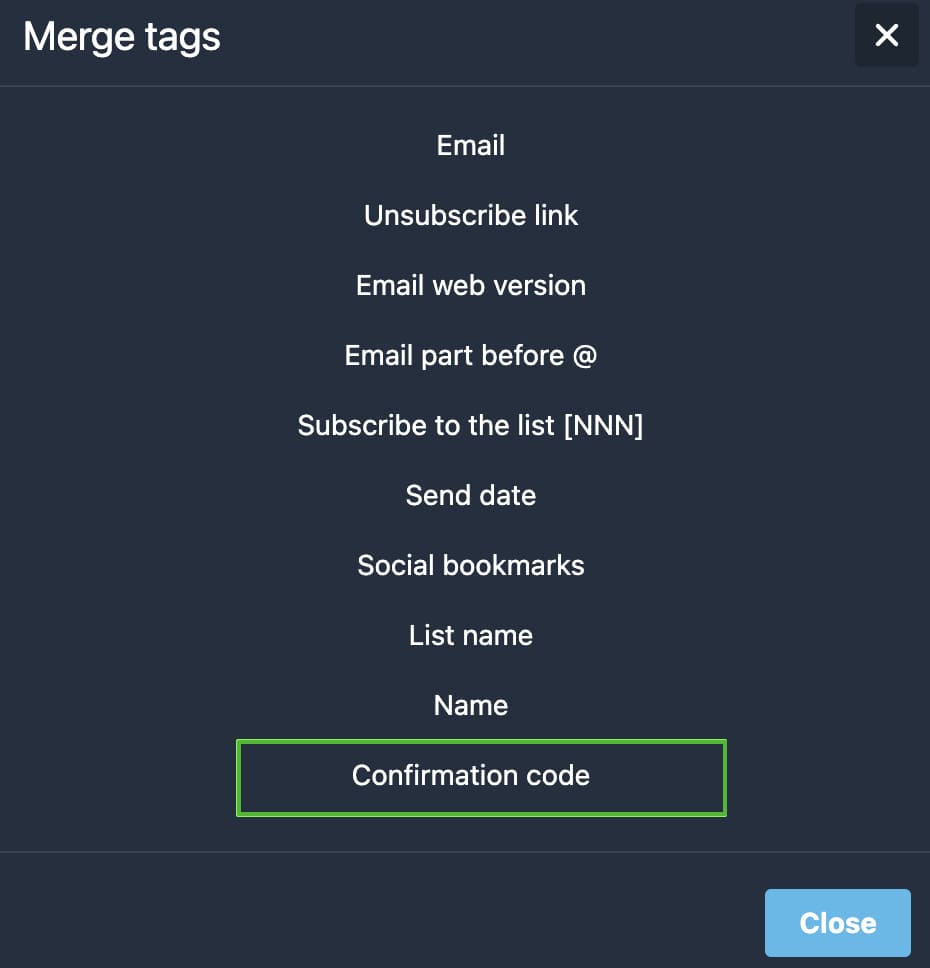
Select the tag type (System or User) and the field you want to pull values from. The merge tag will be added to the email.
Alternatively, you can simply copy the desired merge tag from the Custom fields section and paste it into the email or enter it manually — make sure to include double curly braces.
You can also replace some text with the merge tag. To do this, highlight the text you want to replace and, in the text settings, click Text replacer. Then, enter the tag manually or add it via the Merge tags button.
You can also add merge tags to email text as hyperlinks, such as an unsubscribe link or the web version of an email). To do this, highlight the text where you want to insert the link, click the link icon in the text settings, and add the desired merge tag to the field.
In the old email builder
Create an email following the instructions from Tutorial № 5.
In the email, click where you want to insert a merge tag in the text. In the top toolbar, click the Merge tags button.
Choose the field you want to pull values from.
The merge tag should now be added to the email.
You can add other merge tags in the same way, including Selzy system tags.
Alternatively, you can simply copy the desired merge tag from the Custom fields section and paste it into the email or enter it manually — make sure to include double curly braces.
You can also use this option in the HTML editor.

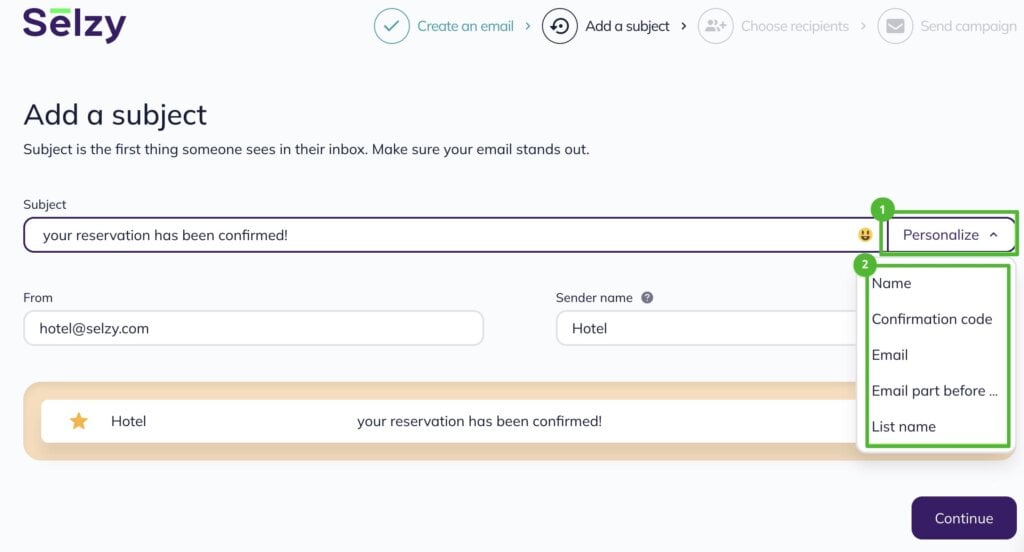
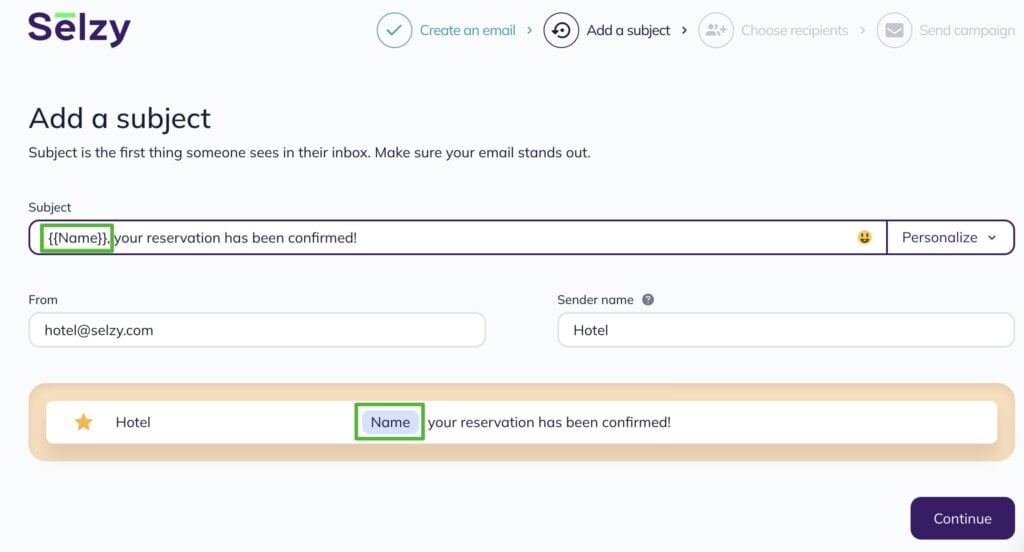
Add merge tags to the subject line
To add a merge tag to the email subject line, go to the corresponding step of the sending campaign flow. In the email subject line field, put the cursor where you want to insert your merge tag and click Personalize. From the drop-down list, choose the merge tag you want to use.
Alternatively, you can simply copy the desired merge tag from the Custom fields section and paste it into the email or enter it manually — make sure to include double curly braces.
Set custom field values
A merge tag works correctly only when there is data in the field it refers to. The data can be imported, collected through sign-up forms, or entered manually.
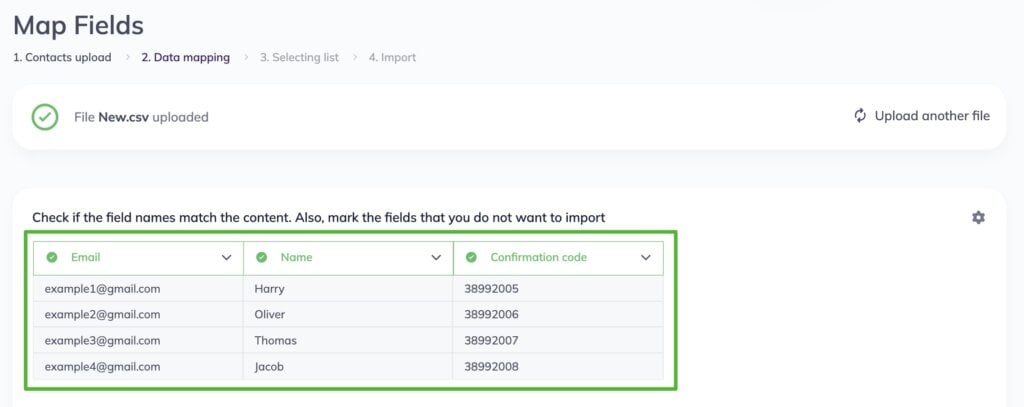
For example, you have a file that contains contact data in the following format:
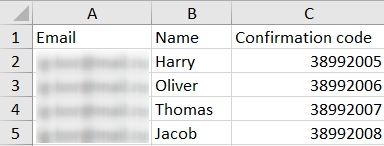
When importing the file to Selzy, you'll need to set up contact fields by matching custom contact fields to their corresponding columns in the file.
You can also edit custom fields in the contact card in the Custom fields tab.
Test your merge tags
Please note!
Merge tags do not work in test emails. To test them, you need to send a campaign. To validate dynamic content, create a contact list that only contains email addresses you manage, and send a campaign to this list before sending out to your target audiences.
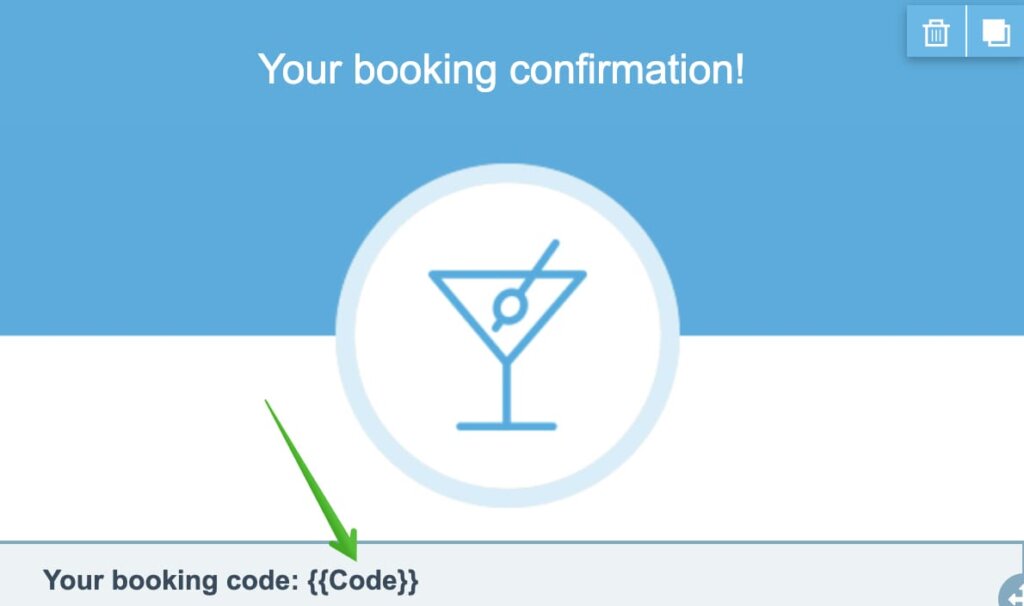
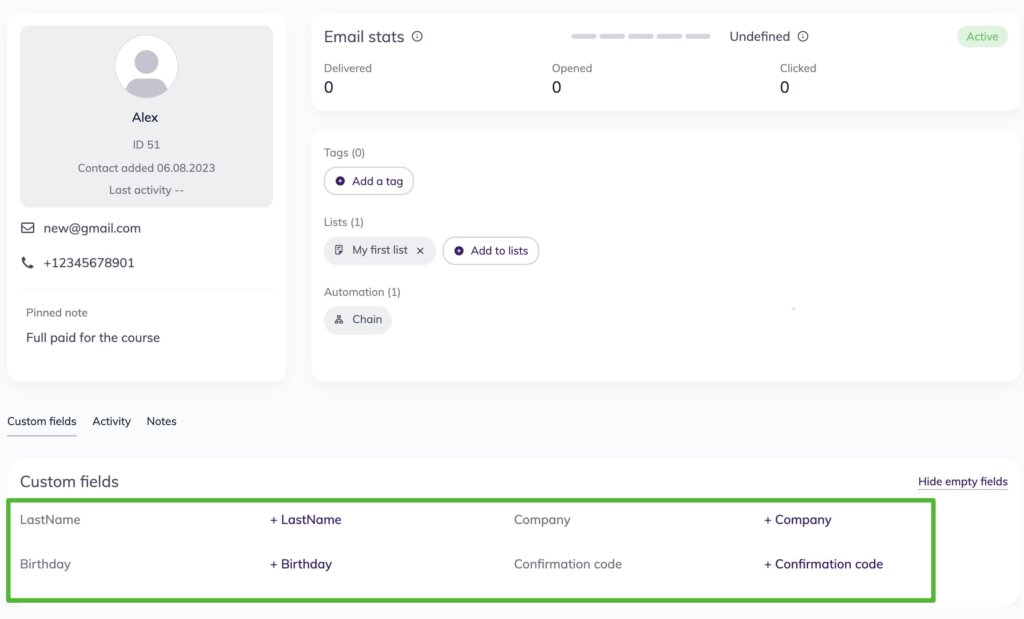
Here's an example of what dynamic content personalization looks like in the email.

The name {{Name}} tag is replaced with the contact's first name and the {{Code}} tag is replaced with the unique confirmation code.
Conditional merge tags
In some cases, you may need to personalize content using conditions rather than predefined values. For example, let's assume that some of your recipients don't have a Name value associated with them, and you need to greet such recipients in a more generic way, such as "Dear Customer". Below, we take a look at how to create conditions for fallback content when using merge tags.
Display content if the field is empty
Use the following merge tag:
{{Name|text if empty}}
Where text if empty is a fallback value that you want to be used in place of the missing data.
Selzy will replace the tag with the content stored in the Name field, and if the field is empty, it will ’ll display the text that goes after |. Here, you can also use variable values stored in other content fields. For example, {{Name|{{Email}}}}.
For example:
Merge tag in the editor Email text, if the value stored in the Name field is "Alexander" Email text, if the Name field is empty Hello {{Name|Dear Customer}}! Hello Alexander! Hello Dear Customer!
Insert personalized content if a field is not empty and not equal to zero
Use the following formula:
{{Name?text if not empty}}
If the Name field is not empty and the value is not equal to zero, Selzy will replace the tag with the value that goes after ?. If the field is empty, Selzy will not insert any value. Here, you can also use a different merge tag instead of text.
For instance, if you use {{Orders?{{Discount}}}}, Selzy will check if a subscriber has any value recorded in the Orders field. If the condition is met, Selzy will insert the value from the Discount field.
For example:
Merge tag in the editor Email text, if the field value is “10” Email text, if the field is empty {{Orders?Grab your 10% off!}} Grab your 10% off!
Add a comma if the name field is not empty
Use the following merge tag:
{{Name?, }}{{Name}}
If the Name field contains data, Selzy will put a comma before the inserted value. If the data is missing, nothing will be inserted.
For example:
Condition merge tag Email text, if the value stored in the Name field is ‘Jill’ Email text, if the Name field is empty Hello{{Name?, }}{{Name}}! Hello, Jill! Hello!
Capitalize a letter if the field is empty
This example shows how you can combine two conditions — one for the capital letter and another for the lowercase. Your formula should look as follows:
{{Name|Capital text}}{{Name?, lowercase text}}
For example:
Condition merge tag Email text, if the value stored in the Name field is ‘Jill’ Email text, if the Name field is empty {{Name|Please}}{{Name?, please}} update your information! Jill, please update your information! Please update your information!
Before sending a campaign with merge tags to the intended audience, we recommend testing the merge tags to make sure they work correctly. To do this, create a new contact list using your testing email address and send the campaign to this list first. If the merge tag works incorrectly, check the configurations in your campaign. Also, check the values stored in custom contact fields.