


Key takeaways
- No-reply emails are essential for situations where you do not want recipients to reply, like order notifications.
- To create a no-reply email in Gmail, set up a rule to reject incoming messages in the Google Workspace Admin console.
- No-reply emails are used for automated messages and should be used only when necessary to avoid email bounce rates.
- You cannot completely block replies to an email, but you can control how they are handled, like rejecting incoming messages or sending automatic responses.
Emails are an essential means of communication. However, there are certain situations in which you do not want the recipient to reply to your email. For example, if you are a business owner sending a bunch of order notifications to people every day, you do not want each one of their recipients to be able to reply to them.
In such cases, a no-reply email address can be helpful. In the following article, we are going to cover the basics of what a no-reply email is, as well as give you a step-by-step guide on how to create a no-reply email in Gmail, Outlook, and Yahoo. We will also provide you with a few best practices and tips on when and how to use no-reply emails.
How to create a no-reply email (quick steps)
To create a no-reply email in Gmail, you need to set up a rule that rejects incoming messages. Here’s how to do it:
- Log in to your Google Workspace Admin console.
- Go to Apps → Google Workspace → Gmail → Routing.
- Click Add rule and name it (e.g., “No-reply”).
- Select Inbound emails.
- Choose Reject message and add a custom response.
- Apply the rule to your no-reply email address (e.g., noreply@yourdomain.com).
Once set up, any replies sent to this address will be automatically rejected.
Note: Gmail doesn’t truly “disable” replies — it blocks or rejects incoming messages using filters or routing rules.
What is a no-reply email?
A no-reply email is an email that is sent from an email account that does not accept incoming emails. In case someone does attempt to reply to it, the message is not going to go through. Instead, the sender is going to receive a non-delivery notification from the email service provider they are currently using.
The purpose of such an email is to provide information, rather than initiate a conversation with its recipient. Because of that, no-reply emails are usually used for automated messages like confirmations for ordered products or instructions related to automated procedures, such as password changes.
Note that sending emails from a no-reply address can sometimes result in a higher rate of email bounce. The reason for that lies in how some email service providers, such as Gmail, may mark emails from no-reply email addresses as potentially suspicious or spammy. So, only use no-replies when necessary.
How to create a no-reply email in Gmail
Creating a no-reply email address in Gmail is not overly complex or technical. Instead, it is a straightforward process that can be accomplished in just a few steps. For starters, you need to sign in to your Google Workspace Admin console at admin.google.com using your administrator account credentials.

Navigate to the Apps section and select Google Workspace from the list of available apps. Click on the Gmail option to open the Gmail settings page, then click on the Routing tab to open the Gmail routing rules section.
If there is no existing routing rule, click on Add another rule to create a new rule. Otherwise, click on Configure to edit the existing rule. Remember to give your configuration rule a name that clearly identifies its purpose. For example, you could name it Reject emails for no-reply. That way, you can easily identify the rule later.
Under the Email messages to be affected section, select Inbound to apply the rule to any external emails sent to the account.

Under Option 2, select Reject message and enter the custom rejection message you want external senders to receive when they try to email the no-reply account.
Next, click on the Show options button to configure which user account to be affected by this routing rule. Under the Account types to affect, pick Users. Under the Envelope filter, pick Only affect specific envelope recipients.
Now, pick the Single email address option and enter the email address for the no-reply email account you want to create. For example, it could be no-reply@yourdomain.com. Then, click on the Save button to save the configurations of the routing rule.
Last but not least, test the configuration by sending an email to the no-reply account from an external email address to see if the autoresponder feature is working. By following these simple steps, you can create a no-reply email address in Gmail and ensure that external senders receive a custom rejection message when they try to email the no-reply account.
Can you block replies to an email?
Short answer: No, you can’t completely stop people from replying to an email.
What you can do is control what happens to those replies:
- Reject incoming messages (e.g., with Gmail routing rules).
- Ignore or filter replies so they never reach your inbox.
- Send automatic responses to let users know the mailbox isn’t monitored.
This is why “no-reply emails” don’t actually block replies — they just prevent you from receiving or processing them.
If you want to keep communication open, consider using a monitored address like support@ or contact@ instead.
How to create a no-reply email in Microsoft 365
Create a shared inbox
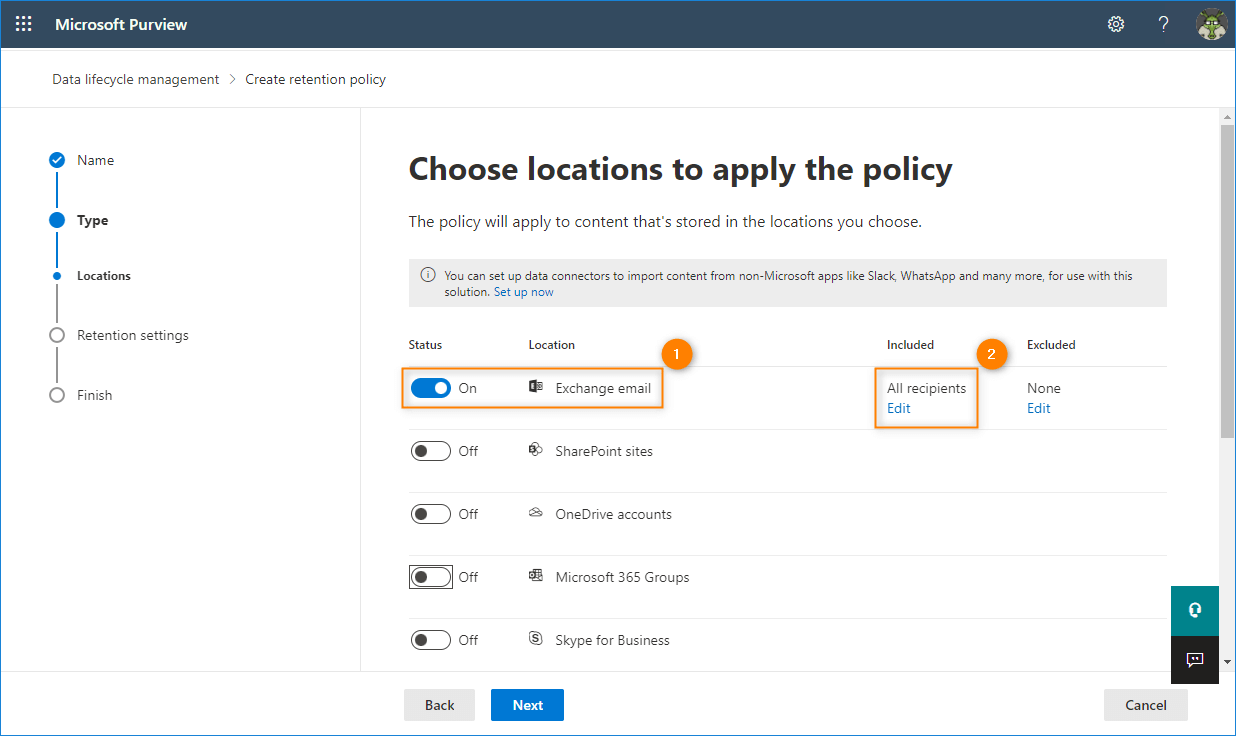
To create a no-reply email in Microsoft 365, you first need to create a shared inbox. Start by opening the Exchange admin center. Then, navigate to the Recipients section, select Mailboxes, and click on the Add a shared mailbox button.
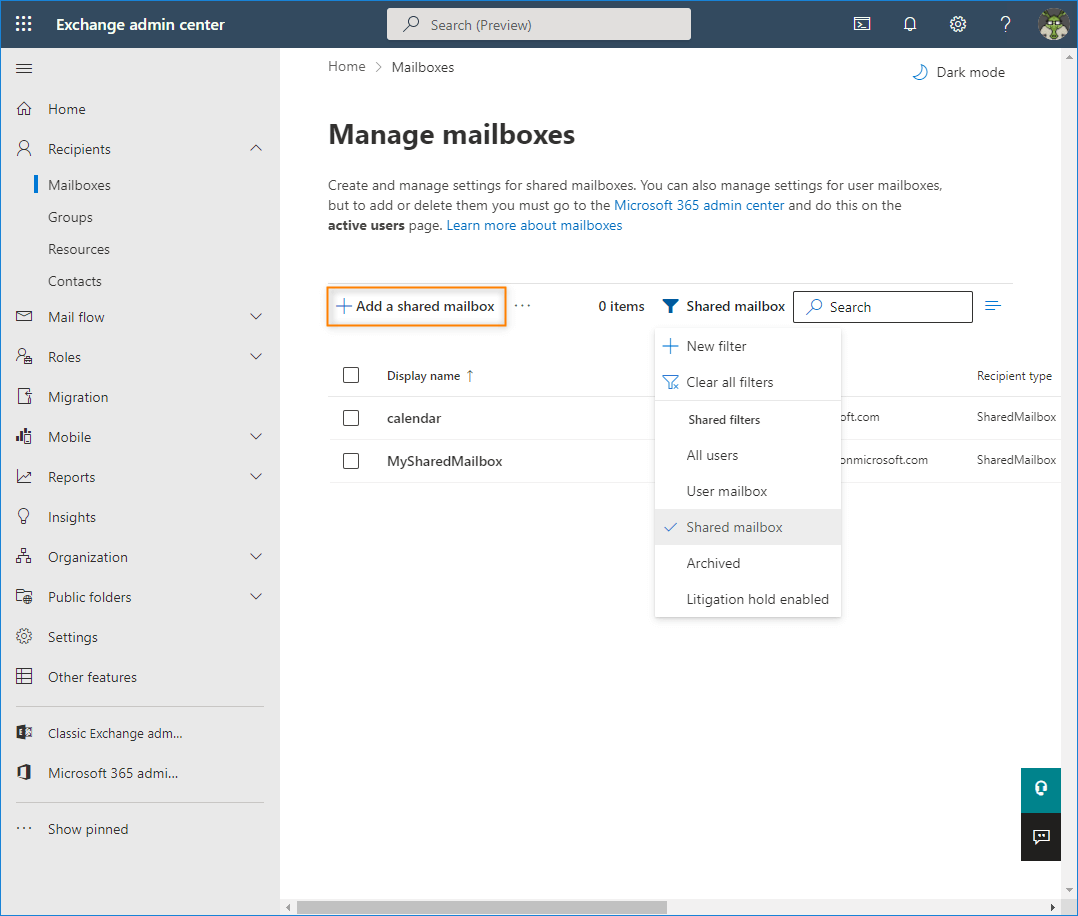
Next, assign an email address and a display name to the mailbox. For instance, if you want to use the address to send out a company newsletter, the display name could be Company Newsletter. As for the address itself, it could be newsletter@yourdomain.com.
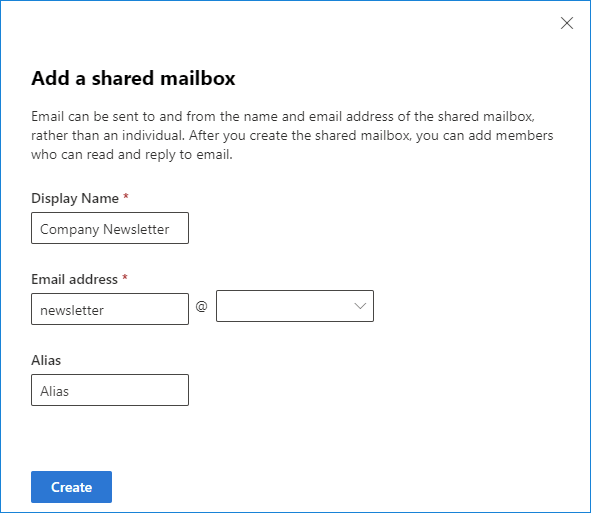
Now, click on the Create button to apply changes and navigate to the Add users to this mailbox option.
There, you could give someone else, such as your boss or a colleague, an option to access and manage this specific email address.
Establish a retention policy
The next step is to establish a retention policy for your no-reply mailbox. It will delete any messages from the inbox after a certain duration. It can be as brief as a single day.
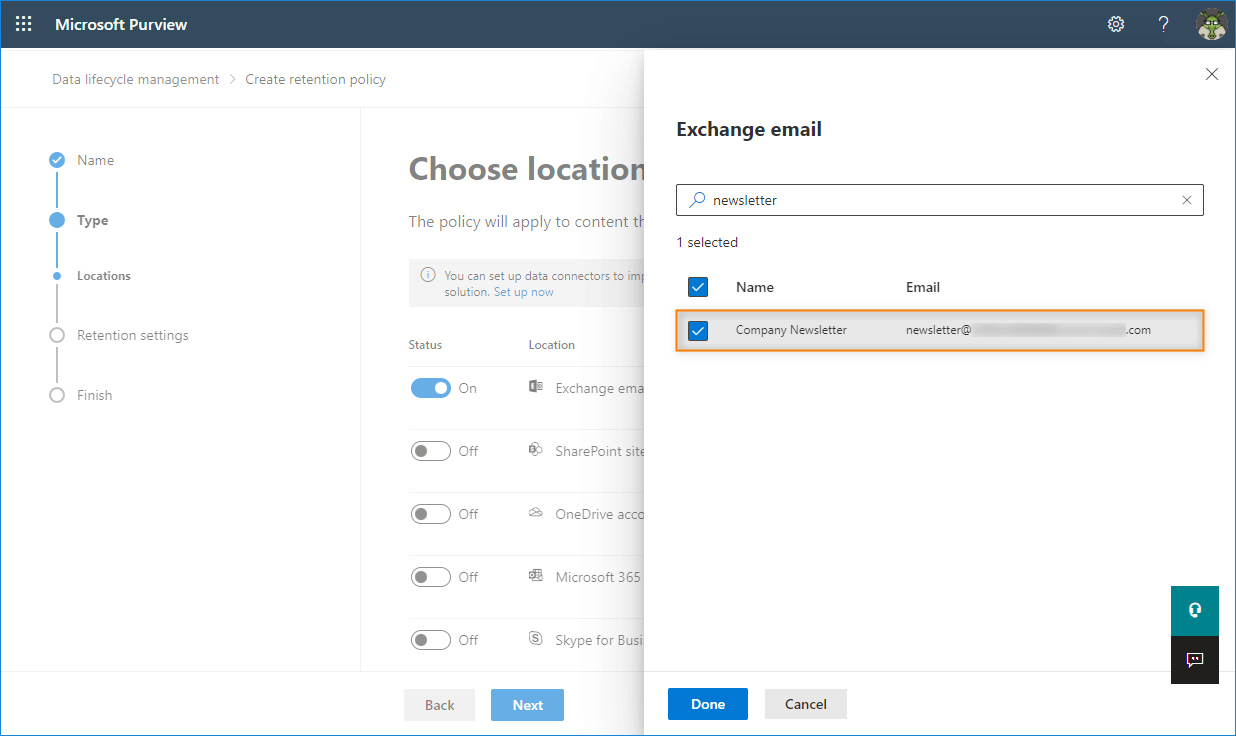
Open the Microsoft Purview compliance portal, go to Policies → Retention, and create a new retention policy.
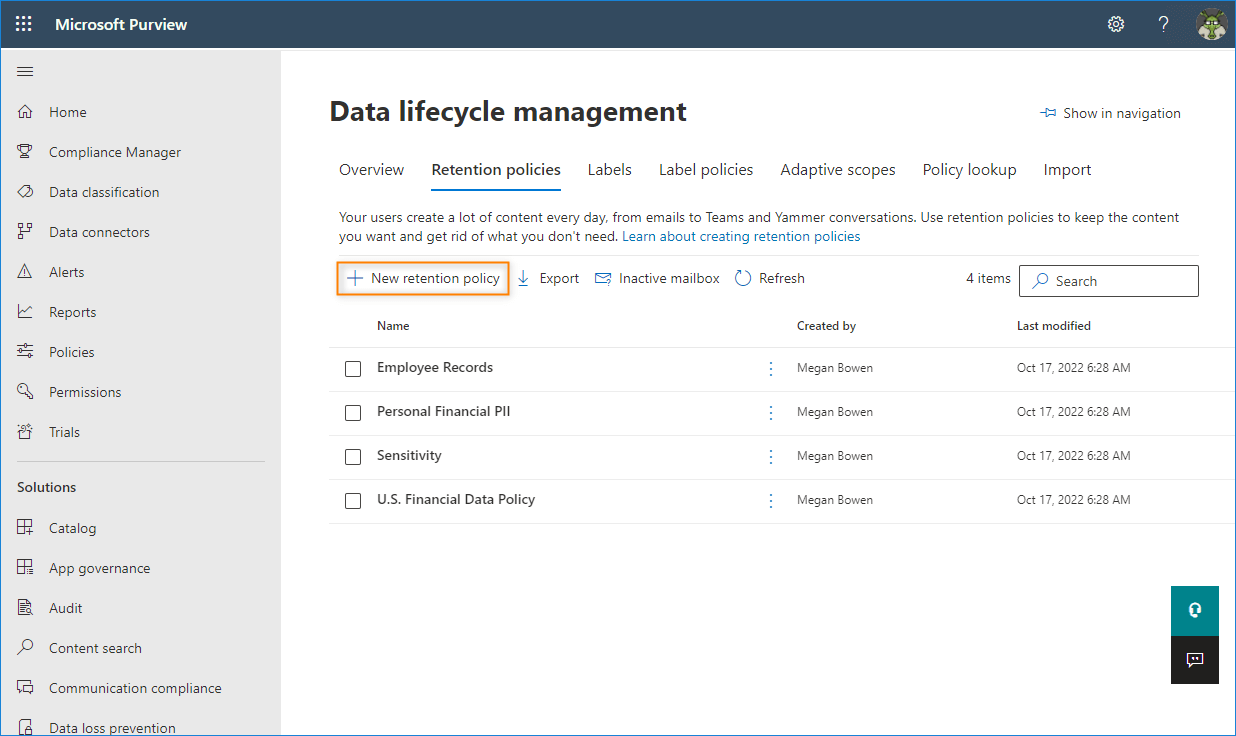
Name your policy, choose the Static type, and apply it to Exchange email.
Find and pick the no-reply mailbox using the search field or the mailbox list, and click on the Done button to confirm.
Proceed to the Retention settings step by clicking Next and select Only delete items when they reach a certain age. Set the policy to delete emails after a chosen time period (for example, one day).
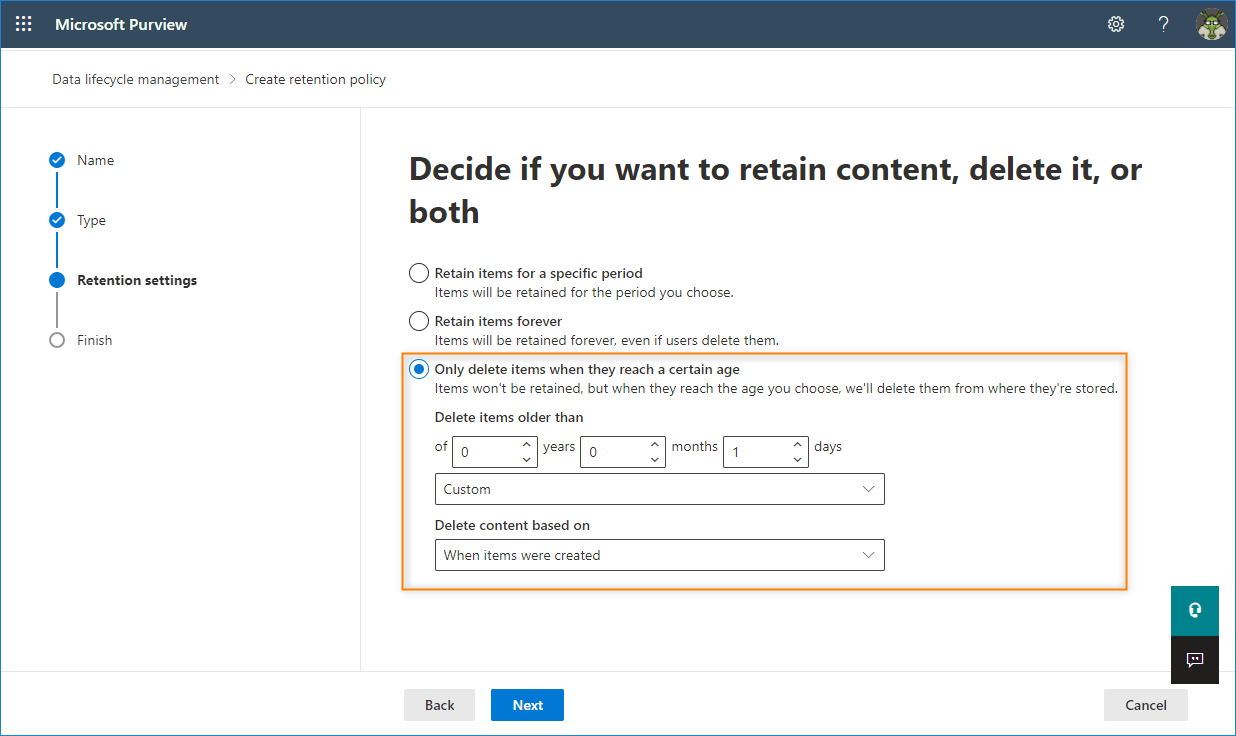
After that, click on the Next button to move to the summary page. Finally, click Submit to create the new retention policy, but note that it may take some time before it takes effect.
Set up an automatic reply
Access the Microsoft 365 admin center and navigate to the Teams & groups tab. Then, go to the Shared mailboxes section and choose the no-reply mailbox by clicking on it. In the new pane that appears, select Edit in the Automatic replies section.
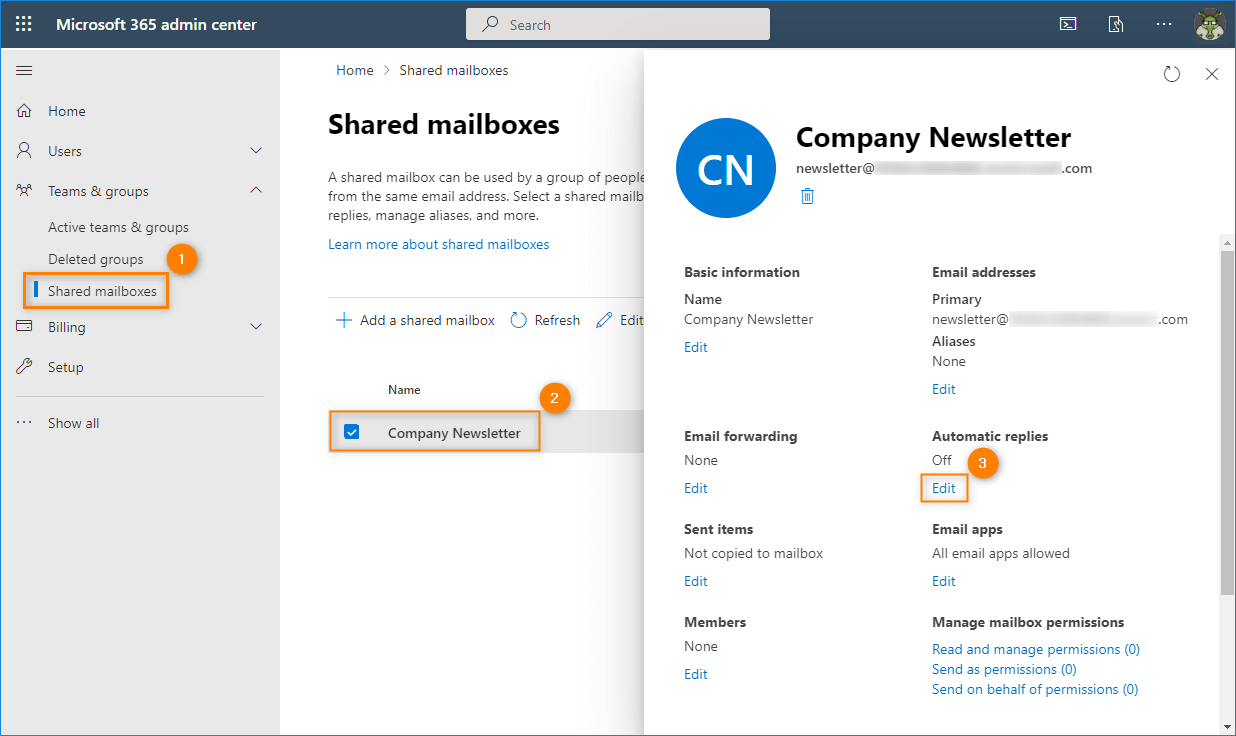
In the Manage automatic replies pane, select the checkboxes for automatically sending replies to senders inside and outside the organization, as well as the option to send replies to all external senders.
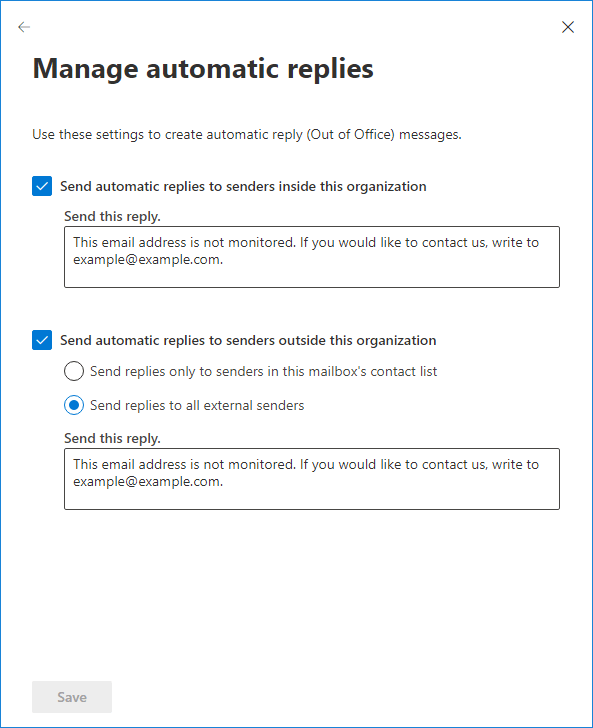
Now, enter the desired text for the automatic reply in the designated fields, and click on the Save button to confirm the changes.
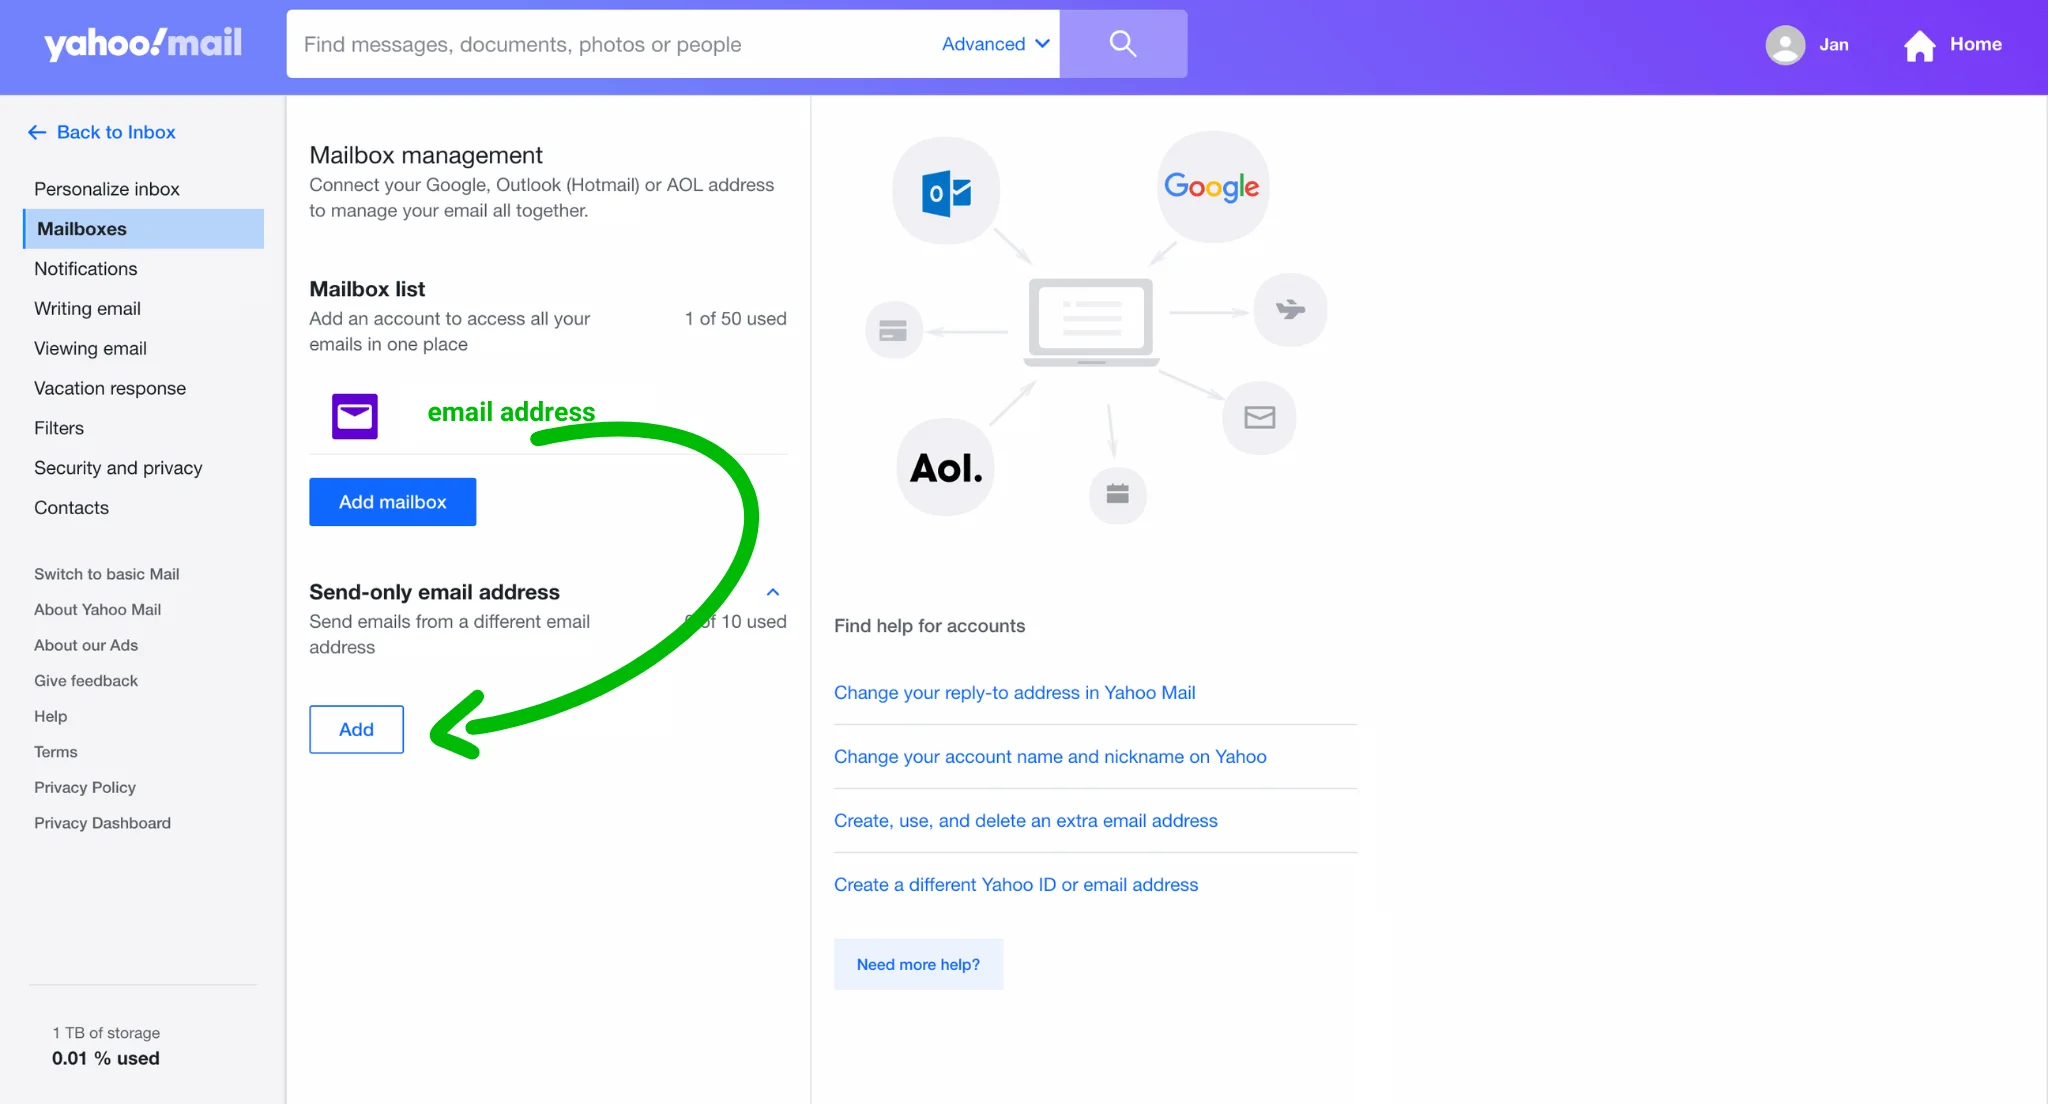
How to create a no-reply email in Yahoo
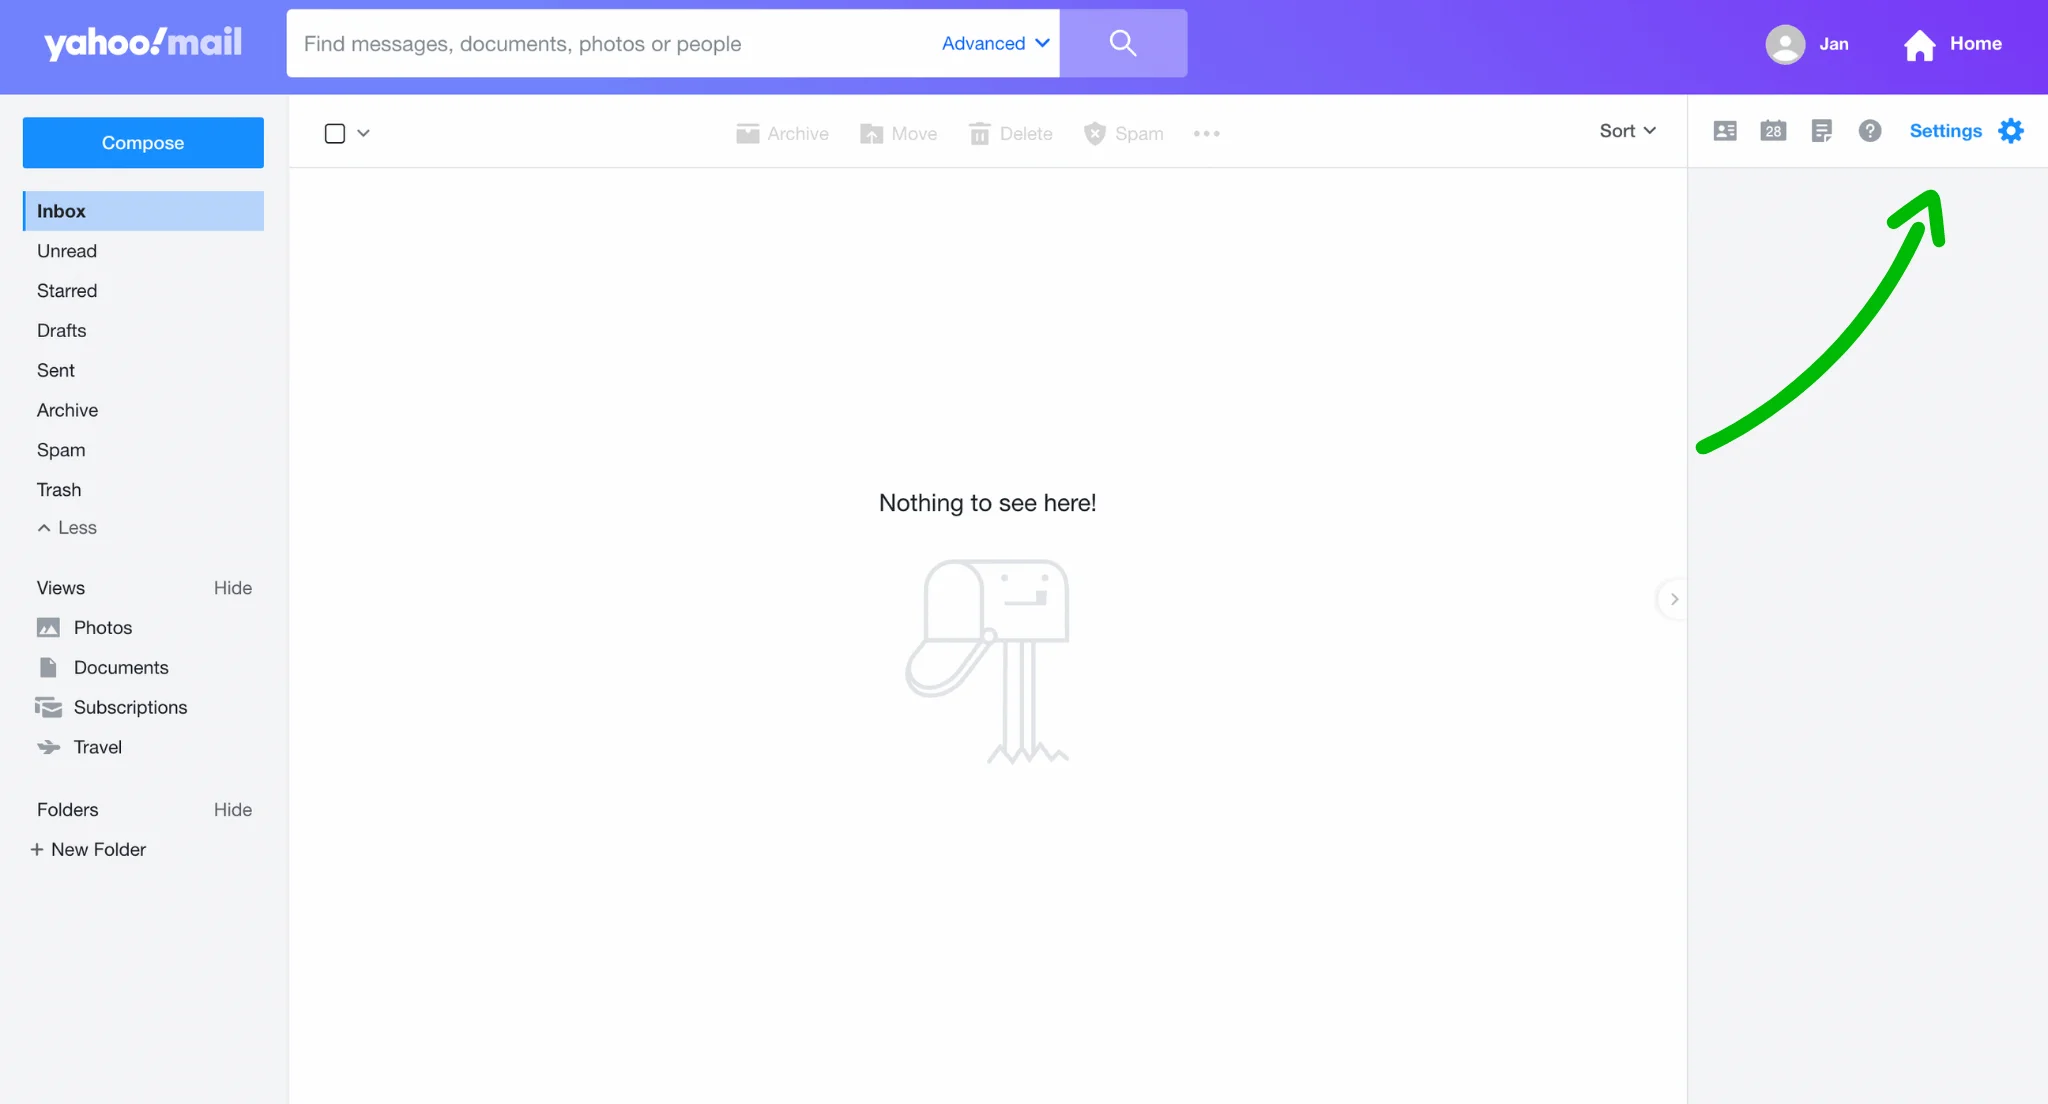
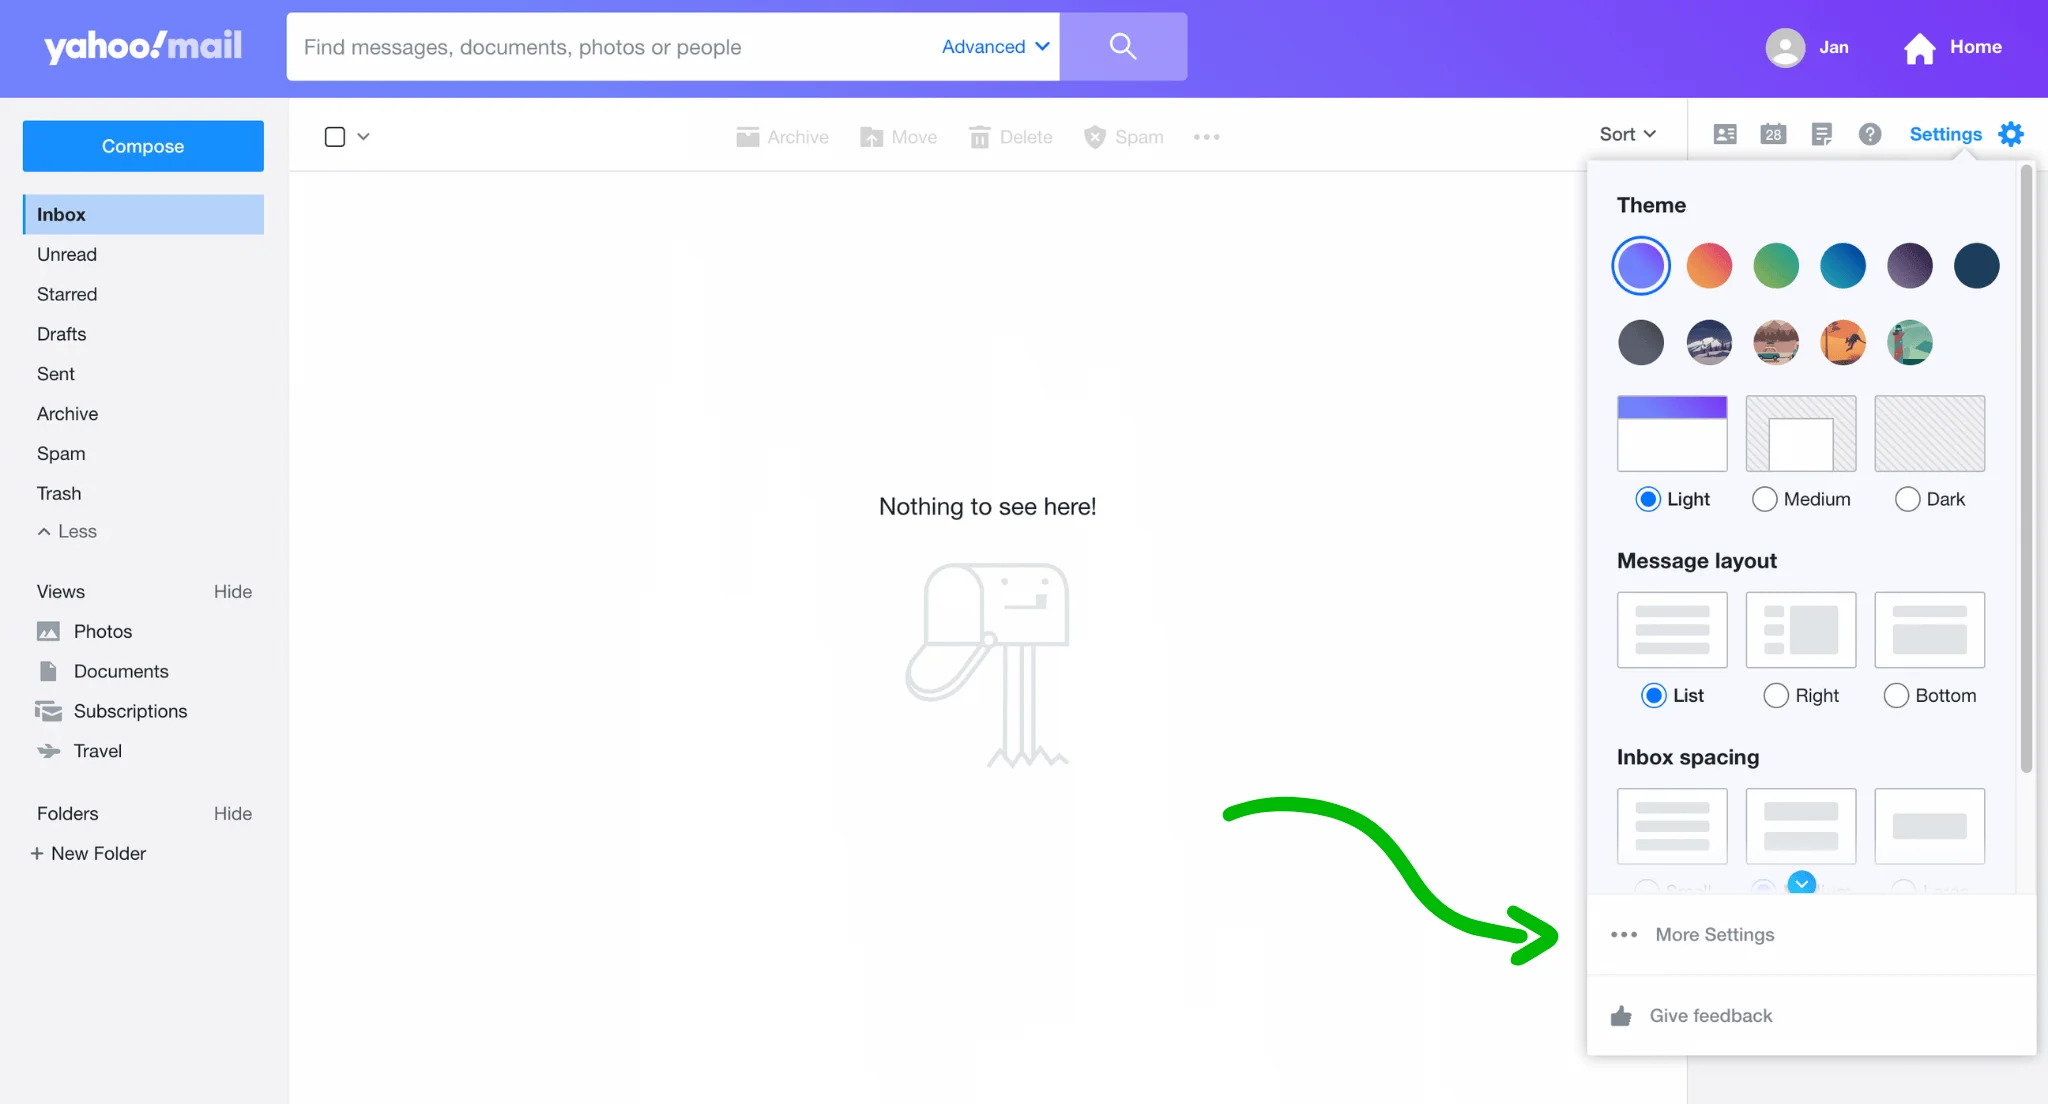
To add a send-only email address, first, click on the Settings icon, followed by More settings.
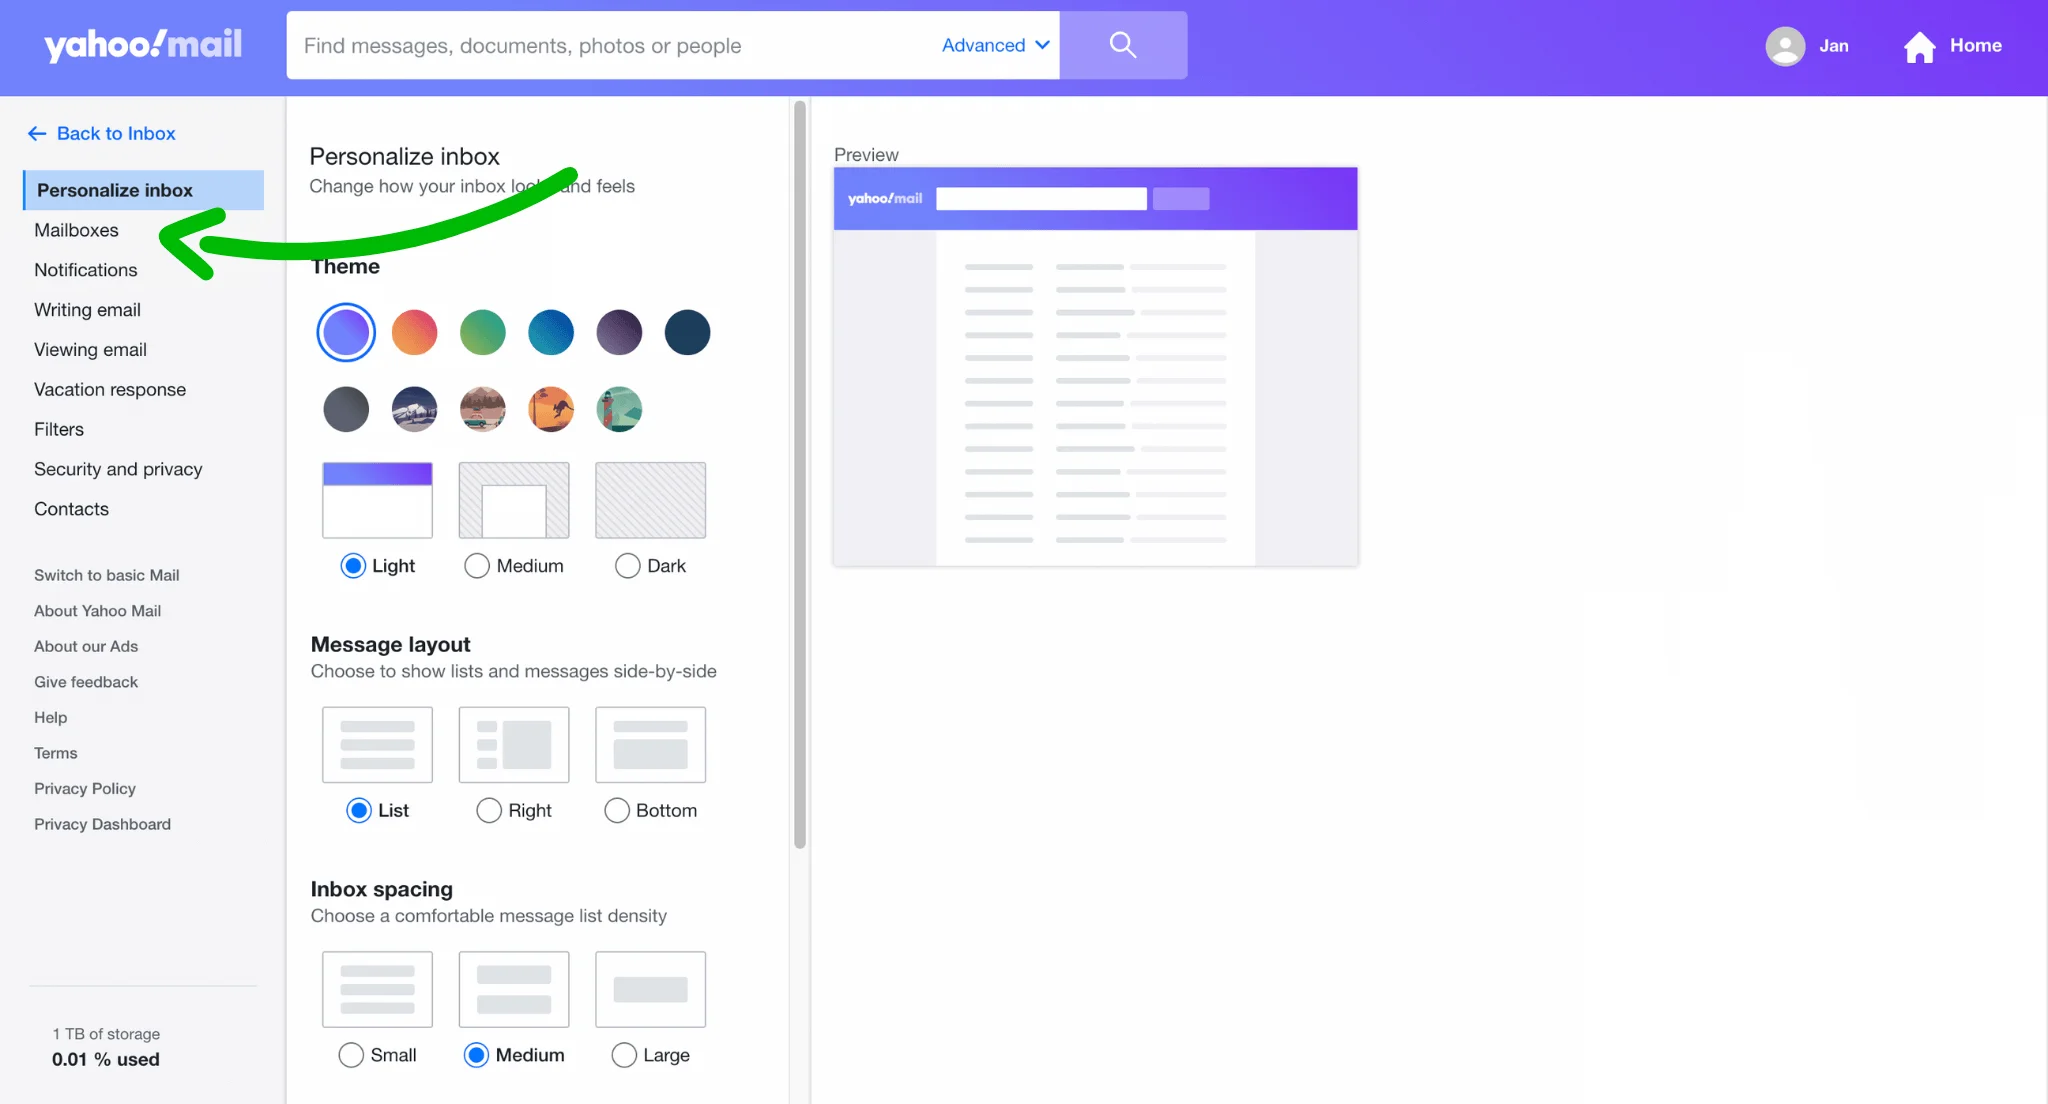
Select Mailboxes.
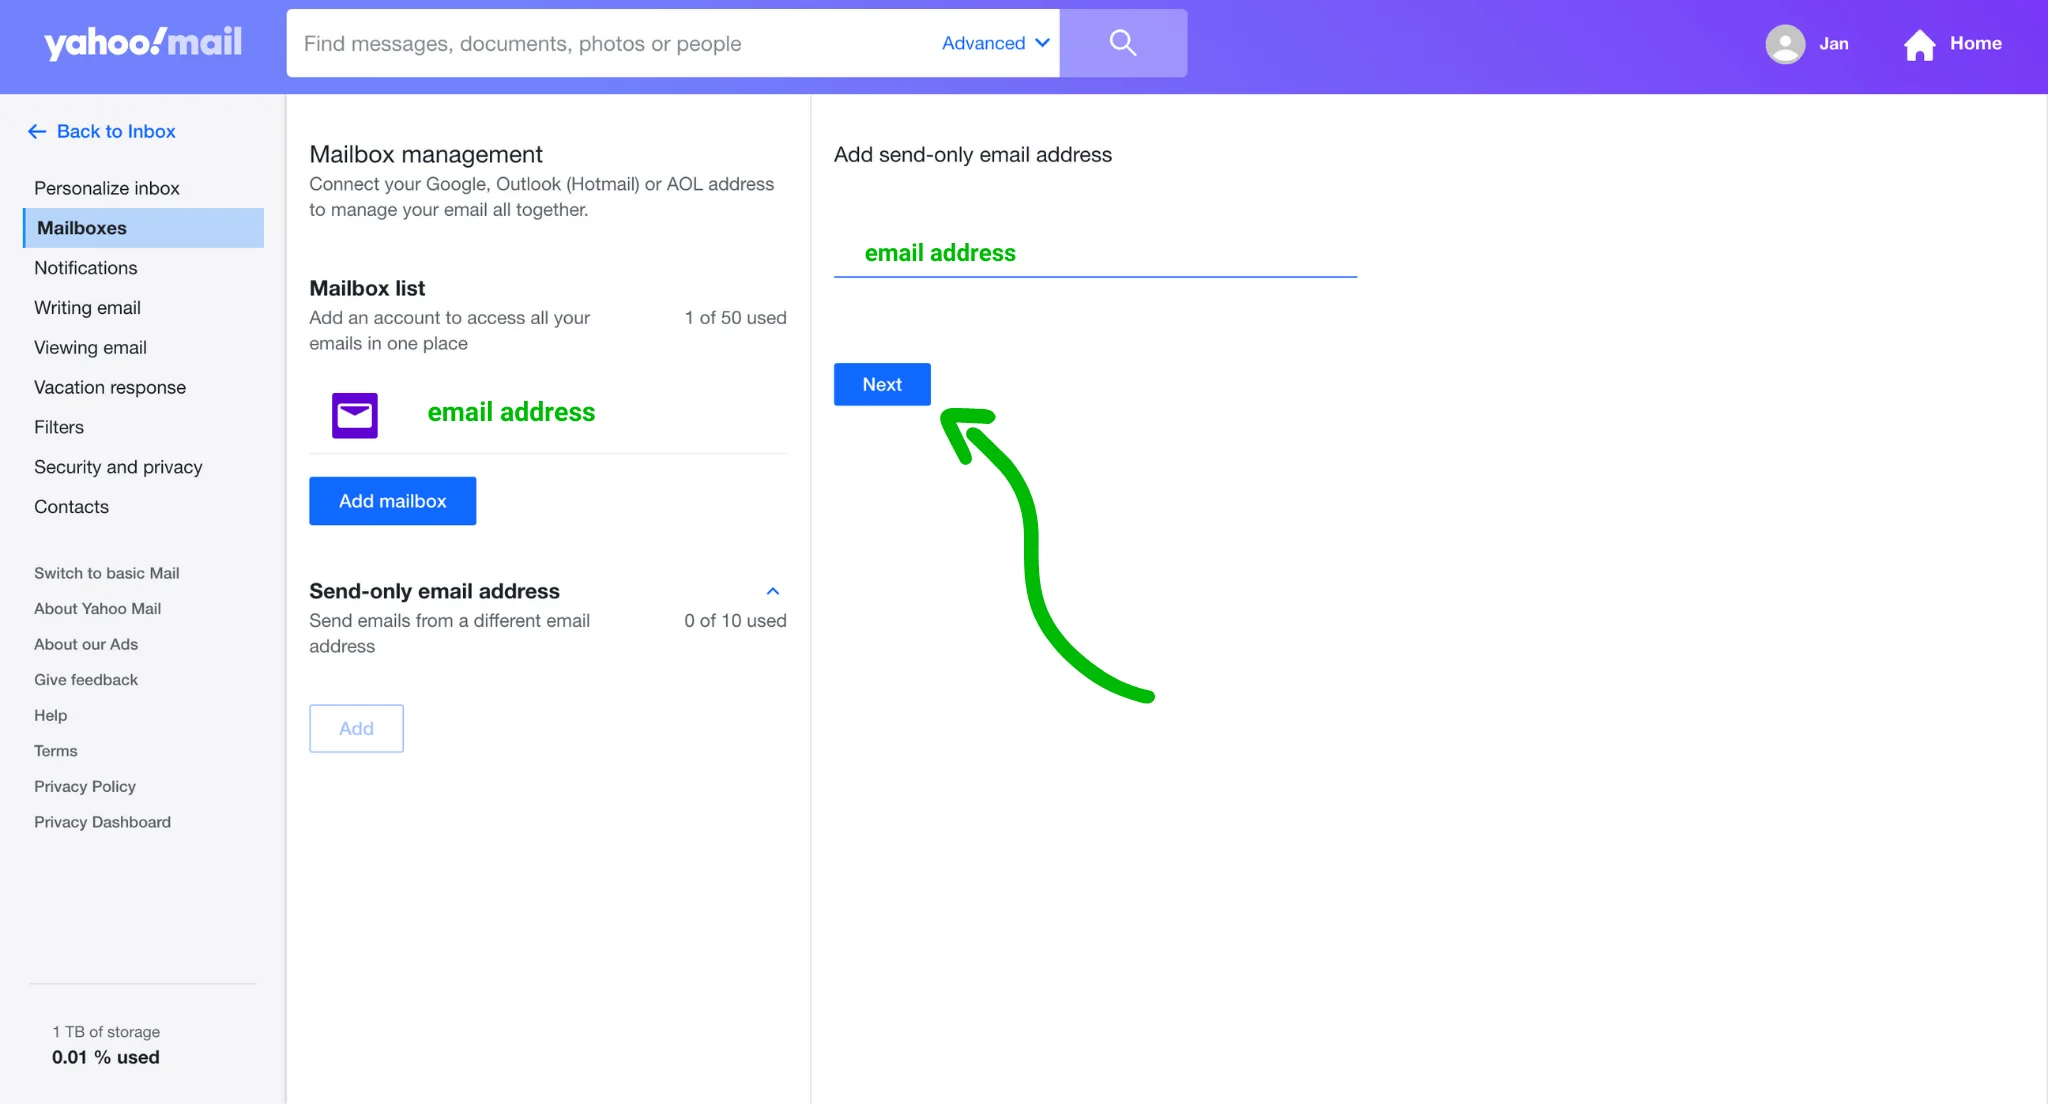
Click on the Add button under the Send-only email address.
Enter the desired send-only email address and click Next.
Now, click Verify to setup.
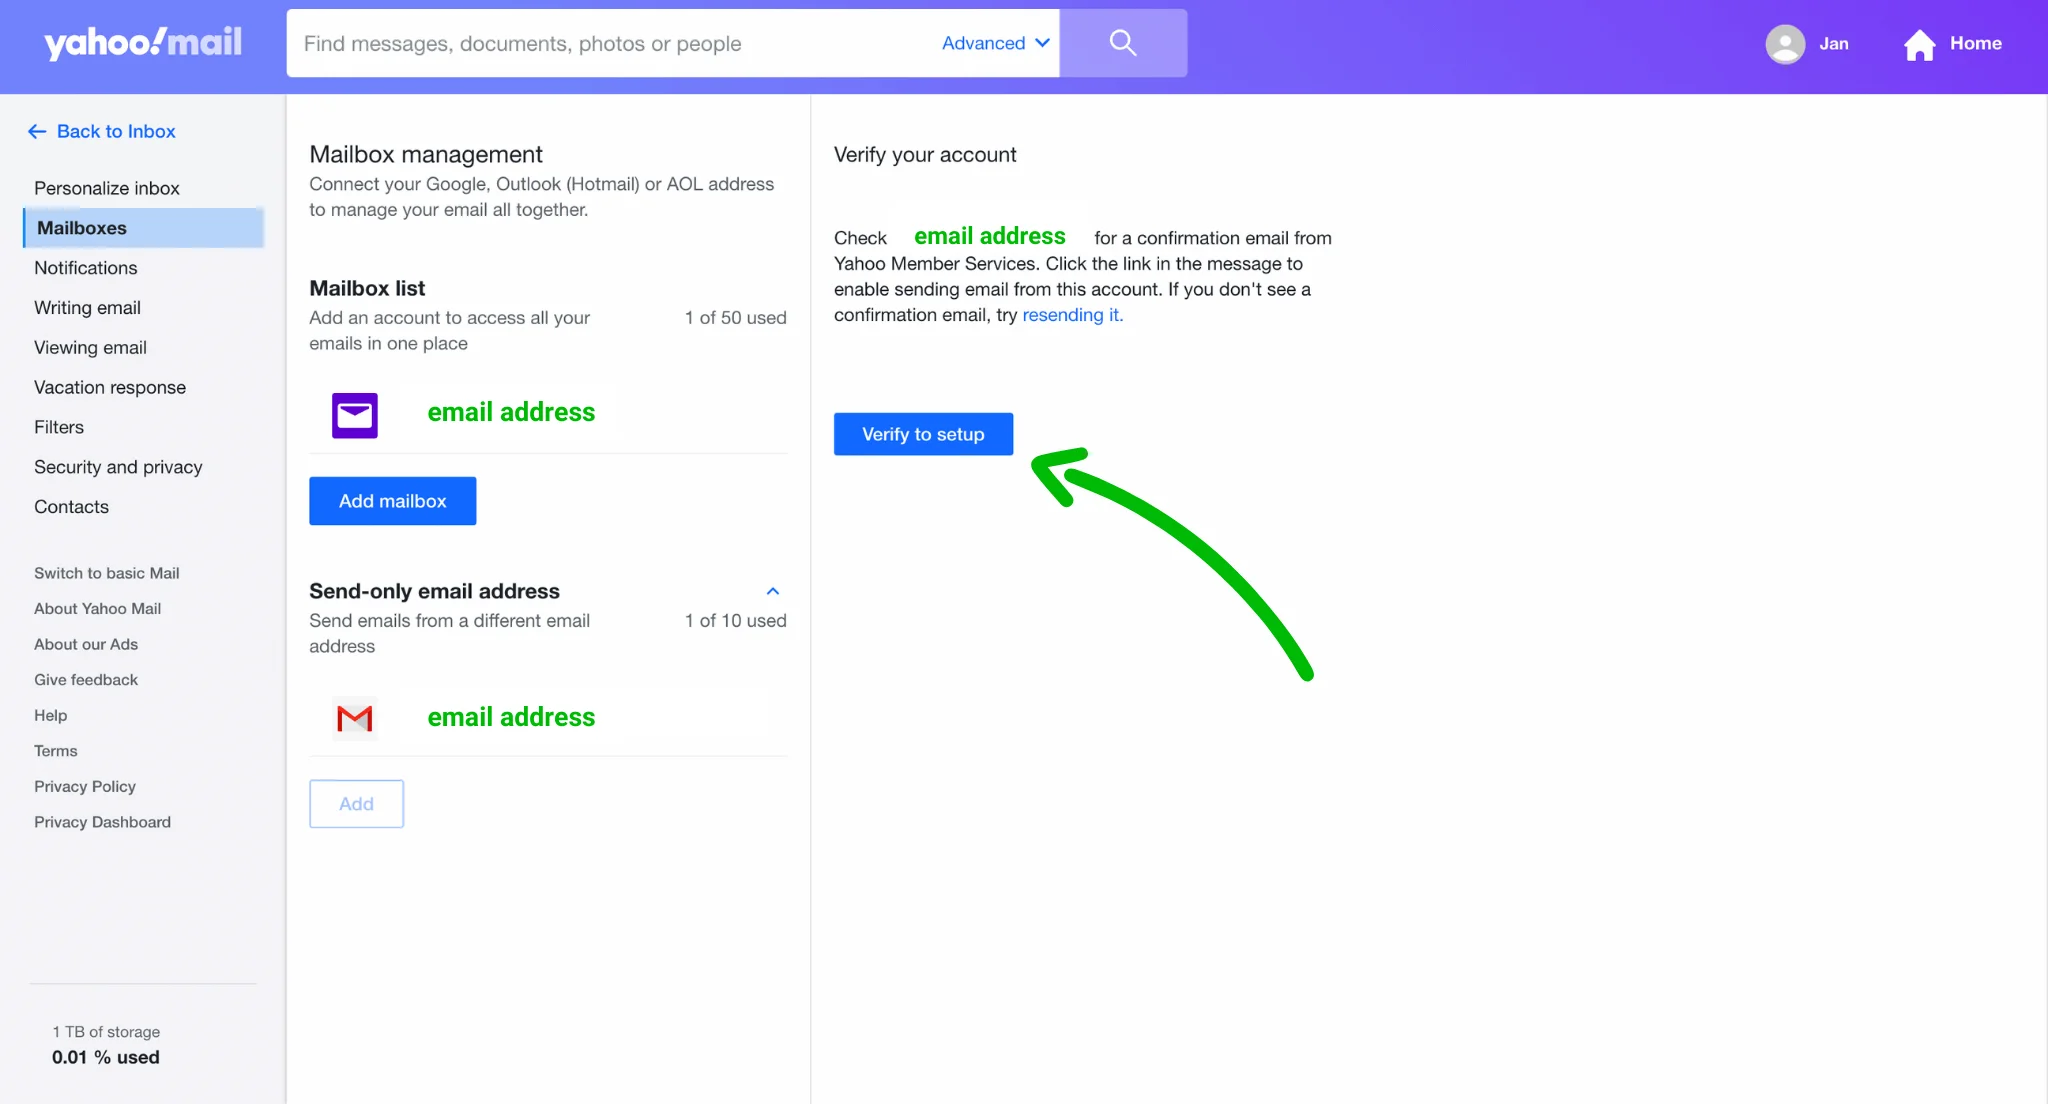
Now, you just need to check your email and follow the instructions to complete the verification process.
Once you have added the send-only account, you can select it as the From address when composing or replying to emails.
Tips on how to use a no-reply email
While creating a no-reply email is simple, there are a few things to keep in mind to ensure that it is effective. Here are some tips on how to set up a no-reply email.
Use a no-reply email only when responses are not necessary
One of the main reasons to use a no-reply email is to provide its recipient with information without initiating a conversation. For that reason, it is crucial to use this type of email only when responses are not necessary. For instance, if you are sending an order confirmation to someone, there might be no need for them to reply to the email.
On the other hand, if you are requesting direct feedback from your clients, such as a detailed review of several products or ways in which you could improve their customer experience, you should use a different email address that allows for replies. Using a no-reply email address for messages that require a response is considered poor email etiquette and can lead to frustration for the recipient.
Always indicate that the recipients should not reply to the email
When using a no-reply email address, include a clear message indicating that the recipient should not reply to the email you are sending out. This information can be included in the subject line or the body of the email. It is also essential to provide a reason why the email address does not accept replies. For example, you can mention that the email address is used for notifications only, and replies will not be read.
By including a clear message, you can prevent confusion and ensure that the recipient understands the purpose of the email. Additionally, it shows that you respect the recipient’s time and do not expect them to spend time writing a response that will never be read, which could have a positive impact on their customer experience.
Include an alternative means of communication
When using a no-reply email address, it is important to provide the recipient with an alternative means of communication. They need to be able to opt out of receiving emails from you by communicating with you directly. Otherwise, your emails will be non-compliant with GDPR and CAN-SPAM laws.
With that in mind, always remember to include an alternative means of communication in each no-reply email you send out. This can be another email address or a phone number that they can use to contact you if necessary. Not doing so is actually among fairly common email mistakes.
On top of ensuring legal compliance, it adds a human touch to the email and can help build trust with your audience. It shows that while you are sending out no-reply messages, you are still willing to engage with your clients when needed.
Alternative solutions to no-reply emails
Yes, no-reply emails can serve a purpose — but not in every case. Here’s a comparison to help you decide when to use them:
| Use Case | No-Reply Email ✅ | Reply-Enabled Email ✅ |
| Order confirmations & shipping updates | ✅ Yes | Optional |
| Password resets & system alerts | ✅ Yes | Optional |
| Legal or policy updates | ✅ Yes | Optional |
| Surveys or feedback requests | ❌ No | ✅ Yes |
| Customer support or inquiries | ❌ No | ✅ Yes |
| Promotional campaigns | ❌ No | ✅ Yes |
Here are alternative ways to help you avoid no-reply emails:
Use a dedicated reply-to address
You can (and absolutely should) replace your no-reply email with a “do-reply” one — a dedicated inbox for your customers’ messages. You might have noticed those, they usually look like this:
- contact@domain.com
- support@domain.com
- hello@domain.com
This way you can:
- Keep the communication line open and your inbox secured
- Collect valuable feedback (let’s face it: not always, but it can be)
- Build customer loyalty
- Reduces the risk of spam flags and email deliverability issues
Take note that relevant team members should have access to this account and respond when needed.
Filter automated responses
When you send mass or bulk emails, responses like “Out of office” or “Your place in line is 57” are unavoidable. But that doesn’t mean your inbox will be full of them — you can set up a filter, so your email provider automatically deletes unnecessary replies.
For example, here is how to do it in Gmail:
Step 1. At the right corner of your search tab, click on the “Search options” icon.

Step 2. In the “Has the words” field, type keywords like “automated reply”.

Step 3. Click “Create filter”, choose “Delete it”, and confirm.

And just like that — you are all set.
Improve customer support channels
Great customer support helps you significantly reduce the number of replies from customers.
Here is how to ensure you have a good system in place:
- Be proactive with your customer support — create guides, FAQs, a knowledge hub, and other means to provide information.
- Use different channels and tools to communicate— for example, you can create a chatbot that takes a huge load off the customer support team and from your inbox.
This can both improve your customer experience and ensure that your inbox is not overheated with hundreds of emails.

Final thoughts
So here’s what to keep in mind while using no-reply email:
- Use a no-reply email only when responses aren’t needed — order confirmations, password resets, system alerts, or policy updates.
- Find alternatives for emails that require interaction — customer support, surveys, or newsletters.
- Always inform subscribers that the address is not monitored and offer other ways to contact you.
- Don’t forget to include unsubscribe options to comply with laws like GDPR and CAN-SPAM.
- Test your no-reply setup to avoid deliverability issues.
But still, it’s better not to use no-reply emails: do it the wrong way, and you could end up breaking the law and facing harsh penalties. So proceed with caution and only when absolutely necessary.
