Easy-to-use drag-and-drop email builder, 100+ free templates, automation tools, in-depth analytics. Send like a pro, even if it’s your first campaign!
Try it nowSubscribe to our blog digest and get tips and inspo every 2 weeks. Plus, you’ll get our Foolproof Guide To Email List Building
Emails are an essential means of communication. However, there are certain situations in which you do not want the recipient to reply to your email. For example, if you are a business owner sending a bunch of order notifications to people every day, you do not want each one of their recipients to be able to reply to them.
In such cases, a no-reply email address can be helpful. In the following article, we are going to cover the basics of what a no-reply email is, as well as give you a step-by-step guide on how to create a no-reply email in Gmail, Outlook, and Yahoo. We will also provide you with a few best practices and tips on when and how to use no-reply emails.
A no-reply email is an email that is sent from an email account that does not accept incoming emails. In case someone does attempt to reply to it, the message is not going to go through. Instead, the sender is going to receive a non-delivery notification from the email service provider they are currently using.
The purpose of such an email is to provide information, rather than initiate a conversation with its recipient. Because of that, no-reply emails are usually used for automated messages like confirmations for ordered products or instructions related to automated procedures, such as password changes.
It is worth noting that sending emails from a no-reply address can sometimes result in a higher rate of email bounce. The reason for that lies in how some email service providers, such as Gmail, may mark emails from no-reply email addresses as potentially suspicious or spammy. Therefore, it is important to use a no-reply email address only when necessary and to follow best practices when creating and sending these types of emails.
Creating a no-reply email address in Gmail is not overly complex or technical. Instead, it is a straightforward process that can be accomplished in just a few steps. For starters, you need to sign in to your Google Workspace Admin console at admin.google.com using your administrator account credentials.
Navigate to the Apps section and select Google Workspace from the list of available apps. Click on the Gmail option to open the Gmail settings page, then click on the Routing tab to open the Gmail routing rules section.
If there is no existing routing rule, click on Add another rule to create a new rule. Otherwise, click on Configure to edit the existing rule. Remember to give your configuration rule a name that clearly identifies its purpose. For example, you could name it Reject emails for no-reply. That way, you can easily identify the rule later.
Under the Email messages to be affected section, select Inbound to apply the rule to any external emails sent to the account.
Under Option 2, select Reject message and enter the custom rejection message you want external senders to receive when they try to email the no-reply account.
Next, click on the Show options button to configure which user account to be affected by this routing rule. Under the Account types to affect, pick Users. Under the Envelope filter, pick Only affect specific envelope recipients.
Now, pick the Single email address option and enter the email address for the no-reply email account you want to create. For example, it could be [email protected]. Then, click on the Save button to save the configurations of the routing rule.
Last but not least, test the configuration by sending an email to the no-reply account from an external email address to see if the autoresponder feature is working. By following these simple steps, you can create a no-reply email address in Gmail and ensure that external senders receive a custom rejection message when they try to email the no-reply account.
To create a no-reply email in Microsoft 365, you first need to create a shared inbox. Start by opening the Exchange admin center. Then, navigate to the Recipients section, select Mailboxes, and click on the Add a shared mailbox button.
Next, assign an email address and a display name to the mailbox. For instance, if you want to use the address to send out a company newsletter, the display name could be Company Newsletter. As for the address itself, it could be [email protected].
If you own more than one domain, remember to pick the appropriate one. Leave the Alias field empty.
Now, click on the Create button to apply changes and navigate to the Add users to this mailbox option.
There, you could give someone else, such as your boss or a colleague, an option to access and manage this specific email address.
The next step is to establish a retention policy for your no-reply mailbox. It will delete any messages from the inbox after a certain duration. It can be as brief as a single day. Alternatively, you may choose to implement a longer retention period to allow yourself or another employee to review incoming emails. Aside from that, you should make use of the autoresponder feature to inform potential senders that this mailbox is not checked on a regular basis.
Start by opening the Microsoft Purview compliance portal. Then, go to the Policies section, and then the Retention section. Click on the New retention policy button. Once you do that, you will have to complete a series of steps.
First, you have to name your retention policy and click on the Next button. At the Type step, choose the Static type of retention policy and click Next to confirm. At the Locations step, turn on the toggle next to Exchange email. Second, click on the Edit in the Included column.
Find and pick the no-reply mailbox using the search field or the mailbox list, and click on the Done button to confirm.
Proceed to the Retention settings step by clicking Next and select Only delete items when they reach a certain age. From the Delete items older than drop-down list, select Custom and set it to delete items older than one day using the fields provided. In the Delete content based on the drop-down menu, choose When items were created.
After that, click on the Next button to move to the summary page. Finally, click Submit to create the new retention policy, but note that it may take some time before it takes effect.
Last but not least, you need to set up an automatic reply. Access the Microsoft 365 admin center and navigate to the Teams & groups tab. Then, go to the Shared mailboxes section and choose the no-reply mailbox by clicking on it. In the new pane that appears, select Edit in the Automatic replies section.
In the Manage automatic replies pane, select the checkboxes for automatically sending replies to senders inside and outside the organization, as well as the option to send replies to all external senders.
Now, enter the desired text for the automatic reply in the designated fields, and click on the Save button to confirm the changes.
To add a send-only email address, first, click on the Settings icon, followed by More settings.
Select Mailboxes.
Click on the Add button under the Send-only email address.
Enter the desired send-only email address and click Next.
Now, click Verify to setup.
Now, you just need to check your email and follow the instructions to complete the verification process.
Once you have added the send-only account, you can select it as the From address when composing or replying to emails.
While creating a no-reply email is simple, there are a few things to keep in mind to ensure that it is effective. Here are some tips on how to set up a no-reply email.
One of the main reasons to use a no-reply email is to provide its recipient with information without initiating a conversation. For that reason, it is crucial to use this type of email only when responses are not necessary. For instance, if you are sending an order confirmation to someone, there might be no need for them to reply to the email.
On the other hand, if you are requesting direct feedback from your clients, such as a detailed review of several products or ways in which you could improve their customer experience, you should use a different email address that allows for replies. Using a no-reply email address for messages that require a response is considered poor email etiquette and can lead to frustration for the recipient.
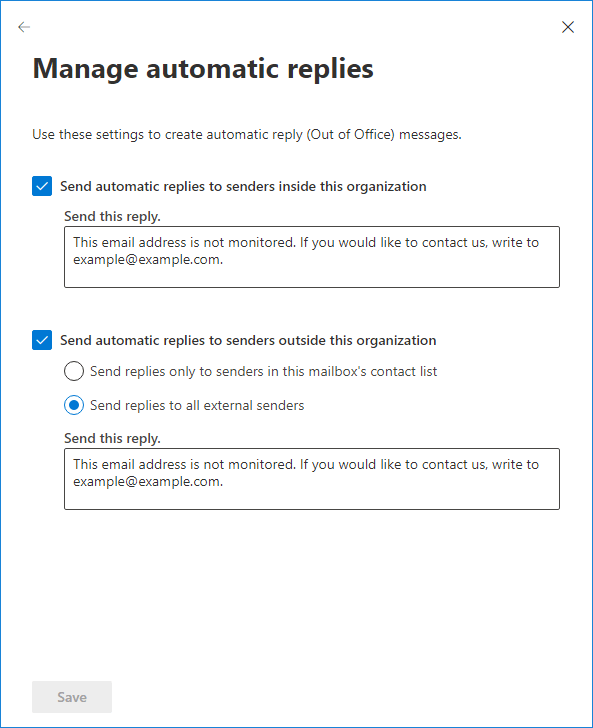
When using a no-reply email address, include a clear message indicating that the recipient should not reply to the email you are sending out. This information can be included in the subject line or the body of the email. It is also essential to provide a reason why the email address does not accept replies. For example, you can mention that the email address is used for notifications only, and replies will not be read.
By including a clear message, you can prevent confusion and ensure that the recipient understands the purpose of the email. Additionally, it shows that you respect the recipient’s time and do not expect them to spend time writing a response that will never be read, which could have a positive impact on their customer experience.
When using a no-reply email address, it is important to provide the recipient with an alternative means of communication. They need to be able to opt out of receiving emails from you by communicating with you directly. Otherwise, your emails will be non-compliant with GDPR and CAN-SPAM laws.
With that in mind, always remember to include an alternative means of communication in each no-reply email you send out. This can be another email address or a phone number that they can use to contact you if necessary. Not doing so is actually among fairly common email mistakes.
On top of ensuring legal compliance, it adds a human touch to the email and can help build trust with your audience. It shows that while you are sending out no-reply messages, you are still willing to engage with your clients when needed.
To sum up, it is better not to use no-reply emails. If you do it the wrong way, you could end up breaking the law and facing harsh penalties. What is more, it is not uncommon for email service providers to treat such emails unfavorably.
If you do want to use a no-reply email, remember to provide your customers with an alternative means of communication. Additionally, you should always include a message indicating that the email address does not accept replies. By following these tips, you can ensure that your no-reply emails are effective and help you create a positive experience for your clients.
In case you need further assistance with setting up a no-reply email address, you should reach out to your email service provider. They should be able to provide you with the necessary information and help you set up an effective no-reply email in no time.
10 Best Online Quiz-Making Software Websites in 2025
The Ultimate Guide to Millennials Email Marketing
ChatGPT for Email Marketing: Best Prompts and Use Cases
9 Social Media Marketing Trends You Need To Watch in 2025
7 Things I Do as a Marketer To Adapt to the Ever-Changing Social Media Algorithms
A Definitive Guide on Email Marketing for Dentists
Others just make a list of ways. We actually explain how to make the most of each way.
21 surefire ways to grow your email list with detailed explanations and hand-picked examples. Based on research and 10+ years experience in email marketing.
Check your email — the guide is on it’s way to your inbox.